Сетевое программирование на перл
Линкольн Д. Штейн
Часть 1: Основы
|
Раздел 1. Ввод/Вывод - основы
Код примеров из этой книги лежит тут
В этом разделе вы узнаете , как писать
TCP/IP - приложения на Perl.
Будет рассмотрен перловый input/output (I/O) , используя встроенные системные вызова самого языка,
а также использование ОО perl.
|
Perl and Networking
Why would you want to write networking
applications in Perl?
The Internet is based on Transmission Control
Protocol/Internet Protocol (TCP/IP), and most networking
applications are based on a straightforward application
programming interface (API) to the protocol known as Berkeley
sockets. The success of TCP/IP is due partly to the ubiquity
of the sockets API, which is available for all major languages
including C, C++, Java, BASIC, Python, COBOL, Pascal, FORTRAN,
and, of course, Perl. The sockets API is similar in all these
languages. There may be a lot of work involved porting a
networking application from one computer language to another,
but porting the part that does the socket communications is
usually the least of your problems.
For dedicated Perl programmers, the answer to
the question that starts this chapter is clearbecause you
can! But for those who are not already members of the choir,
one can make a convincing argument that not only is networking
good for Perl, but Perl is good for networking.
A Language Built for Interprocess
Communication
Perl was built from the ground up to make it
easy to do interprocess communication (the thing that happens
when one program talks to another). As we shall see later in
this chapter, in Perl there is very little difference between
opening up a local file for reading and opening up a
communications channel to read data from another local
program. With only a little more work, you can open up a
socket to read data from a program running remotely on another
machine somewhere on the Internet. Once the communications
channel is open, it matters little whether the thing at the
other end is a file, a program running on the same machine, or
a program running on a remote machine. Perl's input/output
functions work in the same way for all three types of
connections.
A Language Built for Text
Processing
Another Perl feature that makes it good for
network applications is its powerful integrated regular
expression-matching and text-processing facilities. Much of
the data on the Internet is text based (the Web, for
instance), and a good portion of that is unpredictable,
line-oriented data. Perl excels at manipulating this type of
data, and is not vulnerable to the type of buffer overflow and
memory overrun errors that make networking applications
difficult to write (and possibly insecure) in languages like C
and C++.
An Open Source Project
Perl is an Open Source project, one of the
earliest. Examining other people's source code is the best way
to figure out how to do something. Not only is the source code
for all of Perl's networking modules available, but the whole
source tree for the interpreter itself is available for your
perusal. Another benefit of Perl's openness is that the
project is open to any developer who wishes to contribute to
the library modules or to the interpreter source code. This
means that Perl adds features very rapidly, yet is stable and
relatively bug free.
The universe of third-party Perl modules is
available via a distributed Web-based archive called CPAN, for
Comprehensive Perl Archive Network. You can search CPAN for
modules of interest, download and install them, and contribute
your own modules to the archive. The preface to this book
describes CPAN and how to reach it.
Object-Oriented Networking
Extensions
Perl5 has object-oriented extensions, and
although OO purists may express dismay over the fast and loose
way in which Perl has implemented these features, it is
inarguable that the OO syntax can dramatically increase the
readability and maintainability of certain applications.
Nowhere is this more evident than in the library modules that
provide a high-level interface to networking protocols. Among
many others, the IO::Socket modules provide a clean and
elegant interface to Berkeley sockets; Mail::Internet provides
cross-platform access to Internet mail; LWP gives you
everything you need to write Web clients; and the Net::FTP and
Net::Telnet modules let you write interfaces to these
important protocols.
Security
Security is an important aspect of network
application development, because by definition a network
application allows a process running on a remote machine to
affect its execution. Perl has some features that increase the
security of network applications relative to other languages.
Because of its dynamic memory management, Perl avoids the
buffer overflows that lead to most of thesecurity holes in C
and other compiled languages. Of equal importance, Perl
implements a powerful "taint" check system that prevents
tainted data obtained from the network from being used in
operations such as opening files for writing and executing
system commands, which could be dangerous.
Performance
A last issue is performance. As an
interpreted language, Perl applications run several times more
slowly than C and other compiled languages, and about par with
Java and Python. In most networking applications, however, raw
performance is not the issue; the I/O bottleneck is. On
I/O-bound applications Perl runs just as fast (or as slowly)
as a compiled program. In fact, it's possible for the
performance of a Perl script to exceed that of a compiled
program. Benchmarks of a simple Perl-based Web server that we
develop in Chapter
12 are several times better than the C-based Apache Web
server.
If execution speed does become an issue, Perl
provides a facility for rewriting time-critical portions of
your application in C, using the XS extension system. Or you
can treat Perl as a prototyping language, and implement the
real application in C or C++ after you've worked out the
architectural and protocol details.
|
Networking Made Easy
Before we get into details, let's look at two
simple programs.
The lgetl.pl
script (for "line get local," Figure
1.1) reads the first line of a local file. Call it with
the path to the file you want to read, and it will print out
the top line. For example, here's what I see when I run the
script on a file that contains a quote from James Hogan's
"Giants Star":
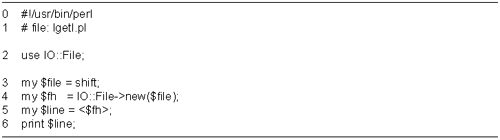
% lgetl.pl giants_star.txt
 "Reintegration complete," ZORAC advised. "We're back in the universe."
This snippet illustrates the typographic
conventions this book uses for terminal (command-line
interpreter) sessions. The "%" character is the prompt printed
out by my command-line interpreter. Bold-faced text is what I
(the user) typed. Everything else is regular monospaced
font.
The script itself is straightforward:
Lines 12: Load modules We
use() the IO::File module, which wraps an
object-oriented interface around Perl file operations.
Line 3: Process the command line
argument We shift() the filename off the
command line and store it in a variable named
$file.
Line 4: Open the file We call the
IO::File->new() method to open the file,
returning a filehandle, which we store in $fh.
Don't worry if the OO syntax is unfamiliar to you; we
discuss it more later in this chapter.
Lines 56: Read a line from the
filehandle and print it We use the <>
operator to read a line of text from the filehandle into the
variable $line, which we immediately print.
Now we'll look at a very similar script named
lgetr.pl (for "line get
remote," Figure
1.2). It too fetches and prints a line of text, but
instead of reading from a local file, this one reads from a
remote server. Its command-line argument is the name of a
remote host followed by a colon and the name of the network
service you want to access.
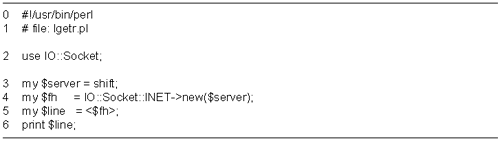
To read a line of text from the "daytime"
service running on the FTP server wuarchive.wustl.edu, we use an
argument of "wuarchive.wustl.edu:daytime." This retrieves the
current time of day at the remote site: % lgetr.pl wuarchive.wustl.edu:daytime
Tue Aug 8 06:49:20 2000
To read the welcome banner from the FTP
service at the same site, we ask for
"wuarchive.wustl.edu:ftp": % lgetr.pl wuarchive.wustl.edu:ftp
2:220 wuarchive.wustl.edu FTP server (Version wu-2.6.1(1) Thu Jul 13
21:24:09 CDT 2000) ready.
Or for a change of hosts, we can read the
welcome banner from the SMTP (Internet mail) server running at
mail.hotmail.com like this: % lgetr.pl mail.hotmail.com:smtp
2:220-HotMail (NO UCE) ESMTP server ready at Tue Aug 08 05:24:40 2000
Let's turn to the code for the lgetr.pl script in Figure
1.2.
Lines 12: Load modules We
use() the IO::Socket module, which provides an
object-oriented interface for network socket operations.
Line 3: Process the command line
argument We shift() the host and service name
off the command line and store it in a variable named
server
Line 4: Open a socket We call the
IO::Socket::INET->new() method to create a
"socket" connected to the designated service running on the
remote machine. IO::Socket::INET is a filehandle class that
is adapted for Internet-based communications. A socket is
just a specialized form of filehandle, and can be used
interchangeably with other types of filehandles in I/O
operations.
Lines 56: Read a line from the socket
and print it We use the <> operator to
read a line of text from the socket into the variable
$line, which we immediately print.
Feel free to try the lgetr.pl script on your favorite
servers. In addition to the services used in the examples
above, other services to try include "nntp," the Netnews
transfer protocol, "chargen," a test character generator, and
"pop3," a protocol for retrieving mail messages. If the script
appears to hang indefinitely, you've probably contacted a
service that requires the client to send the first line of
text, such as an HTTP (Web) server. Just interrupt the script
and try a different service name.
Although lgetr.pl doesn't do all that much, it
is useful in its own right. You can use it to check the time
on a remote machine, or wrap it in a shell script to check the
time synchronization of all the servers on your network. You
could use it to generate a summary of the machines on your
network that are running an SMTP mail server and the software
they're using.
Notice the similarity between the two
scripts. Simply by changing IO::File->new() to
IO::Socket::INET->new(), we have created a fully
functional network client. Such is the power of Perl.
|
Filehandles
Filehandles are the foundation of networked
applications. In this section we review the ins and outs of
filehandles. Even if you're an experienced Perl programmer,
you might want to scan this section to refresh your memory on
some of the more obscure aspects of Perl I/O.
Standard Filehandles
A filehandle connects a Perl script to the
outside world. Reading from a filehandle brings in outside
data, and writing to one exports data. Depending on how it was
created, a filehandle may be connected to a disk file, to a
hardware device such as a serial port, to a local process such
as a command-line window in a windowing system, or to a remote
process such as a network server. It's also possible for a
filehandle to be connected to a "bit bucket" device that just
sucks up data and ignores it.
A filehandle is any valid Perl identifier
that consists of uppercase and lowercase letters, digits, and
the underscore character. Unlike other variables, a filehandle
does not have a distinctive prefix (like "$"). So to make them
distinct, Perl programmers often represent them in all capital
letters, or caps.
When a Perl script starts, exactly three
filehandles are open by default: STDOUT,
STDIN, and STDERR. The STDOUT
filehandle, for "standard output," is the default filehandle
for output. Data sent to this filehandle appears on the user's
preferred output device, usually the command-line window from
which the script was launched. STDIN, for "standard
input," is the default input filehandle. Data read from this
filehandle is taken from the user's preferred input device,
usually the keyboard. STDERR ("standard error") is
used for error messages, diagnostics, debugging, and other
such incidental output. By default STDERR uses the
same output device as STDOUT, but this can be changed
at the user's discretion. The reason that there are separate
filehandles for normal and abnormal output is so that the user
can divert them independently; for example, to send normal
output to a file and error output to the screen.
This code fragment will read a line of input
from STDIN, remove the terminating end-of-line
character with the chomp() function, and echo it to
standard output: $input = <STDIN>;
chomp($input);
print STDOUT "If I heard you correctly, you said: $input\n";
By taking advantage of the fact that
STDIN and STDOUT are the defaults for many
I/O operations, and by combining chomp() with the
input operation, the same code could be written more
succinctly like this: chomp($input = <>);
print "If I heard you correctly, you said: $input\n";
We review the <> and
print() functions in the next section. Similarly,
STDERR is the default destination for the
warn() and die() functions.
The user can change the attachment of the
three standard filehandles before launching the script. On
UNIX and Windows systems, this is done using the redirect
metacharacters "<" and ">". For example, given a script
named muncher.pl this command
will change the script's standard input so that it comes from
the file data.txt, and its
standard output so that processed data ends up in crunched.txt: % muncher.pl <data.txt >crunched.txt
Standard error isn't changed, so diagnostic
messages (e.g., from the built-in warn() and
die() functions) appear on the screen.
On Macintosh systems, users can change the
source of the three standard filehandles by selecting
filenames from a dialog box within the MacPerl development
environment.
Input and Output Operations
Perl gives you the option of reading from a
filehandle one line at a time, suitable for text files, or
reading from it in chunks of arbitrary length, suitable for
binary byte streams like image files.
For input, the <> operator is
used to read from a filehandle in a line-oriented fashion, and
read() or sysread() to read in a byte-stream
fashion. For output, print() and syswrite()
are used for both text and binary data (you decide whether to
make the output line-oriented by printing newlines).
|
$line =
<FILEHANDLE>
@lines =
<FILEHANDLE>
$line
<>
@lines
<>
The <> ("angle bracket")
operator is sensitive to the context in which it is
called. If it is used to assign to a scalar variable, a
so-called scalar context, it reads a line of text from
the indicated filehandle, returning the data along with
its terminating end-of-line character. After reading the
last line of the filehandle, <> will
return undef, signaling the end-of-file (EOF)
condition.
When <> is assigned to
an array or used in another place where Perl ordinarily
expects a list, it reads all lines from the filehandle
through to EOF, returning them as one (potentially
gigantic) list. This is called a list context.
If called in a "void context" (i.e.,
without being assigned to a variable),<>
copies a line into the $_ global variable. This
is commonly seen in while() loops, and often
combined with pattern matches and other operations that
use $_ implicitly: while (<>) {
print "Found a gnu\n" if /GNU/i;
}
The <FILEHANDLE> form of
this function explicitly gives the filehandle to read
from. However, the <> form is "magical."
If the script was called with a set of file names as
command-line arguments, <> will attempt
to open() each argument in turn and will then
return lines from them as if they were concatenated into
one large pseudofile.
If no files are given on the command
line, or if a single file named "-" is given, then
<> reads from standard input and is
equivalent to <STDIN>. See the perlfunc POD documentation for
an explanation of how this works (pod perlfunc,
as explained in the Preface).
$bytes = read
(FILEHANDLE,$buffer,$length [,$offset])
$bytes =
sysread (FILEHANDLE,$buffer,$length
[,$offset])
The read() and
sysread() functions read data of arbitrary
length from the indicated filehandle. Up to
$length bytes of data will be read, and placed
in the $buffer scalar variable. Both functions
return the number of bytes actually read, numeric 0 on
the end of file, or undef on an error.
This code fragment will attempt to read
50 bytes of data from STDIN, placing the
information in $buffer, and assigning the
number of bytes read to $bytes: my $buffer;
$bytes = read (STDIN,$buffer,50);
By default, the read data will be
placed at the beginning of $buffer, overwriting
whatever was already there. You can change this behavior
by providing the optional numeric $offset
argument, to specify that read data should be written
into the variable starting at the specified
position.
The main difference between
read() and sysread() is that
read() uses standard I/O buffering, and
sysread() does not. This means that
read() will not return until either it can
fetch the exact number of bytes requested or it hits the
end of file. The sysread() function, in
contrast, can return partial reads. It is guaranteed to
return at least 1 byte, but if it cannot immediately
read the number of bytes requested from the filehandle,
it will return what it can. This behavior is discussed
in more detail later in the Buffering and Blocking
section.
$result =
print FILEHANDLE $data1,$data2,$data3...
$result =
print $data1,$data2,$data3...
The print() function prints a
list of data items to a filehandle. In the first form,
the filehandle is given explicitly. Notice that there is
no comma between the filehandle name and the first data
item. In the second form, print() uses the
current default filehandle, usually STDOUT. The
default filehandle can be changed using the one-argument
form of select() (discussed below). If no data
arguments are provided, then print() prints the
contents of $_.
If output was successful,
print() returns a true value. Otherwise it
returns false and leaves an error message in the
variable named $!.
Perl is a parentheses-optional
language. Although I prefer using parentheses around
function arguments, most Perl scripts drop them with
print(), and this book follows that convention
as well.
$result =
printf $format,$data1,$data2,$data3...
The printf() function is a
formatted print. The indicated data items are formatted
and printed according to the $format format
string. The formatting language is quite rich, and is
explained in detail in Perl's POD documentation for the
related sprintf() (string formatting)
function.
$bytes =
syswrite (FILEHANDLE,$data [,$length [,$offset]])
The syswrite() function is an
alternative way to write to a filehandle that gives you
more control over the process. Its arguments are a
filehandle and a scalar value (avariable or string
literal). It writes the data to the filehandle, and
returns the number of bytes successfully written.
By default, syswrite()
attempts to write the entire contents of $data,
beginning at the start of the string. You can alter this
behavior by providing an optional $length and
$offset, in which case syswrite() will
write $length bytes beginning at the position
specified by $offset.
Aside from familiarity, the main
difference between print() and
syswrite() is that the former uses standard I/O
buffering, while the latter does not. We discuss this
later in the Buffering and Blocking section.
Don't confuse syswrite() with
Perl's unfortunately named write() function.
The latter is part of Perl's report formatting package,
which we won't discuss further.
$previous =
select(FILEHANDLE)
The select() function changes
the default output filehandle used by print print
(). It takes the name of the filehandle to set as
the default, and returns the name of the previous
default. There is also a version of select()
that takes four arguments, which is used for I/O
multiplexing. We introduce the four-argument version in
Chapter
8. |
When reading data as a byte stream with
read() or sysread(), a common idiom is to
pass length($buffer) as the offset into the buffer.
This will make read() append the new data to the end
of data that was already in the buffer. For example: my $buffer;
while (1) {
$bytes = read (STDIN,$buffer,50,length($buffer));
last unless $bytes > 0;
}
Detecting the End of File
The end-of-file condition occurs when there's
no more data to be read from a file or device. When reading
from files this happens at the literal end of the file, but
the EOF condition applies as well when reading from other
devices. When reading from the terminal (command-line window),
for example, EOF occurs when the user presses a special key:
control-D on UNIX, control-Z on Windows/DOS, and command-. on
Macintosh. When reading from a network-attached socket, EOF
occurs when the remote machine closes its end of the
connection.
The EOF condition is signaled differently
depending on whether you are reading from the filehandle one
line at a time or as a byte stream. For byte-stream operations
with read() or sysread(), EOF is indicated
when the function returns numeric 0. Other I/O errors return
undef and set $! to the appropriate error
message. To distinguish between an error and a normal end of
file, you can test the return value with defined():
while (1) {
   my $bytes = read(STDIN,$buffer,100);
   die "read error" unless defined ($bytes);
   last unless $bytes > 0;
 }
In contrast, the <> operator
doesn't distinguish between EOF and abnormal conditions, and
returns undef in either case. To distinguish them,
you can set $! to undef before performing a
series of reads, and check whether it is defined
afterward: undef $!;
while (defined(my $line = <STDIN>)) {
$data .= $line;
}
die "Abnormal read error: $!" if defined ($!);
When you are using <> inside
the conditional of a while() loop, as shown in the
most recent code fragment, you can dispense with the explicit
defined() test. This makes the loop easier on the
eyes: while (my $line = <STDIN>) {
$data .= $line;
}
This will work even if the line consists of a
single 0 or an empty string, which Perl would ordinarily treat
as false. Outside while() loops, be careful to use
defined() to test the returned value for EOF.
Finally, there is the eof()
function, which explicitly tests a filehandle for the EOF
condition:
|
$eof =
eof(FILEHANDLE)
The eof() function returns
true if the next read on FILEHANDLE will return
an EOF. Called without arguments or parentheses, as in
eof, the function tests the last filehandle
read from.
When using while(<>) to
read from the command-line arguments as a single
pseudofile, eof() has "magical"or at least
confusingproperties. Called with empty parentheses, as
in eof(), the function returns true at the end
of the very last file. Called without parentheses or
arguments, as in eof, the function returns true
at the end of each of the individual files on the
command line. See the Perl POD documentation for
examples of the circumstances in which this behavior is
useful. |
In practice, you do not have to use
eof() except in very special circumstances, and a
reliance on it is often a signal that something is amiss in
the structure of your program.
Anarchy at the End of the Line
When performing line-oriented I/O, you have
to watch for different interpretations of the end-of-line
character. No two operating system designers can seem to agree
on how lines should end in text files. On UNIX systems, lines
end with the linefeed character (LF, octal \012 in
the ASCII table); on Macintosh systems, they end with the
carriage return character (CR, octal \015); and the
Windows/DOS designers decided to end each line of text with
two characters, a carriage return/linefeed pair (CRLF, or
octal \015\012). Most line-oriented network servers
also use CRLF to terminate lines.
This leads to endless confusion when moving
text files between machines. Fortunately, Perl provides a way
to examine and change the end-of-line character. The global
variable $/ contains the current character, or
sequence of characters, used to signal the end of line. By
default, it is set to \012 on Unix systems,
\015 on Macintoshes, and \015\012 on Windows
and DOS systems.
The line-oriented <> input
function will read from the specified handle until it
encounters the end-of-line character(s) contained in
$/, and return the line of text with the end-of-line
sequence still attached. The chomp() function looks
for the end-of-line sequence at the end of a text string and
removes it, respecting the current value of $/.
The string escape \n is the logical newline character, and means
different things on different platforms. For example,
\n is equivalent to \012 on UNIX systems,
and to \015 on Macintoshes. (On Windows systems,
\n is usually \012, but see the later
discussion of DOS text mode.) In a similar vein, \r
is the logical carriage return character, which also varies
from system to system.
When communicating with a line-oriented
network server that uses CRLF to terminate lines, it won't be
portable to set $/ to \r\n. Use the explicit
string \015\012 instead. To make this less obscure,
the Socket and IO::Socket modules, which we discuss in great
detail later, have an option to export globals named
$CRLF and CRLF() that return the correct
values.
There is an additional complication when
performing line-oriented I/O on Microsoft Windows and DOS
machines. For historical reasons, Windows/DOS distinguishes
between filehandles in "text mode" and those in "binary mode."
In binary mode, what you see is exactly what you get. When you
print to a binary filehandle, the data is output exactly as
you specified. Similarly, read operations return the data
exactly as it was stored in the file.
In text mode, however, the standard I/O
library automatically translates LF into CRLF pairs on the way
out, and CRLF pairs into LF on the way in. The virtue of this
is that it makes text operations on Windows and UNIX Perls
look the samefrom the programmer's point of view, the DOS
text files end in a single \n character, just as they
do in UNIX. The problem one runs into is when reading or
writing binary filessuch as images or indexed databasesand
the files become mysteriously corrupted on input or output.
This is due to the default line-end translation. Should this
happen to you, you should turn off character translation by
calling binmode() on the filehandle.
|
binmode
(FILEHANDLE [$discipline])
The binmode() function turns
on binary mode for a filehandle, disabling character
translation. It should be called after the filehandle is
opened, but before doing any I/O with it. The
single-argument form turns on binary mode. The
two-argument form, available only with Perl 5.6 or
higher, allows you to turn binary mode on by providing
:raw as the value of $discipline, or
restore the default text mode using :crlf as
the value.
binmode() only has an effect
on systems like Windows and VMS, where the end-of-line
sequence is more than one character. On UNIX and
Macintosh systems, it has no
effect. |
Another way to avoid confusion over text and
binary mode is to use the sysread() and
syswrite() functions, which bypass the character
translation routines in the standard I/O library.
A whole bevy of special global variables
control other aspects of line-oriented I/O, such as whether to
append an end-of-line character automatically to data output
with the print() statement, and whether multiple data
values should be separated by a delimiter. See Appendix B for
a brief summary.
Opening and Closing Files
In addition to the three standard
filehandles, Perl allows you to open any number of additional
filehandles. To open a file for reading or writing, use the
built-in Perl function open() If successful,
open() gives you a filehandle to use for the read
and/or write operations themselves. Once you are finished with
the filehandle, call close() to close it. This code
fragment illustrates how to open the file message.txt for writing, write two
lines of text to it, and close it: open (FH,">message.txt") or die "Can't open file: $!";
print FH "This is the first line.\n";
print FH "And this is the second.\n";
close (FH) or die "Can't close file: $!";
We call open() with two arguments: a
filehandle name and the name of the file we wish to open. The
filehandle name is any valid Perl identifier consisting of any
combination of uppercase and lowercase letters, digits, and
the underscore character. To make them distinct, most Perl
programmers choose all uppercase letters for filehandles. The
" > " symbol in front of the filename tells Perl
to overwrite the file's contents if it already exists, or to
create the file if it doesn't. The file will then be opened
for writing.
If open() succeeds, it returns a
true value. Otherwise, it returns false, causing Perl to
evaluate the expression to the right of the or
operator. This expression simply dies with an error message,
using Perl's $! global variable to retrieve the last
system error message encountered.
We call print() twice to write some
text to the filehandle. The first argument to print()
is the filehandle, and the second and subsequent arguments are
strings to write to the filehandle. Again, notice that there
is no comma between the filehandle and the strings to print.
Whatever is printed to a filehandle shows up in its
corresponding file. If the filehandle argument to
print() is omitted, it defaults to
STDOUT.
After we have finished printing, we call
close() to close the filehandle. close()
returns a true value if the filehandle was closed
uneventfully, or false if some untoward event, such as a disk
filling up, occurred. We check this result code using the same
type of or test we used earlier.
Let's look at open() and
close() in more detail.
|
$success =
open(FILEHANDLE,$path)
$success =
open(FILEHANDLE,$mode,$path)
The open() call opens the file
given in $path, associating it with a
designated FILEHANDLE. There are both two- and
three-argument versions of open(). In the
three-argument version, which is available in Perl
versions 5.6 and higher, a $mode argument
specifies how the file is to be opened. $mode
is a one- or two-character string chosen to be
reminiscent of the I/O redirection operators in the UNIX
and DOS shells. Choices are shown here.
| <
|
Open file for
reading |
| >
|
Truncate file to
zero length and open for writing |
| >> |
Open file for
appending, do not truncate |
| +>
|
Truncate file
and then open for read/write |
| <+
|
Open file for
read/write, do not
truncate | |
We can open the file named darkstar.txt for reading and
associate it with the filehandle DARKFH like
this: open(DARKFH,'<','darkstar.txt');
In the two-argument form of open(),
the mode is appended directly to the filename, as in: open(DARKFH,'<darkstar.txt');
For readability, you can put any amount of
whitespace between the mode symbol and the filename; it will
be ignored. If you leave out the mode symbol, the file will be
opened for reading. Hence the above examples are all
equivalent to this: open(DARKFH,'darkstar.txt');
If successful, open() will return a
true value. Otherwise it returns false. In the latter case,
the $! global will contain a human-readable message
indicating thecause of the error.
|
$success =
close(FH);
The close() function closes a
previously opened file, returning true if successful, or
false otherwise. In the case of an error, the error
message can again be found in $!.
When your program exits, any
filehandles that are still open will be closed
automatically. |
The three-argument form of open() is
used only rarely. However, it has the virtue of not scanning
the filename for special characters the way that the
two-argument form does. This lets you open files whose names
contain leading or trailing whitespace, ">" characters, and
other weird and arbitrary data. The filename "-" is special.
When opened for reading, it tells Perl to open standard input.
When opened for writing, it tells Perl to open standard
output.
If you call open() on a filehandle
that is already open, it will be automatically closed and then
reopened on the file that you specify. Among other things,
this call can be used to reopen one of the three standard
filehandles on the file of your choice, changing the default
source or destination of the <>,
print(), and warn() functions. We will see
an example of this shortly.
As with the print() function, many
programmers drop the parentheses around open() and
close(). For example, this is the most common idiom
for opening a file: open DARKSTAR,"darkstar.txt" or die "Couldn't open darkstar.txt: $!"
I don't like this style much because it leads
to visual ambiguity (does the or associate with the
string "darkstar.txt" or with the open() function?).
However, I do use this style with close(),
print(), and return() because of their
ubiquity.
The two-argument form of open() has
a lot of magic associated with it (too much magic, some would
say). The full list of magic behavior can be found in the
perlfunc and perlopentut POD documentation.
However, one trick is worth noting because we use it in later
chapters. You can duplicate a
filehandle by using it as the second argument to
open() with the sequence >& or
<& prepended to the beginning.
>& duplicates filehandles used for writing,
and <& duplicates those used for reading: open (OUTCOPY,">&STDOUT");
open (INCOPY,"<&STDOUT");
This example creates a new filehandle named
OUTCOPY that is attached to the same device as
STDOUT. You can now write to OUTCOPY and it
will have the same effect as writing to STDOUT. This
is useful when you want to replace one or more of the three
standard filehandles temporarily, and restore them later. For
example, this code fragment will temporarily reopen
STDOUT onto a file, invoke the system date command (using the
system() function, which we discuss in more detail in
Chapter
2), and then restore the previous value of
STDOUT. When date
runs, its standard output is opened on the file, and its
output appears there rather than in the command window: #!/usr/bin/perl
# file: redirect.pl
print "Redirecting STDOUT\n";
open (SAVEOUT,">&STDOUT");
open (STDOUT,">test.txt") or die "Can't open test.txt: $!";
print "STDOUT is redirected\n";
system "date";
open (STDOUT,">&SAVEOUT");
print "STDOUT restored\n";
When this script runs, its output looks like
this: % redirect.pl
Redirecting STDOUT
STDOUT restored
and the file test.txt contains these lines: STDOUT is redirected
Thu Aug 10 09:19:24 EDT 2000
Notice how the second print()
statement and the output of the date system command went to the file
rather than to the screen because we had reopened
STDOUT at that point. When we restored
STDOUT from the copy saved in SAVEOUT, our
ability to print to the terminal was restored.
Perl also provides an alternative API for
opening files that avoids the magic and obscure syntax of
open() altogether. The sysopen() function
allows you to open files using the same syntax as the C
library's open() function.
|
$result =
sysopen (FILEHANDLE,$filename,$mode [,$perms])
The sysopen() function opens
the file indicated by $filename, using the I/O
mode indicated by $mode. If the file doesn't
exist, and $mode indicates that the file should
be created, then the optional $perms value
specifies the permission bits for the newly created
file. We discuss I/O modes and permissions in more
detail below.
If successful, sysopen()
returns a true result and associates the opened file
with FILEHANDLE. Otherwise it returns a false
result and leaves the error message in
$!. |
The $mode argument used in
sysopen() is different from the mode used in ordinary
open(). Instead of being a set of characters, it is a
numeric bitmask formed by ORing together one or more constants
using the bitwise OR operator " | ". For
example, the following snippet opens up a file for writing
using a mode that causes it to be created if it doesn't exist,
and truncated to length zero if it does (equivalent to
open()'s " > " mode): sysopen(FH, "darkstar.txt",O_WRONLY|O_CREAT|O_TRUNC)
or die "Can't open: $!"
The standard Fcntl module exports
the constants recognized by sysopen(), all of which
begin with the prefix O_. Just use Fcntl at
the top of your script togain access to them.
The mode constants useful for
sysopen() are listed in Table
1.1. Each call to sysopen() must have one (and
only one) of O_RDONLY, O_WRONLY, and
O_RDWR. The O_WRONLY and O_RDWR
constants may be ORed with one or more of O_CREAT,
O_EXCL, O_TRUNC, or O_APPEND.
O_CREAT causes the file to be
created if it doesn't already exist. If it isn't specified,
and the file doesn't exist when you try to open it for
writing, then sysopen() will fail.
Combining O_CREAT with
O_EXCL leads to the useful behavior of creating the
file if it doesn't already exist, but failing if it does. This
can be used to avoid accidentally clobbering an existing
file.
If O_TRUNC is specified, then the
file is truncated to zero length before the first write,
effectively overwriting the previous contents.
O_APPEND has the opposite effect, positioning the
write pointer to the end of the file so that everything
written to the file is appended to its existing
contents.
Table 1.1. sysopen() Mode
Constants
| O_RDONLY |
Open read only. |
| O_WRONLY |
Open write only. |
| O_RDWR |
Open read/write. |
| O_CREAT |
Create file if it
doesn't exist. |
| O_EXCL |
When combined with
O_CREAT, create file if it doesn't exist and
fail if it does. |
| O_TRUNC |
If file already
exists, truncate it to zero. |
| O_APPEND |
Open file in append
mode (equivalent to open()'s "
>> "). |
| O_NOCTTY |
If the file is a
terminal device, open it without allowing it to become
the process's controlling terminal. |
| O_NONBLOCK
|
Open file in
nonblockingmode. |
| O_SYNC |
Open file for
synchronous mode, so that all writes block until the
data is physically
written. |
The O_NOCTTY, O_NONBLOCK,
and O_SYNC modes all have specialized uses that are
discussed in later chapters.
If sysopen() needs to create a file,
the $perm argument specifies the permissions mode of
the resulting file. File permissions is a UNIX concept that
maps imperfectly onto the Windows/DOS world, and not at all
onto the Macintosh world. It is an octal value, such as
0644 (which happens to specify read/write permissions
for the owner of the file, and read-only permissions for
others).
If $perm is not provided,
sysopen() defaults to 0666, which grants
read/write access to everyone. However, whether you specify
the permissions or accept the default, the actual permissions
of the created file are determined by performing the bitwise
AND between the $perm argument and the current
contents of the user's umask
(another UNIX concept). This is often set, at the user's
discretion, to forbid access to the file from outside the
user's account or group.
In most circumstances, it is best to omit the
permissions argument and let the user adjust the umask. This also increases the
portability of the program. See the umask() entry in
the perlfunc POD documentation
for information on how you can examine and set the umask
programatically.
Buffering and Blocking
When you print() or
syswrite() to a filehandle, the actual output
operation does not occur immediately. If you are writing to a
file, the system has to wait for the write head to reach the
proper location on the disk drive, and for the spinning
platter to bring the proper location under the head. This is
usually an insignificant length of time (although it may be
quite noticeable on a laptop that intermittently spins down
its disk to save battery power), but other output operations
can take much more time. In particular, network operations may
take a considerable length of time to complete. The same
applies to input.
There is a fundamental mismatch between
computational speed and I/O speed. A program can execute the
contents of a tight loop a million times a second, but a
single I/O operation may take several seconds to complete. To
overcome this mismatch, modern operating systems use the
techniques of buffering and blocking.
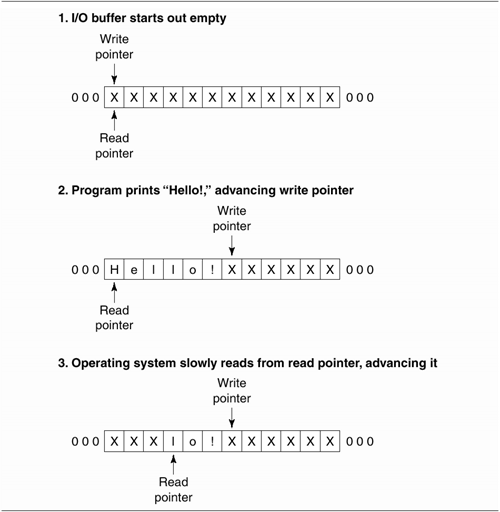
The idea behind buffering is shown in Figure
1.3. Buffers decouple the I/O calls invoked by the program
from the actual I/O operations that occur at the hardware
level. A call to print(), for example, doesn't send
data directly to the terminal, network card, or disk drive,
but instead it results in data being written to a memory area.
This occurs quickly, because writes to memory are fast.
Meanwhile, in an asynchronous fashion, the operating system
reads from data previously written to the buffer and performs
the actions necessary to write the information to the hardware
device.
Similarly, for input operations, the
operating system receives data from active input devices (the
keyboard, disk drive, network card) and writes that data to an
input buffer somewhere in memory. The data remains in the
input buffer until your program calls <> or
read(), at which point the data is copied from the
operating system's buffer into the memory space corresponding
to a variable in your program.
The advantage of buffering is significant,
particularly if your program performs I/O in a "bursty" way;
that is, it performs numerous reads and writes of
unpredictable size and timing. Instead of waiting for each
operation to complete at the hardware level, the data is
safely buffered in the operating system and "flushed"passed
on to the output devicewhenever the downstream hardware can
accept it.
The buffers in Figure
1.3 are conceptually circular FIFO (first in first out)
data structures. When data is written beyond the end of the
buffer memory area, the operating system merely begins writing
new data at the beginning. The operating system maintains two
pointers in each of its I/O buffers. The write pointer is the
place where new data enters the buffer. The read pointer is
the position from which stored data is moved out of the buffer
to its next destination. For example, on write operations,
each print() you perform adds some data to the output
buffer and advances the write pointer forward. The operating
system reads older data starting at the read pointer and
copies it to the low-level hardware device.
The size of the I/O buffer minus the distance
between the write pointer and the read pointer is the amount
of free space remaining. If your program is writing faster
than the output hardware can receive it, then the buffer will
eventually fill up and the buffer's free space will be zero.
What happens then?
Because there is no room for new data in the
buffer, the output operation cannot succeed immediately. As a
result, the write operation blocks. Your program will be
suspended at the blocked print() or
syswrite() for an indefinite period of time. When the
backlog in the output buffer clears and there is again room to
receive new data, the output operation will unblock and
print() or syswrite() will return.
In a similar fashion, reads will block when
the input buffer is empty; that is, it blocks when the amount
of free space is equal to the size of the buffer. In this
case, calls to read() or sysread() will
block until some new data has entered the buffer and there is
something to be read.
Blocking is often the behavior you want, but
sometimes you need more control over I/O. There are several
techniques to manage blocking. One technique, discussed in Chapter
2 under Timing Out System Calls, uses signals to abort an
I/O operation prematurely if it takes too long. Another
technique, discussed in Chapter
12, uses the four-argument select() system call
to test a filehandle for its readiness to perform I/O before
actually making the read or write call. A third technique,
discussed in Chapter
13, is to mark the filehandle as nonblocking, which causes
the read or write operation to return immediately with an
error code if the operation would block.
Standard I/O Buffering
Although we have spoken of a single buffer
for I/O operations on a filehandle, there may in fact be
several buffers at different layers of the operating system.
For example, when writing to a disk file, there is a very
low-level buffer on the disk hardware itself, another one in
the SCSI or IDE driver that controls the disk, a third in the
driver for the filesystem, and a fourth in the standard C
library used by Perl. I may have missed a few.
You cannot control or even access most of
these buffers directly, but there is one class of buffer that
you should be aware of. Many of Perl's I/O operations flow
through "stdio," a standard C-language library which maintains
its own I/O buffers independent of the operating system's.
Perl's <> operator,
read(), and print() all use stdio. When you
call print(), the data is transferred to an output
buffer in the stdio layer before being sent to the operating
system itself. Likewise, <> and read()
both read data from an stdio buffer rather than directly from
the OS. Each filehandle has its own set of buffers for input
and output. For efficiency reasons, stdio waits until its
output buffers reach a certain size before flushing their
contents to the OS.
Normally, the presence of the stdio buffering
is not a problem, but it can run you into trouble when doing
more sophisticated types of I/O such as network operations.
Consider the common case of an application that requires you
to write a small amount of data to a remote server, wait for a
response, and then send more data. You may think that the data
has been sent across the network, but in fact it may not have
been. The output data may still be sitting in its local stdio
buffer, waiting for more data to come before flushing the
buffer. The remote server will never receive the data, and so
will never return a response. Your program will never receive
a response and so will never send additional data. Deadlock
ensues.
In contrast, the lower-level buffering
performed by the operating system doesn't have this property.
The OS will always attempt to deliver whatever data is in its
output buffers as soon as the hardware can accept it.
There are two ways to work around stdio
buffering. One is to turn on "autoflush" mode for the
filehandle. Autoflush mode applies only to output operations.
When active, Perl tells stdio to flush the filehandle's buffer
every time print() is called.
To turn on autoflush mode, set the special
variable $| to a true value. Autoflush mode affects
the currently selected filehandle, so to change autoflush mode
for a specific filehandle, one must first select()
it, set $| to true, and then select() the
previously selected filehandle. For example, to turn on
autoflush mode for filehandle FH: my $previous = select(FH);
$| = 1;
select($previous);
You will sometimes see this motif abbreviated
using the following mind-blowing idiom: select((select(FH),$|=1)[0]);
However, it is much cleaner to bring in the
IO::Handle module, which adds an autoflush()
method to filehandles. With IO::Handle loaded,
FH can be put into autoflush mode like this: use IO::Handle;
FH->autoflush(1);
If the OO syntax confuses you, see the
Objects and References section later in this chapter.
The other way to avoid stdio buffering
problems is to use the sysread()i and
syswrite() calls. These calls bypass the stdio
library and go directly to the operating system I/O calls. An
important advantage of these calls is that they interoperate
well with other low-level I/O calls, such as the four-argument
select() call, and with advanced techniques such as
nonblocking I/O.
Another ramification of the fact that the
sys*() functions bypass stdio is the difference in
behavior between read() and sysread() when
asked to fetch a larger chunk of data than is available. In
the case of read(), the function will block
indefinitely until it can fetch exactly the amount of data
requested. The only exception to this is when the filehandle
encounters the end of file before the full request has been
satisfied, in which case read() will return
everything to the end of the file. In contrast,
sysread() can and will return partial reads. If it
can't immediately read the full amount of data requested, it
will return the data that is available. If no data is
available, sysread() will block until it can return
at least 1 byte. This behavior makes sysread()
invaluable for use in network communications, where data
frequently arrives in chunks of unpredictable size.
For these reasons, sysread() and
syswrite() are preferred for many network
applications.
Passing and Storing
Filehandles
Network applications frequently must open
multiple filehandles simultaneously, pass them to subroutines,
and keep track of them in hashes and other data structures.
Perl allows you to treat filehandles as strings, store them
into variables, and pass them around to subroutines. For
example, this functional but flawed code fragment stores the
MY_FH filehandle into a variable named $fh,
and then passes it to a subroutine named hello() to
use in printing a friendly message: # Flawed technique
$fh = MY_FH;
hello($fh);
sub hello {
my $handle = shift;
print $handle "Howdy folks!\n";
}
This technique often works; however, it will
run you into problems as soon asyou try to pass filehandles to
subroutines in other packages, such as functions exported by
modules. The reason is that passing filehandles as strings
loses the filehandle package information. If we pass the
filehandle MY_FH from the main script (package
main) to a subroutine defined in the MyUtils
module, the subroutine will try to access a filehandle named
MyUtils::MY_FH rather than the true filehandle, which
is main::MY_FH. The same problem also occurs, of
course, when a subroutine from one package tries to return a
filehandle to a caller from another package.
The correct way to move filehandles around is
as a typeglob or a typeglob reference. Typeglobs are
symbol table entries, but you don't need to know much more
about them than that in order to use them (see the perlref POD documentation for the
full details). To turn a filehandle into a glob put an
asterisk ("*") in front of its name: $fh = *MY_FH;
To turn a filehandle into a typeglob
reference, put "\*" in front of its name: $fh = \*MY_FH;
In either case, $fh can now be used
to pass the filehandle back and forth between subroutines and
to store filehandles in data structures. Of the two forms, the
glob reference (\*HANDLE) is the safer, because
there's less risk of accidentally writing to the variable and
altering the symbol table. This is the form we use throughout
this book, and the one used by Perl's I/O-related modules,
such as IO::Socket.
Typeglob references can be passed directly to
subroutines: hello(\*MY_FH):
They can also be returned directly by
subroutines: my $fh = get_fh();
sub get_fh {
open (FOO,"foo.txt") or die "foo: $!";
return \*FOO;
}
Typeglob refs can be used anywhere a bare
filehandle is accepted, including as the first argument to
print(), read(), sysread(),
syswrite(), or any of the socket-related calls that
we discuss in later chapters.
Sometimes you will need to examine a scalar
variable to determine whether it contains a valid filehandle.
The fileno() function makes this possible:
|
$integer = fileno (FILEHANDLE)
The fileno() function accepts
a filehandle in the form of a bare string, a typeglob,
or a typeglob reference. If the filehandle is valid,
fileno() returns the file descriptor for the
filehandle. This is a small integer that uniquely
identifies the filehandle to the operating system.
STDIN, STDOUT, and STDERR
generally correspond to descriptors 0, 1, and 2,
respectively (but this can change if you close and
reopen them). Other filehandles have descriptors greater
than 3.
If the argument passed to
fileno() does not correspond to a valid
filehandle (including former filehandles that have been
closed), fileno() returns undef. Here
is the idiom for checking whether a scalar variable
contains a filehandle: die "not a filehandle" unless defined fileno($fh);
|
Detecting Errors
Because of the vicissitudes of Internet
communications, I/O errors are common in network applications.
As a rule, each of the Perl functions that performs I/O
returns undef, a false value, on failure. More
specific information can be found by examining the special
global variable $!.
$! has an interesting dual nature.
Treated as a string, it will return a human-readable error
message such as Permission denied. Treated as a
number, however, it will return the numeric constant for the
error, as defined by the operating system (e.g.,
EACCES). It is generally more reliable to use these
numeric error constants to distinguish particular errors,
because they are standardized across operating systems.
You can obtain the values of specific error
message constants by importing them from the Errno
module. In the use statement, you can import
individual constants by name, or all of them at once. To bring
in individual constants, list them in the use()
statement, as shown here: use Errno qw(EACCES ENOENT);
my $result = open (FH,">/etc/passwd");
if (!$result) { # oops, something went wrong
if ($! == EACCESS) {
warn "You do not have permission to open this file.";
} elsif ($! == ENOENT) {
warn "File or directory not found.";
} else {
warn "Some other error occurred: $!";
}
}
The qw() operator is used to split a
text string into a list of words. The first line above is
equivalent to: use Errno ('EACCESS','ENOENT');
and brings in the EACCESS and
ENOENT constants. Notice that we use the numeric
comparison operator " == " when comparing $!
to numeric constants.
To bring in all the common error constants,
import the tag :POSIX. Thisbrings in the error
constants that are defined by the POSIX standard,
across-platform API that UNIX, Windows NT/2000, and many other
operating systems are largely compliant with. For example: use Errno qw(:POSIX);
Do not get into the habit of testing
$! to see if an error occurred during the last
operation. $! is set when an operation fails, but is
not unset when an operation succeeds. The value of $!
should be relied on only immediately after a function has
indicated failure.
|
Using Object-Oriented Syntax with
the IO::Handle and IO::File Modules
We use Perl5's object-oriented facilities
extensively later in this book. Although you won't need to
know much about creating object-oriented modules, you will
need a basic understanding of how to use OO modules and their
syntax. This section illustrates the basics of Perl's OO
syntax with reference to the IO::Handle and IO::File module,
which together form the basis of Perl's object-oriented I/O
facilities.
Objects and References
In Perl, references are pointers to data
structures. You can create a reference to an existing data
structure using the backslash operator. For example: $a = 'hi there';
$a_ref = \$a; # reference to a scalar
@b = ('this','is','an','array');
$b_ref = \@b; # reference to an array
%c = ( first_name => 'Fred', last_name => 'Jones');
$c_ref = \%c; # reference to a hash
Once a reference has been created, you can
make copies of it, as you would any regular scalar, or stuff
it into arrays or hashes. When you want to get to the data
contained inside a reference, you dereference it using the
prefix appropriate for its contents: $a = $$a_ref;
@b = @$b_ref;
%c = %$c_ref;
You can index into array and hash references
without dereferencing the whole thing by using the
-> syntax: $b_ref->[2]; # yields "an"
$c_ref->{last_name}; # yields "Jones"
It is also possible to create references to
anonymous, unnamed arrays and hashes, using the following
syntax: $anonymous_array = ['this','is','an','anonymous','array'];
$anonymous_hash = { first_name =>'Jane', last_name => 'Doe' };
If you try to print out a reference, you'll
get a string like HASH(0x82ab0e0), which indicates
the type of reference and the memory location where it can be
found (which is just short of useless).
An object is a
reference with just a little bit extra. It is "blessed" into a
particular module's package in such a way that it carries
information about what module created it.
The blessed reference will continue to work just like other
references. For example, if the object named $object
is a blessed hash reference, you can index into it like
this:
$object->{last_name};
What makes objects different from plain
references is that they have methods. A method call uses the
-> notation, but followed by a subroutine name and
optional subroutine-style arguments: $object->print_record(); # invoke the print_record() method
You may sometimes see a method called with
arguments, like this: $object->print_record(encoding => 'EBCDIC');
The "=>" symbol is accepted by Perl as a
synonym for ','. It makes the relationship between the two
arguments more distinct, and has the added virtue of
automatically quoting the argument on the left. This allows us
to write encoding rather than "encoding". If a method takes no
arguments, it's often written with the parentheses omitted, as
in: $object->print_record;
In many cases, print_record() will
be a subroutine defined in the object's package. Assuming that
the object was created by a module named BigDatabase, the
above is just a fancy way of saying this: BigDatabase::print_record($object);
However, Perl is more subtle than this, and
the print_record(), method definition might actually
reside in another module, which the current module inherits from. How this works is
beyond the scope of this introduction, and can be found in the
perltoot, perlobj, and perlref POD pages, as well as in
[Wall 2000] and the other general Perl reference works listed
in Appendix D.
To create an object, you must invoke one of
its constructors. A constructor
is a method call that is invoked from the module's name. For
example, to create a new BigDatabase object: $object = BigDatabase->new(); # call the new() constructor
Constructors, which are a special case of a
class method, are frequently
named new(). However, any subroutine name is
possible. Again, this syntax is part trickery. In most cases
an equivalent call would be: $object = BigDatabase::new('BigDatabase');
This is not quite the same thing, however,
because class methods can also be inherited.
The IO::Handle and IO::File
Modules
The IO::Handle and IO::File modules, standard
components of Perl, together provide object-oriented interface
to filehandles. IO::Handle provides generic methods that are
shared by all filehandle objects, including pipes and sockets.
The more specialized class, IO::File, adds functionality for
opening and manipulating files. Together, these classes smooth
out some of the bumps and irregularities in Perl's built-in
filehandles, and make larger programs easier to understand and
maintain.
IO::File's elegance does not by itself
provide any very compelling reason to choose the
object-oriented syntax over native filehandles. Its main
significance is that IO::Socket, IO::Pipe, and other
I/O-related modules also inherit their behavior from
IO::Handle. This means that programs that read and write from
local files and those that read and write to remote network
servers share a common, easy-to-use interface.
We'll get a feel for the module by looking at
a tiny example of a program that opens a file, counts the
number of lines, and reports its findings (Figure
1.4).
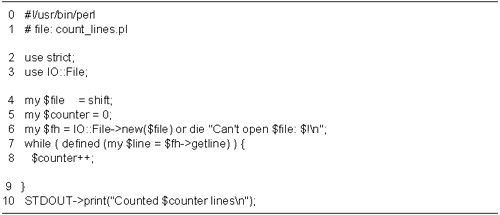
Lines 13: Load modules We turn on
strict syntax checking, and load the IO::File module.
Lines 45: Initialize variables We
recover from the command line the name of the file to
perform the line count on, and initialize the
$counter variable to zero.
Line 6: Create a new IO::File object
We call the IO::File::new() method, using the
syntax IO::File->new(). The argument is the name
of the file to open. If successful, new() returns a
new IO::File object that we can use for I/O. Otherwise it
returns undef, and we die with an error message.
Lines 79: Main loop We call the
IO::File object's getline() method in the test
portion of a while() loop. This method returns the
next line of text, or undef on end of filejust
like <>.
Each time through the loop we bump up
$counter. The loop continues until
getline() returns undef.
Line 10: Print results We print out
our results by calling STDOUT->print(). We'll
discuss why this surprising syntax works in a moment.
When I ran count_lines.pl on the unfinished
manuscript for this chapter, I got the following result: % count_lines.pl ch1.pod
Counted 2428 lines
IO::File objects are actually blessed
typeglob references (see the Passing and Storing Filehandles
section earlier in this chapter). This means that you can use
them in an object-oriented fashion, as in: $fh->print("Function calls are for the birds.\n");
or with the familiar built-in function
calls: print $fh "Object methods are too effete.\n";
Many of IO::File's methods are simple
wrappers around Perl's built-in functions. In addition to
print() and getline() methods, there are
read(), syswrite(), and close()
methods, among others. We discuss the pros and cons of using
object-oriented method calls and function calls in Chapter
5, where we introduce IO:: Socket.
When you load IO::File (technically, when
IO::File loads IO::Handle, which it inherits from), it adds
methods to ordinary filehandles. This means that any of the
methods in IO::File can also be used with STDIN,
STDOUT, STDERR, or even with any
conventional filehandles that you happen to create. This is
why line 10 of Figure
1.4 allows us to print to standard output by calling
print().
Of the method listings that follow, only the
new() and new_tmpfile() methods are actually
defined by IO::File. The rest are inherited from IO::Handle
and can be used with other descendents of IO::Handle, such as
IO::Socket. This list is not complete. I've omitted some of
the more obscure methods, including those that allow you to
move around inside a file in a record-oriented fashion,
because we won't need them for network communications.
|
$fh =
IO::File->new($filename [,$mode [,$perms]])
The new() method is the main
constructor for IO::File. It is a unified replacement
for both open() and sysopen(). Called
with a single argument, new() acts like the
two-argument form of open(), taking a filename
optionally preceded by a mode string. For example, this
will open the indicated file for appending: $fh = IO::File->new(">darkstar.txt");
If called with two or three arguments,
IO::File treats the second argument as the open mode,
and the third argument as the file creation permissions.
$mode may be a Perl-style mode string, such as
" +< ", or an octal numeric mode, such as
those used by sysopen(). As a convenience,
IO::File automatically imports the Fcntl O_*
constants when it loads. In addition, open()
allows for an alternative type of symbolic mode string
that is used in the C fopen() call; for
example, it allows " w " to open the file for
writing. We won't discuss those modes further here,
because they do not add functionality.
The permission agreement given by
$perms is an octal number, and has the same
significance as the corresponding parameter passed to
sysopen().
If new() cannot open the
indicated file, it will return undef and set
$! to the appropriate system error message.
$fh =
IO::File->new_tmpfile
The new_tmpfile() constructor,
which is called without arguments, creates a temporary
file opened for reading and writing. On UNIX systems,
this file is anonymous, meaning that it cannot be seen
on the file system. When the IO::File object is
destroyed, the file and all its contents will be deleted
automatically.
This constructor is useful for storing
large amounts of temporary data.
$result =
$fh->close
The close() method closes the
IO::File object, returning a true result if successful.
If you do not call close() explicitly, it will
be called automatically when the object is destroyed.
This happens when the script exits, if you happen to
undef() the object, or if the object goes out
of scope such as when a my variable reaches the
end of its enclosing block.
$result =
$fh->open($filename [,$mode [,$perms]])
You can reopen a filehandle object on
the indicated file by using its open() method.
The input arguments are identical to new(). The
method result indicates whether the open was
successful.
This is chiefly used for reopening the
standard filehandles STDOUT, STDIN,
and STDERR. For example: STDOUT->open("log.txt") or die "Can't reopen STDOUT: $!";
Calls to print() will now
write to the file log.txt .
$result =
$fh->print(@args)
$result=$fh->printf($fmt,@args)
$bytes=$fh->write($data [,$length
[,$offset]])
$bytes =
$fh->syswrite($data [,$length [,$offset]])
The print(),
printf(), and syswrite() methods work
exactly like their built-in counterparts. For example,
print() takes a list of data items, writes them
to the filehandle object, and returns true if
successful.
The write() method is the
opposite of read(), writing a stream of bytes
to the filehandle object and returning the number
successfully written. It is similar to
syswrite(), except that it uses stdio
buffering. This method corrects the inconsistent naming
of the built-in write() function, which creates
formatted reports. The IO::File object method that
corresponds to the built-in write() goes by the
name of format_write().
$line =
$fh->getline
@lines=$fh->getlines
$bytes =
$fh->read($buffer,$length ",$offset")
$bytes =
$fh->ysread($buffer,$length ",$offsetr")
The getline() and
getlines() methods together replace the
<> operator. getline() reads one
line from the filehandle object and returns it, behaving
in the same way in both scalar and list contexts. The
getlines() method acts like <>
in a list context, returning a list of all the available
lines. getline() will return undef at the end
of file.
The read() and
sysread() methods act just like their built-in
function counterparts.
$previous =
$fh->autoflush([$boolean])
The autoflush() method gets or
sets the autoflush() mode for the filehandle
object. Called without arguments, it turns on autoflush. Called with a
single boolean argument, it sets autoflush to the
indicated status. In either case, autoflush()i
returns the previous value of the autoflush state.
$boolean =
$fh->opened
The opened() method returns
true if the filehandle object is currently valid. It is
equivalent to: defined fileno($fh);
$boolean =
$fh->eof
Returns true if the next read on the
filehandle object will return EOF.
$fh->flush
The flush() method immediately
flushes any data that is buffered in the filehandle
object. If the filehandle is being used for writing,
then its buffered data is written to disk (or to the
pipe, or network, as we'll see when we get to IO::Socket
objects). If the filehandle is being used for reading,
any data in the buffer is discarded, forcing
the next read to come from disk.
$boolean =
$fh->blocking("$boolean")
The blocking() method turns on
and off blocking mode for the filehandle. We discuss how
to use this at length in Chapter
13.
$fh->clearerr
$boolean =
$fh->error
These two methods are handy if you wish
to perform a series of I/O operations and check the
error status only after you're finished. The
error()i method will return true if any errors
have occurred on the filehandle since it was created, or
since the last call to clearerr(). The
clearerr() method clears this
flag. |
In addition to the methods listed here,
IO::File has a constructor named new_from_fd(), and a
method named fdopen(), both inherited from
IO::Handle. These methods can be used to save and restore
objects in much the way that the >&FILEHANDLE
does with standard filehandles.
|
$fh =
IO::File->new_from_fd($fd,$mode)
The new_from_fd() method opens
up a copy of the filehandle object indicated by
$fd using the read/write mode given by
$mode. The object may be an IO::Handle object,
an IO::File object, a regular filehandle, or a numeric
file descriptor returned byfileno().
$mode must match the mode with which
$fd was originally opened. For example: $saveout = IO::File->new_from_fd(STDOUT,">");
$result =
$fh->fdopen($fd,$mode)
The fdopen() method is used to
reopen an existing filehandle object, making it a copy
of another one. The $fd argument may be an
IO::Handle object or a regular filehandle, or a numeric
file descriptor $mode must match the mode with
which $fd was originally opened.
This is typically used in conjunction
with new_from_fd() to restore a saved
filehandle: $saveout = IO::File->new_from_fd(STDOUT,">"); # save STDOUT
STDOUT->open('>log.txt'); # reopen on a file
STDOUT->print("Yippy yie yay!\n"); # print something
STDOUT->fdopen($saveout,">"); # reopen on saved
 value value
|
See the POD documentation for IO::Handle and
IO::File for information about the more obscure features that
these modules provide.
|
Chapter 2. Processes, Pipes, and
Signals
This chapter discusses three key Perl
features: processes, pipes, and signals. By creating new
processes, a Perl program can run another program or even
clone copies of itself in order to divide the work. Pipes
allow Perl scripts to exchange data with other processes, and
signals make it possible for Perl scripts to monitor and
control other processes.
|
Processes
UNIX, VMS, Windows NT/2000, and most other
modern operating systems are multitasking. They can run
multiple programs simultaneously, each one running in a
separate thread of execution known as a process. On machines
with multiple CPUs, the processes running on different CPUs
really are executing simultaneously. Processes that are
running on single-CPU machines only appear to be running
simultaneously because the operating system switches rapidly
between them, giving each a small slice of time in which to
execute.
Network applications often need to do two or
more things at once. For example, a server may need to process
requests from several clients at once, or handle a request at
the same time that it is watching for new requests.
Multitasking simplifies writing such programs tremendously,
because it allows you to launch new processes to deal with
each of the things that the application needs to do. Each
process is more or less independent, allowing one process to
get on with its work without worrying about what the others
are up to.
Perl supports two types of multitasking. One
type, based on the traditional UNIX multiprocessing model,
allows the current process to clone itself by making a call to
the fork() function. After fork() executes,
there are two processes, each identical to the other in almost
every respect. One goes off to do one task, and the other does
another task.
Another type, based on the more modern
concept of a lightweight "thread," keeps all the tasks within
a single process. However, a single program can have multiple
threads of execution running through it, each of which runs
independently of the others.
In this section, we introduce fork()
and the variables and functions that are relevant to
processes. We discuss multithreading in Chapter
11.
The fork() Function
The fork() function is available on
all UNIX versions of Perl, as well as the VMS and OS/2 ports.
Version 5.6 of Perl supports fork() on Microsoft
Windows platforms, but not, unfortunately, on the
Macintosh.
The Perl fork() function takes no
arguments and returns a numeric result code. When
fork() is called, it spawns an exact duplicate of the
current process. The duplicate, called the child, shares the
current values of all variables, filehandles (including data
in the standard I/O buffers), and other data structures. In
fact, the duplicate process even has the memory of calling
fork(). It is like a man walking into the cloning
booth of a science fiction movie. The copy wakes up in the
other booth having all the memories of the original up to and
including walking into the cloning booth, but thinking wait, didn't I start out over there?
And who is the handsome gentleman in
that other booth?
To ensure peaceful coexistence, it is vital
that the parent and child processes know which one is which.
Each process on the system is associated with a unique
positive integer, known as its process ID, or PID.
After a call to fork(), the parent
and child examine the function's return value. In the parent
process, fork() returns the PID of the child. In the
child process, fork() returns numeric 0. The code
will go off and do one thing if it discovers it's the parent,
and do another if it's the child.
|
$pid =
fork()
Forks a new process. Returns the
child's PID in the parent process, and 0 in the child
process. In case of error (such as insufficient memory
to fork), returns undef, and sets $!
to the appropriate error
message. |
If the parent and child wish to communicate
with each other following the fork, they can do so with a pipe
(discussed later in this chapter in the Pipes section), or via
shared memory (discussed in Chapter
14 in the An Adaptive Preforking Server Using Shared
Memory section). For simple messages, parent and child can
send signals to each others' PIDs using the kill()
function. The parent gets the child's PID from
fork()'s result code, and the child can get the
parent's PID by calling getppid(). A process can get
its own PID by examining the $$ special variable.
|
$pid =
getppi()
Returns the PID of the parent process.
Every Perl script has a parent, even those launched
directly from the command line (their parent is the
shell process).
$$
The $$ variable holds the
current PID for the process. It can be read, but not
changed. |
We discuss the kill() function later
in this chapter, in the Signals section.
If it wishes, a child process can itself
fork(), creating a grandchild. The original parent
can also fork() again, as can its children and
grandchildren. In this way, Perl scripts can create a whole
tribe of (friendly, we hope) processes. Unless specific action
is taken, each member of this tribe belongs to the same process group.
Each process group has a unique ID, which is
usually the same as the process ID of the shared ancestor.
This value can be obtained by calling getpgrp():
|
$processid =
getpgrp([$pid])
For the process specified by
$pid, the getpgrp() function returns
its process group ID. If no PID is specified, then the
process group of the current process is
returned. |
Each member of a process group shares
whatever filehandles were open at the time its parent forked.
In particular, they share the same STDIN,
STDOUT, and STDERR. This can be modified by
any of the children by closing a filehandle, or reopening it
on some other source. However, the system keeps track of which
children have filehandles open, and will not close the file
until the last child has closed its copy of the
filehandle.
Figure
2.1 illustrates the typical idiom for forking. Before
forking, we print out the PID stored in $$. We then call
fork() and store the result in a variable named
$child. If the result is undefined, then
fork() has failed and we die with an error
message.
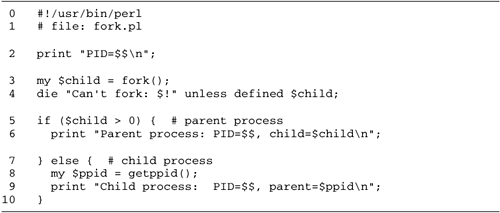
We now examine $child to see whether
we are running in the parent or the child. If $child
is nonzero, we are in the parent process. We print out our PID
and the contents of $child, which contains the child
process's PID.
If $child is zero, then we are
running in the child process. We recover the parent's PID by
calling ppid() and print it and our own PID.
Here's what happens when you run fork.pl: % fork.pl
PID=372
Parent process: PID=372, child=373
Child process: PID=373, parent=372
The system() and
exec() Functions
Another way for Perl to launch a subprocess
is with system(). system() runs another
program as a subprocess, waits for it to complete, and then
returns. If successful, system() returns a result
code of 0 (notice that this is different from the usual Perl
convention!). Otherwise it returns -1 if the program couldn't
be started, or the program's exit status if it exited with
some error. See the perlvar POD
entry for the $? variable for details on how to
interpret the exit status fully.
|
$status =
system ('command and arguments')
$status =
system ('command', 'and', 'arguments')
The system() function executes
a command as a subprocess and waits for it to exit. The
command and its arguments can be specified as a single
string, or as a list containing the command and its
arguments as separate elements. In the former case, the
string will be passed intact to the shell for
interpretation. This allows you to execute commands that
contain shell metacharacters (such as input/output
re-directs), but opens up the possibility of executing
shell commands you didn't anticipate. The latter form
allows you to execute commands with arguments that
contain whitespace, shell metacharacters, and other
special characters, but it doesn't interpret
metacharacters at all. |
The exec() function is like
system(), but replaces
the current process with the indicated command. If successful,
it never returns because the process is gone. The new process
will have the same PID as the old one, and will share the same
STDIN, STDOUT, and STDERR
filehandles. However, other opened filehandles will be closed
automatically.
|
$status =
exec ('command and arguments')
$status =
exec ('command', 'and', 'arguments')
exec() executes a command,
replacing the current process. It will return a status
code only on failure. Otherwise it does not return. The
single-value and list forms have the same significance
as system(). |
exec() is often used in combination
with fork() to run a command as a subprocess after
doing some special setup. For example, after this code
fragment forks, the child reopens STDOUT onto a file
and then calls exec() to run the ls -l command. On UNIX systems, this
command generates a long directory listing. The effect is to
run ls -l in the background,
and to write its output to the indicated file. my $child = fork();
die "Can't fork: $!" unless defined $child;
if ($child == 0) { # we are in the child now
open (STDOUT,">log.txt") or die "open() error: $!";
exec ('ls','-l');
die "exec error(): $!"; # shouldn't get here
}
We use exec() in this way in Chapter
10, in the section titled The Inetd Super Daemon.
|
Pipes
Network programming is all about interprocess
communication (IPC). One process exchanges data with another.
Depending on the application, the two processes may be running
on the same machine, may be running on two machines on the
same segment of a local area network, or may be halfway across
the world from each other. The two processes may be related to
each otherfor example, one may have been launched under the
control of the otheror they may have been written decades
apart by different authors for different operating
systems.
The simplest form of IPC that Perl offers is
the pipe. A pipe is a filehandle that connects the current
script to the standard input or standard output of another
process. Pipes are fully implemented on UNIX, VMS, and
Microsoft Windows ports of Perl, and implemented on the
Macintosh only in the MPW environment.
Opening a Pipe
The two-argument form of open() is
used to open pipes. As before, the first argument is the name
of a filehandle chosen by you. The second argument, however,
is a program and all its arguments, either preceded or
followed by the pipe " | " symbol. The command should
be entered exactly as you would type it in the operating
system's default shell, which for UNIX machines is the Bourne
shell ("sh") and the DOS/NT command shell on Microsoft Windows
systems. You may specify the full path to the command, for
example /usr/bin/ls, or rely on
the PATH environment variable to find the command for
you.
If the pipe symbol precedes the program name,
then the filehandle is opened for writing and everything
written to the filehandle is sent to the standard input of the
program. If the pipe symbol follows the program, then the
filehandle is opened for reading, and everything read from the
filehandle is taken from the program's standard output.
For example, in UNIX the command ls -l will return a listing of the
files in the current directory. By passing an argument of "
ls -l | " to open(), we can open a pipe to
read from the command: open (LSFH,"ls -l |") or die "Can't open ls -l: $!";
while (my $line = <LSFH>) {
print "I saw: $line\n";
}
close LSFH;
This fragment simply echoes each line
produced by the ls -l command.
In a real application, you'd want to do something more
interesting with the information.
As an example of an output pipe, the UNIX
wc -lw command will count the
lines (option " -l ") and words (option " -w
") of a text file sent to it on standard input. This code
fragment opens a pipe to the command, writes a few lines of
text to it, and then closes the pipe. When the program runs,
the word and line counts produced by wc are printed in the command
window: open (WC,"| wc -lw") or die "Can't open wordcount: $!";
print WC "This is the first line.\n";
print WC "This is the another line.\n";
print WC "This is the last line.\n";
print WC "Oops. I lied.\n";
close WC;
IO::Filehandle supports pipes through its
open() method: $wc = IO::Filehandle->open("| wc - lw") or die "Can't open wordcount:
$!";
Using Pipes
Let's look at a complete functional example
(Figure
2.2). The program whos_there.pl opens up a pipe to the
UNIX who command and counts the
number of times each user is logged in. It produces a report
like this one:
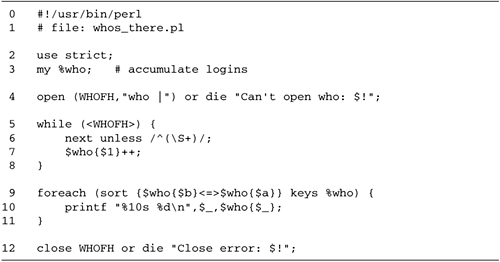
% whos_there.pl
   jsmith 9
      abu 5
   lstein 1
  palumbo 1
This indicates that users "jsmith" and "abu"
are logged in 9 and 5 times, respectively, while "lstein" and
"palumbo" are each logged in once. The users are sorted in
descending order of the number of times they are logged in.
This is the sort of script that might be used by an
administrator of a busy system to watch usage.
Lines 13: Initialize script We turn
on strict syntax checking with use strict. This
catches mistyped variables, inappropriate use of globals,
failure to quote strings, and other potential errors. We
create a local hash %who to hold the set of
logged-in users and the number of times they are logged in.
Line 4: Open pipe to who command We call open()
on a filehandle named WHOFH, using who |
as the second argument. If the open() call fails,
die with an error message.
Lines 58: Read the output of the who command We read and process the
output of who one line at a
time. Each line of who looks
like this: jsmith pts/23 Aug 12 10:26 (cranshaw.cshl.org)
The fields are the username, the name of
the terminal he's using, the date he logged in, and the
address of the remote machine he logged in from (this format
will vary slightly from one dialect of UNIX to another). We
use a pattern match to extract the username, and we tally
the names into the %who hash in such a way that the
usernames become the keys, and the number of times each user
is logged in becomes the value.
The <WHOFH> loop will
terminate at the EOF, which in the case of pipes occurs when
the program at the other end of the pipe exits or closes its
standard output.
Lines 911: Print out the results We
sort the keys of %who based on the number of times
each user has logged in, and print out each username and
login count. The printf() format used here, "
%10s %d\n ", tells printf() to format its
first argument as a string that is right justified on a
field 10 spaces long, to print a space, and then to print
the second argument as a decimal integer.
Line 12: Close the pipe We are done
with the pipe now, so we close() it. If an error is
detected during close, we print out a warning.
With pipes, the open() and
close() functions are enhanced slightly to provide
additional information about the subprocess. When opening a
pipe, open() returns the process ID (PID) of the
command at the other end of the pipe. This is a unique nonzero
integer that can be used to monitor and control the subprocess
with signals (which we discuss in detail later in the Handling
Signals section). You can store this PID, or you can ignore
its special meaning and treat the return value from
open() as a Boolean flag.
When closing a pipe, the close()
call is enhanced to place the exit code from the subprocess in
the special global variable $?. Contrary to most Perl
conventions, $? is zero if the command succeeded, and
nonzero on an error. The perlvar POD page has more to say
about the exit code, as does the section Handling Child
Termination in Chapter
10.
Another aspect of close() is that
when closing a write pipe, the close() call will
block until the process at the other end has finished all its
work and exited. If you close a read pipe before reading to
the EOF, the program at the other end will get a PIPE
signal (see The PIPE Signal) the next time it tries to write
to standard output.
Pipes Made Easy: The Backtick
Operator
Perl's backtick operator, (`), is an easy way
to create a one-shot pipe for reading a program's output. The
backtick acts like the double-quote operator, except that
whatever is contained between the backticks is interpreted as
a command to run. For example: $ls_output = `ls`;
This will run the ls (directory listing) command,
capture its output, and assign the output to the
$ls_output scalar.
Internally, Perl opens a pipe to the
indicated command, reads everything it prints to standard
output, closes the pipe, and returns the command output as the
operator result. Typically at the end of the result there is a
new line, which can be removed with chomp().
Just like double quotes, backticks
interpolate scalar variables and arrays. For example, we can
create a variable containing the arguments to pass to ls like this: $arguments = '-l -F';
$ls_output = `ls $arguments`;
The command's standard error is not
redirected by backticks. If the subprocess writes any
diagnostic or error messages, they will be intermingled with
your program's diagnostics. On UNIX systems, you can use the
Bourne shell's output redirection system to combine the
subprocess's standard error with its standard output like
this: $ls_output = `ls 2>&1`;
Now $ls_output will contain both the
standard error and the standard output of the command.
Pipes Made Powerful: The pipe()
Function
A powerful but slightly involved way to
create a pipe is with Perl's built-in pipe()
function. pipe() creates a pair of filehandles: one
for reading and one for writing. Everything written to the one
filehandle can be read from the other.
|
$result =
pipe (READHANDLE,WRITEHANDLE)
Open a pair of filehandles connected by
a pipe. The first argument is the name of a filehandle
to read from, and the second is a filehandle to write
to. If successful, pipe() returns a true result
code. |
Why is pipe() useful? It is commonly
used in conjunction with the fork() function in order
to create a parent-child pair that can exchange data. The
parent process keeps one filehandle and closes the other,
while the child does the opposite. The parent and child
process can now communicate across the pipe as they work in
parallel.
A short example will illustrate the power of
this technique. Given a positive integer, the facfib.pl script calculates its
factorial and the value of its position in the Fibonacci
series. To take advantage of modern multiprocessing machines,
these calculations are performed in two subprocesses so that
both calculations proceed in parallel. The script uses
pipe() to create filehandles that the child processes
can use to communicate their findings to the parent process
that launched them. When we run this program, we may see
results like this: % facfib.pl 8
factorial(1) => 1
factorial(2) => 2
factorial(3) => 6
factorial(4) => 24
factorial(5) => 120
fibonacci(1) => 1
factorial(6) => 720
fibonacci(2) => 1
factorial(7) => 5040
fibonacci(3) => 2
factorial(8) => 40320
fibonacci(4) => 3
fibonacci(5) => 5
fibonacci(6) => 8
fibonacci(7) => 13
fibonacci(8) => 21
The results from the factorial and Fibonacci
calculation overlap because they are occurring in
parallel.
Figure
2.3 shows how this program works.
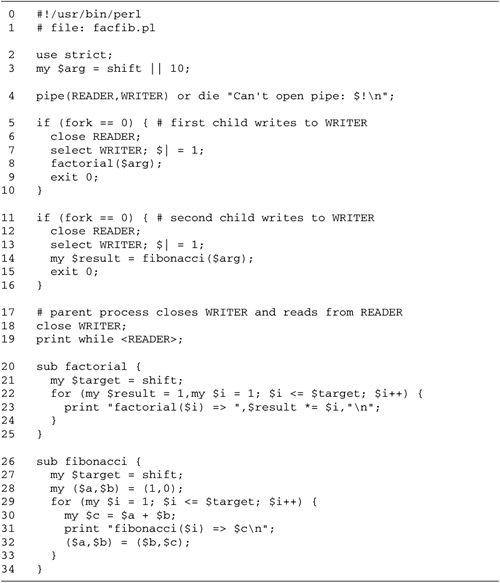
Lines 13: Initialize module We turn
on strict syntax checking and recover the command-line
argument. If no argument is given, we default to 10.
Line 4: Create linked pipes We
create linked pipes with pipe(). READER
will be used by the main (parent) process to read results
from the children, which will use WRITER to write
their results.
Lines 510: Create first child
process We call fork() to clone the current
process. In the parent process, fork() returns the
nonzero PID of the child process. In the child process,
fork() returns numeric 0. If we see that the result
of fork() is 0, we know we are the child process.
We close the READER filehandle because we don't
need it. We select() WRITER, making it the
default filehandle for output, and turn on autoflush mode by
setting $| to a true value. This is necessary to
ensure that the parent process gets our messages as soon as
we write them.
We now call the factorial()
subroutine with the integer argument from the command line.
After this, the child process is done with its work, so we
exit(). Our copy of WRITER is closed
automatically.
Lines 1116: Create the second child
process Back in the parent process, we invoke
fork() again to create a second child process. This
one, however, calls the fibonacci() subroutine
rather than factorial().
Lines 1719: Process messages from
children In the parent process, we close WRITER
because we no longer need it. We read from READER
one line at a time, and print out the results. This will
contain lines issued by both children. READER
returns undef when the last child has finished and
closed its WRITER filehandle, sending us an EOF. We
could close() READER and check the result code, or
let Perl close the filehandle when we exit, as we do here.
Lines 2025: The factorial()
subroutine We calculate the factorial of the subroutine
argument in a straightforward iterative way. For each step
of the calculation, we print out the intermediate result.
Because WRITER has been made the default filehandle
with select(), each print() statement
enters the pipe, where it is ultimately read by the parent
process.
Lines 2634: The fibonacci()
subroutine This is identical to factorial() except
for the calculation itself.
Instead of merely echoing its children's
output, we could have the parent do something more useful with
the information. We use a variant of this technique in Chapter
14 to implement a preforked Web server. The parent Web
server manages possibly hundreds of children, each of which is
responsible for processing incoming Web requests. To tune the
number of child processes to the incoming load, the parent
monitors the status of the children via messages that they
send via a pipe launching more children under conditions of
high load, and killing excess children when the load is
low.
The pipe() function can also be used
to create a filehandle connected to another program in much
the way that piped open() does. We don't use this
technique elsewhere, but the general idea is for the parent
process to fork(), and for the child process to
reopen either STDIN or STDOUT onto one of
the paired filehandles, and then exec() the desired
program with arguments. Here's the idiom: pipe(READER,WRITER) or die "pipe no good: $!";
my $child = fork();
die "Can't fork: $!" unless defined $child;
if ($child == 0) { # child process
close READER; # child doesn't need this
open (STDOUT,">&WRITER"); # STDOUT now goes to writer
exec $cmd,$args;
die "exec failed: $!";
}
close WRITER; # parent doesn't need this
At the end of this code, READER will
be attached to the standard output of the command named
$cmd, and the effect is almost exactly identical to
this code: open (READER,"$cmd $args |") or die "pipe no good: $!";
Bidirectional Pipes
Both piped open() and
pipe() create unidirectional filehandles. If you want
to both read and write to another process, you're out of luck.
In particular, this sensible-looking syntax does not work: open(FH,"| $cmd |");
One way around this is to call
pipe() twice, creating two pairs of linked
filehandles. One pair is used for writing from parent to
child, and the other for child to parent, rather like a
two-lane highway. We won't go into this technique, but it's
what the standard IPC::Open2 and IPC::Open3 modules do to
create a set of filehandles attached to the STDIN,
STDOUT, and STDERR of a subprocess.
A more elegant way to create a bidirectional
pipe is with the socketpair() function. This creates
two linked filehandles like pipe() does, but instead
of being a one-way connection, both filehandles are
read/write. Data written into one filehandle comes out the
other one, and vice versa. Because the socketpair()
function involves the same concepts as the socket()
function used for network communications, we defer our
discussion of it until Chapter
4.
Distinguishing Pipes from Plain
Filehandles
You will occasionally need to test a
filehandle to see if it is opened on a file or a pipe. Perl's
filehandle tests make this possible (Table
2.1).
Table 2.1. Perl's Filehandle
Tests
| -p |
Filehandle is a
pipe. |
| -t |
Filehandle is opened
on a terminal. |
| -s |
Filehandle is a
socket. |
If a filehandle is opened on a pipe, the
-p test will return true: print "I've got a pipe!\n" if -p FILEHANDLE;
The -t and -S file tests
can distinguish other special types of filehandle. If a
filehandle is opened on a terminal (the command-line window),
then -t will return true. Programs can use this to
test STDIN to see if the program is being run
interactively or has its standard input redirected from a
file: print "Running in batch mode, confirmation prompts disabled.\n"
unless -t STDIN;
The -S test detects whether a
filehandle is opened on a network socket (introduced in Chapter
3): print "Network active.\n" if -S FH
There are more than a dozen other file test
functions that can give you a file's size, modification date,
ownership, and other information. See the perlfunc POD page for details.
The Dreaded PIPE Error
When your script is reading from a filehandle
opened on a pipe, and the program at the other end either
exits or simply closes its end of the pipe, your program will
receive an EOF on the filehandle. What happens in the opposite
case, when your script is writing to a pipe and the program at
the other end terminates prematurely or closes its end of the
connection?
To find out, we can write two short Perl
scripts. One, named write_ten.pl, opens up a pipe to the
second program and attempts to write ten lines of text to it.
The script checks the result code from print(), and
bumps up a variable named $count whenever
print() returns a true result. When write_ten.pl is done, it displays the
contents of $count, indicating the number of lines
that were successfully written to the pipe. The second
program, named read_three.pl,
reads three lines of text from standard input and then
exits.
The two scripts are shown in Figures
2.4 and 2.5.
Of note is that write_ten.pl
puts the pipe into autoflush mode so that each line of text is
sent down the pipe immediately, rather than being buffered
locally. write_ten.pl also
sleep()s for one second after writing each line of
text, giving read_three.pl a
chance to report that the text was received. Together, these
steps make it easier for us to see what is happening. When we
run write_ten.pl we see the
following:

% write_ten.pl
 Writing line 1
 Read_three got: This is line number 1
 Writing line 2
 Read_three got: This is line number 2
 Writing line 3
 Read_three got: This is line number 3
 Writing line 4
 Broken pipe
 %
Everything works as expected through line
three, at which point read_three.pl exits. When write_ten.pl attempts to write the
fourth line of text, the script crashes with a Broken
pipe error. The statement that prints out the number of
lines successfully passed to the pipe is never executed.
When a program attempts to write to a pipe
and no program is reading at the other end, this results in a
PIPE exception. This exception, in turn, results in a
PIPE signal being delivered to the writer. By default
this signal results in the immediate termination of the
offending program. The same error occurs in network
applications when the sender attempts to transmit data to a
remote program that has exited or has stopped receiving.
To deal effectively with PIPE, you
must install a signal handler, and this brings us to the next
major topic.
|
Signals
As with filehandles, understanding signals is
fundamental to network programming. A signal is a message sent
to your program by the operating system to tell it that
something important has occurred. A signal can indicate an
error in the program itself such as an attempt to divide by
zero, an event that requires immediate attention such as an
attempt by the user to interrupt the program, or a noncritical
informational event such as the termination of a subprocess
that your program has launched.
In addition to signals sent by the operating
system, processes can signal each other. For example, when the
user presses control-C (^C) on the keyboard to send an
interrupt signal to the currently running program, that signal
is sent not by the operating system, but by the command shell
that pro cesses and interprets keystrokes. It is also possible
for a process to send signals to itself.
Common Signals
The POSIX standard defines nineteen signals.
Each has a small integer value and a symbolic name. We list
them in Table
2.2 (the gaps in the integer sequence represent
nonstandard signals used by some systems).
The third column of the table indicates what
happens when a process receives the signal. Some signals do
nothing. Others cause the process to terminate immediately,
and still others terminate the process and cause a core dump.
Most signals can be "caught." That is, the program can install
a handler for the signal and take special action when the
signal is received. A few signals, however, cannot be
intercepted in this way.
You don't need to understand all of the
signals listed in Table
2.2 because either they won't occur during the execution
of a Perl script, or their generation indicates a low-level
bug in Perl itself that you can't do anything about. However,
a handful of signals are relatively common, and we'll look at
them in more detail now.
HUP signals a hangup event. This
typically occurs when a user is running a program from the
command line, and then closes the command-line window or exits
the interpreter shell. The default action for this signal is
to terminate the program.
INT signals a user-initiated
interruption. It is generated when the user presses the
interrupt key, typically ^C. The default behavior of this
signal is to terminate the program. QUIT is similar
to INT, but also causes the program to generate a
core file (on UNIX systems). This signal is issued when the
user presses the "quit" key, ordinarily ^\.
Table 2.2. POSIX
Signals
| HUP |
1 |
A |
Hangup detected |
| INT |
2 |
A |
Interrupt from
keyboard |
| QUIT |
3 |
A |
Quit from
keyboard |
| ILL |
4 |
A |
Illegal
Instruction |
| ABRT |
6 |
C |
Abort |
| FPE |
8 |
C |
Floating point
exception |
| KILL |
9 |
AF |
Termination
signal |
| USR1 |
10 |
A |
User-defined signal
1 |
| SEGV |
11 |
C |
Invalid memory
reference |
| USR2 |
12 |
A |
User-defined signal
2 |
| PIPE |
13 |
A |
Write to pipe with no
readers |
| ALRM |
14 |
A |
Timer signal from
alarm clock |
| TERM |
15 |
A |
Termination
signal |
| CHLD |
17 |
B |
Child terminated |
| CONT |
18 |
E |
Continue if
stopped |
| STOP |
19 |
DF |
Stop process |
| TSTP |
20 |
D |
Stop typed at
tty |
| TTIN |
21 |
D |
tty input for
background process |
| TTOU |
22 |
D |
tty output for
background process |
By convention, TERM and
KILL are used by one process to terminate another. By
default, TERM causes immediate termination of the
program, but a program can install a signal handler for
TERM to intercept the terminate request and possibly
perform some cleanup actions before quitting. The
KILL signal, in contrast, is uncatchable. It causes
an immediate shutdown of the process without chance of appeal.
For example, when a UNIX system is shutting down, the script
that handles the shutdown process first sends a TERM
to each running process in turn, giving it a chance to clean
up. If the process is still running a few tens of seconds
later, then the shutdown script sends a KILL.
The PIPE signal is sent when a
program writes to a pipe or socket but the process at the
remote end has either exited or closed the pipe. This signal
is so common in networking applications that we will look at
it closely in the Handling PIPE Exceptions section.
ALRM is used in conjunction with the
alarm() function to send the program a prearranged
signal after a certain amount of time has elapsed. Among other
things, ALRM can be used to time out blocked I/O
calls. We will see examples of this in the Timing Out
Long-Running Operations section.
CHLD occurs when your process has
launched a subprocess, and the status of the child has changed
in some way. Typically the change in status is that the child
has exited, but CHLD is also generated whenever the
child is stopped or continued. We discuss how to deal with
CHLD in much greater detail in Chapters
4 and 9.
STOP and TSTP both have the
effect of stopping the current process. The process is put
into suspended animation indefinitely; it can be resumed by
sending it a CONT signal. STOP is generally
used by one program to stop another. TSTP is issued
by the interpreter shell when the user presses the stop key
(^Z on UNIX systems). The other difference between the two is
that TSTP can be caught, but STOP cannot be
caught or ignored.
Catching Signals
You can catch a signal by adding a signal
handler to the %SIG global hash. Use the name of the
signal you wish to catch as the hash key. For example, use
$SIG{INT} to get or set the INT signal
handler. As the value, use a code reference: either an
anonymous subroutine or a reference to a named subroutine. For
example, Figure
2.6 shows a tiny script that installs an INT
handler. Instead of terminating when we press the interrupt
key, it prints out a short message and bumps up a counter.
This goes on until the script counts three interruptions, at
which point it finally terminates. In the transcript that
follows, the "Don't interrupt me!" message was triggered each
time I typed ^C:
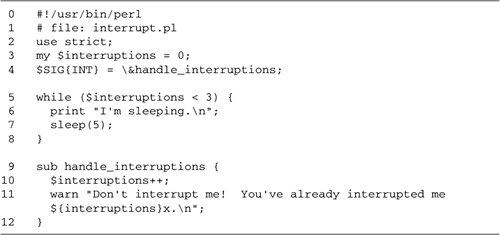
% interrupt.pl
 I'm sleeping.
 I'm sleeping.
 Don't interrupt me! You've already interrupted me 1x.
 I'm sleeping.
 I'm sleeping.
 Don't interrupt me! You've already interrupted me 2x.
 I'm sleeping.
 Don't interrupt me! You've already interrupted me 3x.
Let's look at the script in detail.
Lines 13: Initialize script We turn
on strict syntax checking, and declare a global counter
named $interruptions. This counter will keep track
of the number of times the script has received INT.
Line 4: Install INT handler We
install a handler for the INT signal by setting
$SIG{INT} to a reference to the subroutine
handle_interruptions().
Lines 58: Main loop The main loop
of the program simply prints a message and calls sleep with
an argument of 5. This puts the program to sleep for 5
seconds, or until a signal is received. This continues until
the $interruptions counter becomes 3 or greater.
Lines 912: The
handle_interruptions() subroutine The
handle_interruptions() subroutine is called
whenever the INT signal arrives, even if the
program is busy doing something else at that moment. In this
case, our signal handler bumps up $interruptions
and prints out a warning.
For short signal handlers, you can use an
anonymous subroutine as the handler. For example, this code
fragment is equivalent to that in Figure
2.6, but we don't have to formally name the handler
subroutine: $SIG{INT} = sub {
$interruptions++;
warn "Don't interrupt me! You've already interrupted
me ${interruptions}x.\n";
};
In addition to code references, %SIG
recognizes two special cases. The string " DEFAULT "
restores the default behavior of the signal. For example,
setting $SIG{INT} to " DEFAULT " will cause
the INT signal to terminate the script once again.
The string " IGNORE " will cause the signal to be
ignored altogether.
As previously mentioned, don't bother
installing a handler for either KILL or
STOP. These signals can be neither caught nor
ignored, and their default actions will always be
performed.
If you wish to use the same routine to catch
several different signals, and it is important for the
subroutine to distinguish one signal from another, it can do
so by looking at its first argument, which will contain the
name of the signal. For example, for INT signals, the
handler will be called with the string " INT ": $SIG{TERM} = $SIG{HUP} = $SIG{INT} = \&handler
sub handler {
my $sig = shift;
warn "Handling a $sig signal.\n";
}
Handling PIPE Exceptions
We now have what we need to deal with PIPE
exceptions. Recall the write_
ten.pl and read_three.pl
examples from Figures
2.4 and 2.5
in The Dreaded PIPE Error section. write_ten.pl opens a pipe to read_three.pl and tries to write ten
lines of text to it, but read_three.pl is only prepared to
accept three lines, after which it exits and closes its end of
the pipe. write_ten.pl, not
knowing that the other end of the connection has exited,
attempts to write a fourth line of text, generating a
PIPE signal.
We will now modify write_ten.pl so that it detects the
PIPE error and handles it more gracefully. We will
use variants on this technique in later chapters that deal
with common issues in network communications.
The first technique is shown in Figure
2.7, the write_ten_ph.pl
script. Here we set a global flag, $ok, which starts
out true. We then install a PIPE handler using this
code:
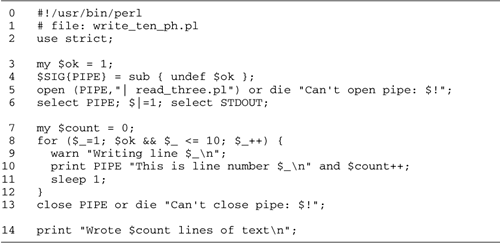
$SIG{PIPE} = sub { undef $ok };
When a PIPE signal is received, the
handler will undefine the $ok flag, making it
false.
The other modification is to replace the
simple for() loop in the original version with a more
sophisticated version that checks the status of $ok.
If the flag becomes false, the loop exits. When we run the
modified script, we see that the program runs to completion,
and correctly reports the number of lines successfully
written: % write_ten_ph.pl
Writing line 1
Read_three got: This is line number 1
Writing line 2
Read_three got: This is line number 2
Writing line 3
Read_three got: This is line number 3
Writing line 4
Wrote 3 lines of text
Another general technique is to set
$SIG{PIPE} to 'IGNORE', in order to ignore
the PIPE signal entirely. It is now our
responsibility to detect that something is amiss, which we can
do by examining the result code from print(). If
print() returns false, we exit the loop.
Figure
2.8 shows the code for write_ten_i.pl, which illustrates
this technique. This script begins by setting
$SIG{PIPE} to the string 'IGNORE',
suppressing PIPE signals. In addition, we modify the
print loop so that if print() is successful, we bump
up $count as before, but if it fails, we issue a
warning and exit the loop via last.
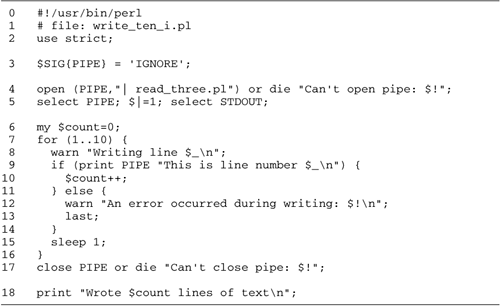
When we run write_ten_i.pl we get this
output: % write_ten_i.pl
Writing line 1
Read_three got: This is line number 1
Writing line 2
Read_three got: This is line number 2
Writing line 3
Read_three got: This is line number 3
Writing line 4
An error occurred during writing: Broken pipe
Wrote 3 lines of text
Notice that the error message that appears in
$! after the unsuccessful print is "Broken pipe." If
we wanted to treat this error separately from other I/O
errors, we could explicitly test its value via a pattern
match, or, better still, check its numeric value against the
numeric error constant EPIPE. For example: use Errno ':POSIX';
...
unless (print PIPE "This is line number $_\n") { # handle write error
last if $! == EPIPE; # on PIPE, just terminate the loop
die "I/O error: $!"; # otherwise die with an error message
}
Sending Signals
A Perl script can send a signal to another
process using the kill() function:
|
$count =
kill($signal,@processes)
The kill() function sends
signal $signal to one or more processes. You
may specify the signal numerically, for example 2, or
symbolically as in " INT ". @processes
is a list of one or more process IDs to deliver the
signal to. The number of processes successfully signaled
is returned as the kill() function
result. |
One process can only signal another if it has
sufficient privileges to do so. In general, a process running
under a normal user's privileges can signal only other
processes that are running under the same user's privileges. A
process running with root or superuser privileges, however,
can signal any other process.
The kill() function provides a few
tricks. If you use the special signal number 0, then
kill() will return the number of processes that could
have been signaled, without actually delivering the signal. If
you use a negative number for the process ID, then
kill() will treat the absolute value of the number as
a process group ID and deliver the signal to all members of
the group.
A script can send a signal to itself by
calling kill() on the variable $$, which
holds the current process ID. For example, here's a fancy way
for a script to commit suicide: kill INT => $$; # same as kill('INT',$$)
Signal Handler Caveats
Because a signal can arrive at any time
during a program's execution, it can arrive while the Perl
interpreter is doing something important, like updating one of
its memory structures, or even while inside a system call. If
the signal handler does something that rearranges memory, such
as allocating or dis posing of a big data structure, then on
return from the handler Perl may find its world changed from
underneath it, and get confused, which occasionally results in
an ugly crash.
To avoid this possibility, signal handlers
should do as little as possible. The safest course is to set a
global variable and return, as we did in the PIPE
handler in Figure
2.7. In addition to memory-changing operations, I/O
operations within signal handlers should also be avoided.
Although we liberally pepper our signal handlers with
diagnostic warn() statements throughout this book,
these operations should be stripped out in production
programs.
It's generally OK to call die() and
exit() within signal handlers. The exception is on
Microsoft Windows systems, where due to limitations in the
signal library, these two calls may cause "Dr. Watson" errors
if invoked from within a signal handler.
Indeed, the implementation of signals on
Windows systems is currently extremely limited. Simple things,
such as an INT handler to catch the interrupt key,
will work. More complex things, such as CHLD handlers
to catch the death of a subprocess, do not work. This is an
area of active development so be sure to check the release
notes before trying to write or adapt any code that depends
heavily on signals.
Signal handling is not implemented in
MacPerl.
Timing Out Slow System Calls
A signal may occur while Perl is executing a
system call. In most cases, Perl automatically restarts the
call and it takes up exactly where it left off.
A few system calls, however, are exceptions
to this rule. One is sleep(), which suspends the
script for the indicated number of seconds. If a signal
interrupts sleep(), however, it will exit early,
returning the number of seconds it slept before being
awakened. This property of sleep() is quite useful
because it can be used to put the script to sleep until some
expected event occurs.
|
$slept =
sleep([$seconds])
Sleep for the indicated number of
seconds or until a signal is received. If no argument is
provided, this function will sleep forever. On return,
sleep() will return the number of seconds it
actually slept. |
Another exception is the four-argument
version of select(), which can be used to perform a
timed wait until one or more of a set of filehandles are ready
for I/O. This function is described in detail in Chapter
12.
Sometimes the automatic restarting of system
calls is not what you want. For example, consider an
application that prompts a user to type her password and tries
to read the response from standard input. You might want the
read to time out after some period of time in case the user
has wandered off and left the terminal unattended. This
fragment of code might at first seem to do the trick: my $timed_out = 0;
$SIG{ALRM} = sub { $timed_out = 1 };
print STDERR "type your password: ";
alarm (5); # five second timeout
my $password = <STDIN>;
alarm (0);
print STDERR "you timed out\n" if $timed_out;
Here we use the alarm() function to
set a timer. When the timer expires, the operating system
generates an ALRM signal, which we intercept with a
handler that sets the $timed_out global to true. In
this code we call alarm() with a five-second timeout,
and then read a line of input from standard input. After the
read completes, we call alarm() again with an
argument of zero, turning the timer off. The idea is that the
user will have five seconds in which to type a password. If
she doesn't, the alarm clock goes off and we fall through to
the rest of the program.
|
$seconds_left
= alarm($seconds)
Arrange for an ALRM signal to
be delivered to the process after $seconds. The
function result is the number of seconds left from the
previous timer, if any. An argument of zero disables the
timer. |
The problem is that Perl automatically
restarts slow system calls, including <>. Even
though the alarm clock has gone off, we remain in the
<> call, waiting for the user's keyboard
input.
The solution to this problem is to use
eval{} and a local ALRM handler to abort the
read. The general idiom is this: print STDERR "type your password: ";
my $password =
eval {
local $SIG{ALRM} = sub { die "timeout\n" };
alarm (5); # five second timeout
return <STDIN>;
};
alarm (0);
print STDERR "you timed out\n" if $@ =~ /timeout/;
Instead of having an ALRM handler in
the main body of the program, we localize it within an
eval{} block. The eval{} block sets the
alarm, as before, and attempts to read from STDIN. If
<> returns before the timer goes off, then the
line of input is returned from the eval{} block, and
assigned to $password.
However, if the timer goes off before the
input is complete, the ALRM handler executes, dying
with the error message "timeout." However, since we are dying
within an eval{} block, the effect of this is for
eval{} to return undef, setting the variable
$@ to the last error message. We pattern match
$@ for the timeout message, and print a warning if
found.
In either case, we turn off the timer
immediately after returning from the eval{} block in
order to avoid having the timer go off at an inconvenient
moment.
We will use this technique several times in
later chapters when we need to time out slow network
calls.
|
Chapter 3. Introduction to Berkeley
Sockets
This chapter introduces Perl's version of the
Berkeley socket API, the low-level network API that underlies
all of Perl's networking modules. It explains the different
kinds of sockets, demonstrates basic Berkeley-based clients
and servers, and discusses some of the common traps
programmers encounter when first working with the API.
|
Clients, Servers, and
Protocols
Network communication occurs when two
programs exchange data across the net. With rare exceptions,
the two programs are not equal. One, the client, initiates the connection and
is usually, but not always, connected to a single server at a
time. The other partner in the connection, the server, is passive, waiting quietly
until it is contacted by a client seeking a connection. In
contrast to clients, it is common for a server to service
incoming connections from multiple clients at the same
time.
Although it is often true that the computer
("host") that runs the server is larger and more powerful than
the client machine, this is not a rule by any means. In fact,
in some popular applications, such as the X Windows System,
the situation is reversed. The server is usually a personal
computer or other desktop machine, while the client is run on
a more powerful "server class" machine.
Most of the network protocols that we are
familiar with are client-server applications. This includes
the HTTP used on the Web, the SMTP used for Internet e-mail,
and all the database access protocols. However, a small but
growing class of network applications is peer-to-peer. In peer-to-peer
scenarios, the two ends of the connection are equivalent, each
making multiple connections to other copies of the same
program. The controversial Napster file-sharing protocol is
peer-to-peer, as are its spiritual heirs Gnutella and
Freenet.
Protocols
We've thrown around the word protocol, but what is it, exactly? A
protocol is simply an agreed-upon set of standards whereby two
software components interoperate. There are protocols at every
level of the networking stack (Figure
3.1).
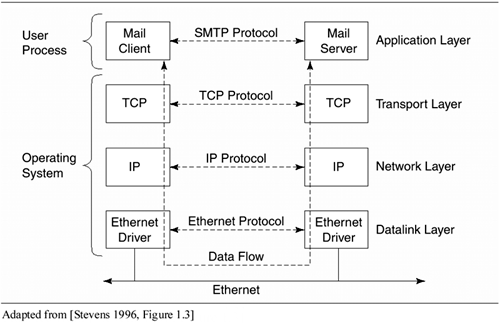
At the lowest level is the hardware or datalink layer, where, for example,
the drivers built into Ethernet network interface cards have a
common understanding of how to interpret the pulses of
electric potential on the network wire in terms of Ethernet
frames, how to detect when the wire is in use by another card,
and how to detect and resolve collisions between two cards
trying to transmit at the same time.
One level up is the network layer. At this layer,
information is grouped into packets that consist of a header
containing the sender and recipient's address, and a payload
that consists of the actual data to send. Payloads are
typically in the range of 500 bytes to 1500 bytes. Internet
routers act at the IP layer by reading packet headers and
figuring out how to route them to their destinations. The main
protocol at this layer is the Internet Protocol, or IP.
The transport
layer is concerned with creating data packets and ensuring the
integrity of their contents. The two important protocols at
this layer are the Transmission Control Protocol (TCP), which
provides reliable connection-oriented communications, and the
User Datagram Protocol (UDP), which provides an unreliable
message-oriented service. These protocols are responsible for
getting the data to its destination. They don't care what is
actually inside the data
stream.
At the top of the stack is the application
layer, where the content of the data stream does matter. There
is an abundance of protocols at this level, including such
familiar and unfamiliar names as HTTP, FTP, SMTP, POP3, IMAP,
SNMP, XDMCP, and NNTP. These protocols specify, sometimes in
excruciating detail, how a client should contact a server,
what messages are allowed, and what information to exchange
with each message.
The combination of the network layer and the
transport layer is known as TCP/IP, named after the two major
protocols that operate at those layers.
Binary versus Text-Oriented
Protocols
Before they can exchange information across
the network, hosts have a fundamental choice to make. They can
exchange data either in binary form or as human-readable text.
The choice has far-reaching ramifications.
To understand this, consider exchanging the
number 1984. To exchange it as text, one host sends the other
the string 1984, which, in the common ASCII character
set, corresponds to the four hexadecimal bytes 0x31
0x39 0x38 0x34. These four bytes
will be transferred in order across the network, and (provided
the other host also speaks ASCII) will appear at the other end
as "1984".
However, 1984 can also be treated as a
number, in which case it can fit into the two-byte integer
represented in hexadecimal as 0x7C0. If this number
is already stored in the local host as a number, it seems
sensible to transfer it across the network in its native
two-byte form rather than convert it into its four-byte text
representation, transfer it, and convert it back into a
two-byte number at the other end. Not only does this save some
computation, but it uses only half as much network
capacity.
Unfortunately, there's a hitch. Different
computer architectures have different ways of storing integers
and floating point numbers. Some machines use two-byte
integers, others four-byte integers, and still others use
eight-byte integers. This is called word size. Furthermore,
computer architectures have two different conventions for
storing integers in memory. In some systems, called big-endian
architectures, the most significant part of the integer is
stored in the first byte of a two-byte integer. On such
systems, reading from low to high, 1984 is represented in
memory as the two bytes: 0x07 0xC0
low -> high
On little-endian architectures, this
convention is reversed, and 1984 is stored in the opposite
orientation: 0xC0 0x07
low -> high
These architectures are a matter of
convention, and neither has a significant advantage over the
other. The problem comes when transferring such data across
the network, because this byte pair has to be transferred
serially as two bytes. Data in memory is sent across the
network from low to high, so for big-endian machines the
number 1984 will be transferred as 0x07 0xC0, while
for little-endian machines the numbers will be sent in the
reverse order. As long as the machine at the other end has the
same native word size and byte order, these bytes will be
correctly interpreted as 1984 when they arrive. However, if
the recipient uses a different byte order, then the two bytes
will be interpreted in the wrong order, yielding hexadecimal
0xC007, or decimal 49,159. Even worse, if the
recipient interprets these bytes as the top half of a
four-byte integer, it will end up as 0xC0070000, or
3,221,684,224. Someone's anniversary party is going to be very
late.
Because of the potential for such binary
chaos, text-based protocols are the norm on the Internet. All
the common protocols convert numeric information into text
prior to transferring them, even though this can result in
more data being transferred across the net. Some protocols
even convert data that doesn't have a sensible text
representation, such as audio files, into a form that uses the
ASCII character set, because this is generally easier to work
with. By the same token, a great many protocols are
line-oriented, meaning that they accept commands and transmit
data in the form of discrete lines, each terminated by a
commonly agreed-upon newline sequence.
A few protocols, however, are binary.
Examples include Sun's Remote Procedure Call (RPC) system, and
the Napster peer-to-peer file exchange protocol. Such
protocols have to be exceptionally careful to represent binary
data in a common format. For integer numbers, there is a
commonly recognized network format. In network format, a
"short" integer is represented in two big-endian bytes, while
a "long" integer is represented with four big-endian bytes. As
we will see in Chapter
19, Perl's pack() and unpack ()
functions provide the ability to convert numbers into network
format and back again.
Floating point numbers and more complicated
things like data structures have no commonly accepted network
representation. When exchanging binary data, each protocol has
to work out its own way of representing such data in a
platform-neutral fashion.
We will stick to text-based protocols for
much of this book. However, to give you a taste for what it's
like to use a binary protocol, the UDP-based real-time chat
system in Chapters
19 and 20
exchanges platform-neutral binary messages.
|
Berkeley Sockets
Berkeley sockets are part of an application
programming interface (API) that specifies the data structures
and function calls that interact with the operating system's
network subsystem. The name derives from the origins of the
API in release 4.2 of the Berkeley Standard Distribution
(4.2BSD) of UNIX. Berkeley sockets act at the transport layer:
They help get the data where it's going, but have nothing to
say about the content of the data.
Berkeley sockets are part of an API, not a
specific protocol, which defines how the programmer interacts
with an idealized network. Although strongly associated with
the TCP/IP network protocol for which the API was first
designed, the Berkeley sockets API is generic enough to
support other types of network, such as Novell Netware,
Windows NT networking, and Appletalk.
Perl provides full support for Berkeley
sockets on most of the platforms it runs on. On certain
platforms such as the Windows and Macintosh ports, extension
modules also give you access to the non-Berkeley APIs native
to those machines. However, if you're interested in writing
portable applications you'll probably want to stick to the
Berkeley API.
The Anatomy of a Socket
A socket is an endpoint for communications, a
portal to the outside world that we can use to send outgoing
messages to other processes, and to receive incoming traffic
from processes interested in sending messages to us.
To create a socket, we need to provide the
system with a minimum of three pieces of information.
The Socket's Domain
The domain
defines the family of networking protocols and addressing
schemes that the socket will support. The domain is selected
from a small number of integer constants defined by the
operating system and exported by Perl's Socket module. There
are only two common domains (see Table
3.1).
AF_INET is used for TCP/IP
networking. Sockets in this domain use IP addresses and port
numbers as their addressing scheme (more on this later).
AF_UNIX is used only for interprocess communication
within a single host. Addresses in this domain are file
pathnames. The name AF_UNIX is unfairly
UNIX-specific; it's possible for non-UNIX systems to implement
it. For this reason, POSIX has tried to rename this constant
AF_LOCAL, although few systems have followed
suit.
Table 3.1. Common Socket
Domains
| AF_INET |
The Internet
protocols |
| AF_UNIX |
Networking within a
single host |
In addition to these domains, there are many
others including AF_APPLETALK, AF_IPX, and
AF_X25, each corresponding to a particular addressing
scheme. AF_INET6, corresponding to the long addresses
of TCP/IP version 6, will become important in the future, but
is not yet supported by Perl.
The AF_ prefix stands for "address
family." In addition, there is a series of "protocol family"
constants starting with the PF_ prefix. For example,
there is a PF_INET constant that corresponds to
AF_INET. These constants evaluate to the same value
and can, in fact, be used interchangeably. The distinction
between them is a historical artifact, and you'll find that
published code sometimes uses the one and sometimes the
other.
The Socket's Type
The socket type identifies the basic
properties of socket communications. As explained more fully
in the next section, sockets can be either a "stream" type, in
which case data is sent through a socket in a continuous
stream (like reading or writing to a file, for example), or a
"datagram" type, in which case data is sent and received in
discrete packages.
The type is controlled by an
operating-system-defined constant that evaluates to a small
integer. Common constants exported by Socket are shown in Table
3.2.
Table 3.2. Constants Exported by
Socket
| SOCK_STREAM
|
A continuous stream of
data |
| SOCK_DGRAM
|
Individual packets of
data |
| SOCK_RAW |
Access to internal
protocols and
interfaces |
Perl fully supports the SOCK_STREAM
and SOCK_DGRAM socket types. SOCK_RAW is
supported through an add-on module named Net::Raw.
The Socket's Protocol
For a given socket domain and type, there may
be one or several protocols that implement the desired
behavior. Like the domain and socket type, the protocol is a
small integer. However, the protocol numbers are not available
as constants, but instead must be looked up at run time using
the Perl getprotobyname()
function. Some of the protocols are listed in Table
3.3.
Table 3.3. Some Socket
Protocols
| tcp |
Transmission Control
Protocol for stream sockets |
| udp |
User Datagram Protocol
for datagram sockets |
| icmp |
Internet Control
Message Protocol |
| raw |
Creates IP packets
manually |
The TCP and UDP protocols are supported
directly by the Perl sockets API. You can get access to the
ICMP and raw protocols via the Net::ICMP and Net::Raw
third-party modules, but we do not discuss them in this book
(it would be possible, but probably not sensible, to
reimplement TCP in Perl using raw packets).
Generally there exists a single protocol to
support a given domain and type. When creating a socket, you
must be careful to set the domain and socket type to match the
protocol you've selected. The possible combinations are
summarized in Table
3.4.
Table 3.4. Allowed Combinations of
Socket Type and Protocol in the INET and UNIX
Domains
| AF_INET |
SOCK_STREAM
|
tcp |
| AF_INET |
SOCK_DGRAM
|
udp |
| AF_UNIX |
SOCK_STREAM
|
PF_UNSPEC
|
| AF_UNIX |
SOCK_DGRAM
|
PF_UNSPEC
|
The allowed combinations of socket domain,
type, and protocol are few. SOCK_STREAM goes with
TCP, and SOCK_DGRAM goes with UDP. Also notice that
the AF_UNIX address family doesn't use a named
protocol, but a pseudoprotocol named PF_UNSPEC (for
"unspecified").
The Perl object-oriented IO::Socket module
(discussed in Chapter
5) can fill in the correct socket type and protocol
automatically when provided with partial information.
Datagram Sockets
Datagram-type sockets provide for the
transmission of connectionless, unreliable, unsequenced
messages. The UDP is the chief datagram-style protocol used by
the Internet protocol family.
As the diagram in Figure
3.2 shows, datagram services resemble the postal system.
Like a letter or a telegram, each datagram in the system
carries its destination address, its return address, and a
certain amount of data. The Internet protocols will make the
best effort to get the datagram delivered to its
destination.
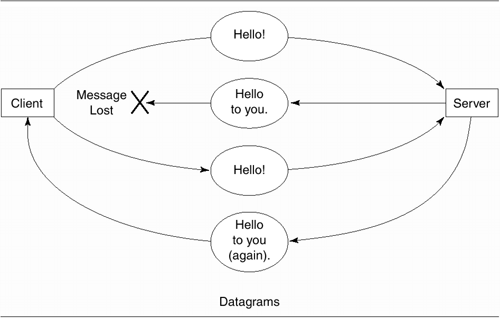
There is no long-term relationship between
the sending socket and the recipient socket: A client can send
a datagram off to one server, then immediately turn around and
send a datagram to another server using the same socket. But
the connectionless nature of UDP comes at a price. Like
certain countries' postal systems, it is very possible for a
datagram to get "lost in the mail." A client cannot know
whether a server has received its message until it receives an
acknowledgment in reply. Even then, it can't know for sure
that a message was lost, because the server might have
received the original message and the acknowledgment got
lost!
Datagrams are neither synchronized nor flow
controlled. If you send a set of datagrams out in a particular
order, they might not arrive in that order. Because of the
vagaries of the Internet, the first datagram may go by one
route, and the second one may take a different path. If the
second route is faster than the first one, the two datagrams
may arrive in the opposite order from which they were sent. It
is also possible for a datagram to get duplicated in transit,
resulting in the same message being received twice.
Because of the connectionless nature of
datagrams, there is no flow control between the sender and the
recipient. If the sender transmits datagrams faster than the
recipient can process them, the recipient has no way to signal
the sender to slow down, and will eventually start to discard
packets.
Although a datagram's delivery is not
reliable, its contents are. Modern implementations of UDP
provide each datagram with a checksum that ensures that its
data portion is not corrupted in transit.
Stream Sockets
The other major paradigm is stream sockets,
implemented in the Internet domain as the TCP protocol. Stream
sockets provide sequenced, reliable bidirectional
communications via byte-oriented streams. As depicted in Figure
3.3, stream sockets resemble a telephone conversation.
Clients connect to servers using their address, the two
exchange data for a period of time, and then one of the pair
breaks off the connection.

Reading and writing to stream sockets is a
lot like reading and writing to a file. There are no arbitrary
size limits or record boundaries, although you can impose a
record-oriented structure on the stream if you like. Because
stream sockets are sequenced and reliable, you can write a
series of bytes into a socket secure in the knowledge that
they will emerge at the other end in the correct order,
provided that they emerge at all ("reliable" does not mean
immune to network errors).
TCP also implements flow control. Unlike UDP,
where the danger of filling the data-receiving buffer is very
real, TCP automatically signals the sending host to suspend
transmission temporarily when the reading host is falling
behind, and to resume sending data when the reading host is
again ready. This flow control happens behind the scenes and
is ordinarily invisible.
If you have ever used the Perl
open(FH, " | command ") syntax to open up a
pipe to an external program, you will find that working with
stream sockets is not much different. The major visible
difference is that, unlike pipes, stream sockets are
bidirectional.
Although it looks and acts like a continuous
byte stream, the TCP protocol is actually implemented on top
of a datagram-style service, in this case the low-level IP
protocol. IP packets are just as unreliable as UDP datagrams,
so behind the scenes TCP is responsible for keeping track of
packet sequence numbers, acknowledging received packets, and
retransmitting lost packets.
Datagram versus Stream Sockets
With all its reliability problems, you might
wonder why anyone uses UDP. The answer is that most
client/server programs on the Internet use TCP stream sockets
instead. In most cases, TCP is the right solution for you,
too.
There are some circumstances, however, in
which UDP might be a better choice. For example, time servers
use UDP datagrams to transmit the time of day to clients who
use the information for clock synchronization. If a datagram
disappears in transit, it's neither necessary nor desirable to
retransmit it because by the time it arrives it will no longer
be relevant.
UDP is also preferred when the interaction
between one host and the other is very short. The length of
time to set up and take down a TCP connection is about
eightfold greater than the exchange of a single byte of data
via UDP (for details, see [Stevens 1996]). If relatively small
amounts of data are being exchanged, the TCP setup time will
dominate performance. Even after a TCP connection is
established, each transmitted byte consumes more bandwidth
than UDP because of the additional overhead for ensuring
reliability.
Another common scenario occurs when a host
must send the same data to many places; for example, it wants
to transmit a video stream to multiple viewers. The overhead
to set up and manage a large number of TCP connections can
quickly exhaust operating system resources, because a
different socket must be used for each connection. In
contrast, sending a series of UDP datagrams is much more
sparing of resources. The same socket can be reused to send
datagrams to many hosts.
Whereas TCP is always a one-to-one
connection, UDP also allows one-to-many and many-to-many
transmissions. At one end of the spectrum, you can address a
UDP datagram to the "broadcast address," broadcasting a
message to all listening hosts on the local area network. At
the other end of the spectrum, you can target a message to a
predefined group of hosts using the "multicast" facility of
modern IP implementations. These advanced features are covered
in Chapters
20 and 21.
The Internet's DNS is a common example of a
UDP-based service. It is responsible for translating hostnames
into IP addresses, and vice versa, using a loose-knit network
of DNS servers. If a client does not get a response from a DNS
server, it just retransmits its request. The overhead of an
occasional lost datagram outweighs the overhead of setting up
a new TCP connection for each request. Other common examples
of UDP services include Sun's Network File System (NFS) and
the Trivial File Transfer Protocol (TFTP). The latter is used
by diskless workstations during boot in order to load their
operating system over the network. UDP was originally chosen
for this purpose because its implementation is relatively
small. Therefore, UDP fit more easily into the limited ROM
space available to workstations at the time the protocol was
designed.
The TCP/IP protocol suite is described well
in [Stevens 1994, Wright and Stevens 1995, and Stevens 1996],
as well as in RFC 1180, A TCP/IP
Tutorial .
|
Socket Addressing
In order for one process to talk to another,
each of them has to know the other's address. Each networking
domain has a different concept of what an address is. For the
UNIX domain, which can be used only between two processes on
the same host machine, addresses are simply paths on the
host's filesystem, such as /usr/tmp/log. For the
Internet domain, each socket address has three parts: the IP
address, the port, and the protocol.
IP Addresses
In the currently deployed version of TCP/IP,
IPv4, the IP address is a 32-bit number used to identify a
network interface on the host machine. A series of subnetworks
and routing tables enables any machine on the Internet to send
packets to any other machine based on its IP address.
For readability, the four bytes of a
machine's IP address are usually spelled out as a series of
four decimal digits separated by dots to create the "dotted
quad address" that network administrators have come to know
and love. For example, 143.48.7.1 is the IP address of one of
the servers at my workplace. Expressed as a 32-bit number in
the hexadecimal system, this address is 0x8f3071.
Many of Perl's networking calls require you
to work with IP addresses in the form of packed binary
strings. IP addresses can be converted manually to binary
format and back again using pack() and
unpack() with a template of "C4" (four unsigned
characters). For example, here's how to convert 18.157.0.125
into its packed form and then reverse the process: ($a,$b,$c,$d) = split /\./, '18.157.0.125';
$packed_ip_address = pack 'C4',$a,$b,$c,$d;
($a,$b,$c,$d) = unpack 'C4',$packed_ip_address;
$dotted_ip_address = join '.', $a,$b,$c,$d;
You usually won't have to do this, however,
because Perl provides convenient high-level functions to
handle this conversion for you.
Most hosts have two addresses, the "loopback"
address 127.0.0.1 (often known by its symbolic name
"localhost") and its public Internet address. The loopback
address is associated with a device that loops transmissions
back onto itself, allowing a client on the host to make an
outgoing connection to a server running on the same host.
Although this sounds a bit pointless, it is a powerful
technique for application development, because it means that
you can develop and test software on the local machine without
access to the network.
The public Internet address is associated
with the host's network interface card, such as an Ethernet
card. The address is either assigned to the host by the
network administrator or, in systems with dynamic host
addressing, by a Boot Protocol (BOOTP) or Dynamic Host
Configuration Protocol (DHCP) server. If a host has multiple
network interfaces installed, each one can have a distinct IP
address. It's also possible for a single interface to be
configured to use several addresses. Chapter
21 discusses IO::Interface, a third-party Perl module that
allows a Perl script to examine and alter the IP addresses
assigned to its interface cards.
Reserved IP Addresses, Subnets, and
Netmasks
In order for a packet of information to
travel from one location to another across the Internet, it
must hop across a series of physical networks. For example, a
packet leaving your desktop computer must travel across your
LAN (local area network) to a modem or router, then across
your Internet service provider's (ISP) regional network, then
across a backbone to another ISP's regional network, and
finally to its destination machine.
Network routers keep track of how the
networks interconnect, and are responsible for determining the
most efficient route to get a packet from point A to point B.
However, if IP addresses were allocated ad hoc, this task
would not be feasible because each router would have to
maintain a map showing the locations of all IP addresses.
Instead, IP addresses are allocated in contiguous chunks for
use in organizational and regional networks.
For example, my employer, the Cold Spring
Harbor Laboratory (CSHL), owns the block of IP addresses that
range from 143.48.0.0 through 143.48.255.255 (this is a
so-called class B address). When a backbone router sees a
packet addressed to an IP address in this range, it needs only
to determine how to get the packet into CSHL's network. It is
then the responsibility of CSHL's routers to get the packet to
its destination. In practice, CSHL and other large
organizations split their allocated address ranges into
several subnets and use routers to interconnect the parts.
A computer that is sending out an IP packet
must determine whether the destination machine is directly
reachable (e.g., over the Ethernet) or whether the packet must
be directed to a router that interconnects the local network
to more distant locations. The basic decision is whether the
packet is part of the local network or part of a distant
network.
To make this decision possible, IP addresses
are arbitrarily split into a host part and a network part. For
example, in CSHL's network, the split occurs after the second
byte: the network part is 143.48. and the host part is the
rest. So 143.48.0.0 is the first address in CSHL's network,
and 143.48.255.255 is the last.
To describe where the network/host split
occurs for routing purposes, networks use a netmask, which is
a bitmask with 1s in the positions of the network part of the
IP address. Like the IP address itself, the netmask is usually
written in dotted-quad form. Continuing with our example, CSHL
has a netmask of 255.255.0.0, which, when written in binary,
is 11111111,11111111,00000000,00000000.
Historically, IP networks were divided into
three classes on the basis of their netmasks (Table
3.5). Class A networks have a netmask of 255.0.0.0 and
approximately 16 million hosts. Class B networks have a
netmask of 255.255.0.0 and some 65,000 hosts, and class C
networks use the netmask 255.255.255.0 and support 254 hosts
(as we will see, the first and last host numbers in a network
range are unavailable for use as a normal host address).
Table 3.5. Address Classes and Their
Netmasks
| A |
255.0.0.0 |
120.155.32.5 |
120. |
155.32.5 |
| B |
255.255.0.0 |
128.157.32.5 |
128.157. |
32.5 |
| C |
255.255.255.0 |
192.66.12.56 |
192.66.12. |
56 |
As the Internet has become more crowded,
however, networks have had to be split up in more flexible
ways. It's common now to see netmasks that don't end at byte
boundaries. For example, the netmask 255.255.255.128 (binary
11111111,11111111,11111111,10000000) splits the last byte in
half, creating a set of 126-host networks. The modern Internet
routes packets based on this more flexible scheme, called
Classless Inter-Domain Routing (CIDR). CIDR uses a concise
convention to describe networks in which the network address
is followed by a slash and an integer containing the number of
1s in the mask. For example, CSHL's network is described by
the CIDR address 143.48.0.0/16. CIDR is described in detail in
RFCs 1517 through 1520, and in the FAQs listed in Appendix
D.
Figuring out the network and broadcast
addresses can be confusing when you work with netmasks that do
not end at byte boundaries. The Net::Netmask module, available
on CPAN, provides facilities for calculating these values in
an intuitive way. You'll also find a short module that I
wrote, Net::NetmaskLite, in Appendix A. You might want to
peruse this code in order to learn the relationships among the
network address, broadcast address, and netmask.
The first and last addresses in a subnet have
special significance and cannot be used as ordinary host
addresses. The first address, sometimes known as the
all-zeroes address, is reserved for use in routing tables to
denote the network as a whole. The last address in the range,
known as the all-ones address, is reserved for use as the
broadcast address. IP packets sent to this address will be
received by all hosts on the subnet. For example, for the
network 192.18.4.x (a class C address or 192.18.4.0/24 in CIDR
format), the network address is 192.18.4.0 and the broadcast
address is 192.18.4.255. We will discuss broadcasting in
detail in Chapter
20.
In addition, several IP address ranges have
been set aside for special purposes (Table
3.6). The class A network 10.x.x.x, the 16 class B
networks 172.16.x.x through 172.31.x.x, and the 255 class C
addresses 192.168.0.x through 192.168.255.x are reserved for
use as internal networks. An organization may use any of these
networks internally, but must not connect the network directly
to the Internet. The 192.168.x.x networks are used frequently
in testing, or placed behind firewall systems that translate
all the internal network addresses into a single public IP
address. The network addresses 224.x.x.x through 239.x.x.x are
reserved for multicasting applications (Chapter
21), and everything above 240.x.x.x is reserved for future
expansion.
Table 3.6. Reserved IP
Addresses
| 127.0.0.x |
Loopback
interface |
| 10.x.x.x |
Private class A
address |
| 172.16.x.x172.32.x.x |
Private class B
addresses |
| 192.168.0.x172.168.255.x |
Private class C
addresses |
Finally, IP address 127.0.0.x is reserved for
use as the loopback network. Anything sent to an address in
this range is received by the local host.
IPv6
Although there are more than 4 billion
possible IPv4 addresses, the presence of several large
reserved ranges and the way the addresses are allocated into
subnetworks reduces the effective number of addresses
considerably. This, coupled with the recent explosion in
network-connected devices, means that the Internet is rapidly
running out of IP addresses. The crisis has been forestalled
for now by various dynamic host-addressing and
address-translation techniques that share a pool of IP
addresses among a larger set of hosts. However, the new drive
to put toaster ovens, television set-top boxes, and cell
phones on the Internet is again threatening to exhaust the
address space.
This is one of the major justifications for
the new version of TCP/IP, known as IPv6, which expands the IP
address space from 4 to 16 bytes. IPv6 is being deployed on
the Internet backbones now, but this change will not
immediately affect local area networks, which will continue to
use addresses backwardly compatible with IPv4. Perl has not
yet been updated to support IPv6, but will undoubtedly do so
by the time that IPv6 is widely implemented.
More information about IPv6 can be found in
[Stevens 1996] and [Hunt 1998 ].
Network Ports
Once a message reaches its destination IP
address, there's still the matter of finding the correct
program to deliver it to. It's common for a host to be running
multiple network servers, and it would be impractical, not to
say confusing, to deliver the same message to them all. That's
where the port number comes in. The port number part of the
socket address is an unsigned 16-bit number ranging from 1 to
65535. In addition to its IP address, each active socket on a
host is identified by a unique port number; this allows
messages to be delivered unambiguously to the correct program.
When a program creates a socket, it may ask the operating
system to associate a port with the socket. If the port is not
being used, the operating system will grant this request, and
will refuse other programs access to the port until the port
is no longer in use. If the program doesn't specifically
request a port, one will be assigned to it from the pool of
unused port numbers.
There are actually two sets of port numbers,
one for use by TCP sockets, and the other for use by UDP-based
programs. It is perfectly all right for two programs to be
using the same port number provided that one is using it for
TCP and the other for UDP.
Not all port numbers are created equal. The
ports in the range 0 through 1023 are reserved for the use of
"well-known" services, which are assigned and maintained by
ICANN, the Internet Corporation for Assigned Names and
Numbers. For example, TCP port 80 is reserved for use for the
HTTP used by Web servers, TCP port 25 is used for the SMTP
used by e-mail transport agents, and UDP port 53 is used for
the domain name service (DNS). Because these ports are well
known, you can be pretty certain that a Web server running on
a remote machine will be listening on port 80. On UNIX
systems, only the root user (i.e., the superuser) is allowed
to create a socket using a reserved port. This is partly to
prevent unprivileged users on the system inadvertently running
code that will interfere with the operations of the host's
network services.
A list of reserved ports and their associated
well-known services is given in Appendix C. Most services are
either TCP- or UDP-based, but some can communicate with both
protocols. In the interest of future compatibility, ICANN
usually reserves both the UDP and TCP ports for each service.
However, there are many exceptions to this rule. For example,
TCP port 514 is used on UNIX systems for remote shell (login)
services, while UDP port 514 is used for the system logging
daemon.
In some versions of UNIX, the high-numbered
ports in the range 49152 through 65535 are reserved by the
operating system for use as "ephemeral" ports to be assigned
automatically to outgoing TCP/IP connections when a port
number hasn't been explicitly requested. The remaining ports,
those in the range 1024 through 49151, are free for use in
your own applications, provided that some other service has
not already claimed them. It is a good idea to check the ports
in use on your machine by using one of the network tools
introduced later in this chapter (Network Analysis Tools)
before claiming one.
The sockaddr_in
Structure
A socket address is the combination of the
host address and the port, packed together in a binary
structure called a sockaddr_in.
This corresponds to a C structure of the same name that is
used internally to call the system networking routines. (By
analogy, UNIX domain sockets use a packed structure called a
sockaddr_un.) Functions
provided by the standard Perl Socket module allow you to
create and manipulate sockaddr_in structures easily:
|
$packed_address =
inet_aton($dotted_quad)
Given an IP address in dotted-quad
form, this function packs it into binary form suitable
for use by sockaddr_in(). The function will
also operate on symbolic hostnames. If the hostname
cannot be looked up, it returns undef.
$dotted_quad
= inet_ntoa($packed_address)
This function takes a packed IP address
and converts it into human-readable dotted-quad form. It
does not attempt
to translate IP addresses into hostnames. You can
achieve this effect by using gethostbyaddr(),
discussed later.
$socket_addr
= sockaddr_in($port,$address)
($port,$address) =
sockaddr_in($socket_addr)
When called in a scalar context,
sockaddr_in() takes a port number and a binary
IP address and packs them together into a socket
address, suitable for use by socket(). When
called in a list context, sockaddr_in() does
the opposite, translating a socket address into the port
and IP address. The IP address must still be passed
through inet_ntoa() to obtain a human-readable
string.
$socket_addr
= pack_sockaddr_in($port,$address)
($port,$address) =
unpack_sockaddr_in($socket_addr)
If you don't like the confusing
behavior of sockaddr_in(), you can use these
two functions to pack and unpack socket addresses in a
context-insensitive manner. |
We'll use several of these functions in the
example that follows in the next section.
In some references, you'll see a socket's
address referred to as its "name." Don't let this confuse you.
A socket's address and its name are one and the same.
|
A Simple Network Client
To put this information into context, we'll
now write a client for the daytime service. This service,
which runs on many UNIX hosts, listens for incoming
connections on TCP port 13. When it sees such a connection, it
outputs a single line of text with the current time and
date.
The script gets the dotted IP address of the
daytime server from the command line. When we run it on
64.7.3.43, which is the IP address of the wuarchive.wustl.edu software
archive, we get output like this: % daytime_cli.pl 64.7.3.43
Sat Jan 6 19:11:22 2001
Figure
3.4 shows the code for the daytime client.
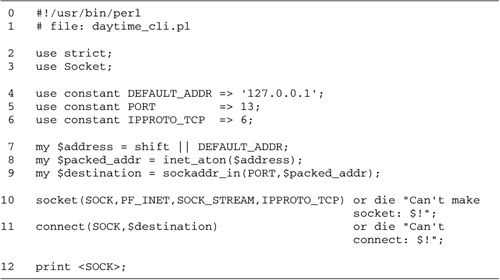
Lines 13: Load modules We turn on
strict type checking with use
strict. This will avoid bugs introduced by mistyped
variable names, the automatic interpretation of bare words
as strings, and other common mistakes. We then load the
Socket module, which imports several functions useful for
socket programming.
Lines 46: Define constants We now
define several constants. DEFAULT_ADDR is the IP
address of a remote host to contact when an address isn't
explicitly provided on the command line. We use 127.0.0.1,
the loopback address.
PORT is the well-known port for
the daytime service, port 13, while IPPROTO_TCP is
the numeric protocol for the TCP protocol, needed to
construct the socket.
It's inelegant to hard code these
constants, and in the case of IPPROTO_TCP may
impede portability. The next section shows how to look up
these values at run time using symbolic names.
Lines 79: Construct the destination
address The next part of the code constructs a
destination address for the socket using the IP address of
the daytime host and the port number of the daytime service.
We begin by recovering the dotted-quad address from the
command line or, if no address was specified, we default to
the loopback address.
We now have an IP address in string form,
but we need to convert it into packed binary form before
passing it to the socket creation function. We do this by
using the inet_aton() function, described
earlier.
The last step in constructing the
destination address is to create the sockaddr_in structure,
which combines the IP address with the port number. We do
this by calling the sockaddr_in() function with the
port number and packed IP address.
Line 10: Create the socket The
socket() function creates the communications
endpoint. The function takes four arguments. The first
argument, SOCK, is the filehandle name to use for
the socket. Sockets look and act like filehandles, and like
them are capitalized by convention. The remaining arguments
are the address family, the socket type, and the protocol
number. With the exception of the protocol, which we have
hard-coded, all constants are taken from the socket module.
This call to socket() creates a
stream-style Internet-domain socket that uses the TCP
protocol.
Line 11: Connect to the remote host
SOCK corresponds to the local communications
endpoint. We now need to connect it to the remote socket. We
do this using the built-in Perl function connect(),
passing it the socket handle and the remote address that we
built earlier. If connect() is successful, it will
return a true value. Otherwise, we again die with an error
message.
Line 12: Read data from remote host and
print it We can now treat SOCK like a
read/write filehandle, either reading data transmitted from
the remote host with the read() or
<> functions, or sending data to the host
using print(). In this case, we use the angle
bracket operator (<>) to read all lines
transmitted by the remote host and immediately echo the data
to standard output.
We discuss the socket() and
connect () calls in more detail in Chapter
4.
|
Network Names and Services
The example in the last section used the
remote host's dotted-quad IP address and numeric port and
protocol numbers to construct the socket. Usually, however,
you'll want to use symbolic names instead of numbers. Not only
does this make it easier to write the program, but it makes it
easier for end users to use it, allowing them to enter the
host address as wuarchive.wustl.edu rather than
128.252.120.8.
The domain name system (DNS) is an
Internet-wide database that translates hostnames into dotted
IP addresses and back again. Various local database services
translate from service names into numbers. This section
introduces the functions that allow you to translate names
into numbers, and vice versa.
Translating Hostnames into IP
Addresses
Perl's gethostbyname() and
gethostbyaddr() functions translate a symbolic
hostname into a packed IP address, and vice versa. They are
front ends to system library calls of the same name. Depending
on your system's name-resolution setup, the call will consult
one or more static text files such as /etc/hosts, local area network
databases such as NIS, or the Internet-wide DNS.
|
($name,$aliases,$type,$len,$packed_addr)
= gethostbyname($name);
$packed_addr
= gethostbyname($name);
If the hostname doesn't exist,
gethostbyname() returns undef.
Otherwise, in a scalar context it returns the IP address
of the host in packed binary form, while in a list
context it returns a five-element list.
The first element, $name, is
the canonical hostnamethe official namefor the
requested host. This is followed by a list of hostname
aliases, the address type and address length, usually
AF_INET and 4, and the address itself in packed
form. The aliases field is a space-delimited list of
alternative names for the host. If there are no
alternative names, the list is empty.
You can pass the packed address
returned by gethostbyname() directly to the
socket functions, or translate it back a human-readable
dotted-quad form using inet_ntoa(). If you pass
gethostbyname() a dotted-quad IP address, it
will detect that fact and return the packed version of
the address, just as inet_aton() does.
$name =
gethostbyaddr($packed_addr,$family);
($name,$aliases,$type,$len,$packed_addr)
= gethostbyaddr($packed_addr, $family);
The gethostbyaddr() call
performs the reverse lookup, taking a packed IP address
and returning the hostname corresponding to it.
gethostbyaddr() takes two
arguments, the packed address and the address family
(usually AF_INET). In a scalar context, it
returns the hostname of the indicated address. In a list
context, it returns a five-element list consisting of
the canonical hostname, a list of aliases, the address
type, address length, and packed address. This is the
same list returned by
gethostbyname(literal).
If the call is unsuccessful in looking
up the address, it returns undef or an empty
list. |
The inet_aton() function can also
translate hostnames into packed IP addresses. In general, you
can replace scalar context calls to gethostbyname()
with calls to inet_aton(): $packed_address = inet_aton($host);
$packed_address = gethostbyname($host);
Which of these two functions you use is a
matter of taste, but be aware that gethostbyname() is
built into Perl, but inet_aton() is available only
after you load the socket module. I prefer
inet_aton() because, unlike gethostbyname(),
it isn't sensitive to list context.
Hostname Translation Examples
Using these functions, we can write a simple
program to translate a list of hostnames into dotted-quad IP
addresses (Figure
3.5). Given a file of hostnames stored in hostnames.txt, the script's output
looks like this:
% ip_trans.pl < hostnames.txt
 pesto.cshl.org => 143.48.7.220
 w3.org => 18.23.0.20
 foo.bar.com => ?
 ntp.css.gov => 140.162.3
Figure
3.6 shows a short program for performing the reverse
operation, translating a list of dotted-quad IP addresses into
hostnames. For each line of input, the program checks that it
looks like a valid IP address (line 6) and, if so, packs the
address using inet_aton(). The packed address is then
passed to gethostbyaddr(), specifying
AF_INET for the address family (line 7). If
successful, the translated hostname is printed out.
Getting Information about Protocols
and Services
In the same way that gethostbyname()
and gethostbyaddr() interconvert hostnames and IP
addresses, Perl provides functions to translate the symbolic
names of protocols and services into protocol and port
numbers.
|
$number =
getprotobyname($protocol)
($name,$aliases,$number) =
getprotobyname($protocol)
getprotobyname() takes a
symbolic protocol name, such as "udp", and converts it
into its corresponding numeric value. In a scalar
context, just the protocol number is returned. In a list
context, the function returns the protocol name, a list
of aliases, and the number. Multiple aliases are
separated by spaces. If the named protocol is unknown,
the function returns undef or an empty list.
$name =
getprotobynumber($protocol_number)
($name,$aliases,$number) =
getprotobyname($protocol_number)
The rarely used
getprotobynumber() function reverses the
previous operation, translating a protocol number into a
protocol name. In a scalar context, it returns the
protocol number's name as a string. In a list context,
it returns the same list as getprotobyname().
If passed an invalid protocol number, this function
returns undef or an empty list.
$port =
getservbyname($service,$protocol)
($name,$aliases,$port,$protocol) =
getservbyname($service,$protocol)
The getservbyname() function
converts a symbolic service name, such as "echo," into a
port number suitable for passing to
sockaddr_in(). The function takes two arguments
corresponding to the service name and the desired
protocol. The reason for the additional protocol
argument is that some services, echo included, come in
both UDP and TCP versions, and there's no guarantee that
the two versions of the service use the same port
number, although this is almost always the case.
In a scalar context,
getservbyname() returns the port number of the
service, or undef if unknown. In a list context, the
function returns a four-element list consisting of the
canonical name for the service, a space-delimited list
of aliases, if any, the port number, and the protocol
number. If the service is unknown, the function returns
an empty list.
$name =
getservbyport($port,$protocol)
($name,$aliases,$port,$protocol) =
getservbyport($port,$protocol)
The getservbyport() function
reverses the previous operation by translating a port
number into the corresponding service name. Its behavior
in scalar and list contexts is exactly the same as
getservbyname(). |
Daytime Client, Revisited
We now have the tools to eliminate the
hard-coded port and protocol numbers from the daytime client
that we developed earlier. In addition, we can make the
program more user friendly by accepting the name of the
daytime host as either a DNS name or a dotted-IP address. Figure
3.7 gives the code for the revised client. The differences
from the earlier version are as follows:
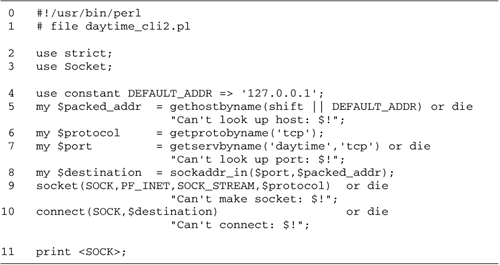
Line 5: Look up IP address of the
daytime host We call gethostbyname() to
translate the hostname given on the command line into a
packed IP address. If no command-line argument is given, we
default to using the loopback address. If the user provided
a dotted-IP address instead of a hostname, then
gethostbyname() simply packs it in the manner of
inet_aton(). If gethostbyname() fails
because the provided hostname is invalid, it returns
undef and we exit with an error message.
Line 6: Look up the TCP protocol
number We call getprotobyname() to retrieve the
value of the TCP protocol number, rather than hard coding it
as before.
Line 7: Look up the daytime service port
number Instead of hard coding the port number for the
daytime service, we call getservbyname() to look it
up in the system service database. If for some reason this
doesn't work, we exit with an error message.
Lines 811: Connect and read data
The remainder of the program is as before, with the
exception that we use the TCP protocol number retrieved from
getprotobyname() in the call to socket().
You can test the script on the host http://www.modperl.com/
Other Sources of Network
Information
In addition to gethostbyname() and
its brethren, specialized add-on modules offer direct access
to a number of other common databases of network information.
I won't cover them in detail here, but you should know that
they exist if you need them. All the modules can be obtained
from CPAN.
Net::DNS
This module offers you much greater control
over how hostnames are resolved using the domain name system.
In addition to the functionality offered by
gethostbyname() and gethostbyaddr(),
Net::DNS allows you to fetch and iterate over all hosts in a
domain; get the e-mail address of the network administrator
responsible for the domain; and look up the machine
responsible for accepting e-mail for a domain (the "mail
exchanger," or MX).
Net::NIS
Many traditional UNIX networks use Sun's
Network Information System (NIS) to distribute such things as
hostnames, IP addresses, usernames, passwords, automount
tables, and cryptographic keys. This allows a user to have the
same login username, password, and home directories on all the
machines on the network. Perl's built-in network information
access functions, such as gethostbyname() and
getpwnam(), provide transparent access to much, but
not all, of NIS's functionality. The Net::NIS module provides
access to more esoteric information, such as automount
tables.
Net::LDAP
NIS is slowly being displaced by the
Lightweight Directory Access Protocol (LDAP), which provides
greater flexibility and scalability. In addition to the types
of information stored by NIS, LDAP is often used to store
users' e-mail addresses, telephone numbers, and other "white
pages"type information. Net::LDAP gives you access to these
databases.
Win32::NetResource
On Windows networks, the NT domain controller
provides directory information on hosts, printers, shared file
systems, and other network information. Win32::NetResources
provides functions for reading and writing this
information.
|
Network Analysis Tools
This section lists some of the basic tools
for analyzing networks and diagnosing network-related
problems. Some of these tools come preinstalled on many
systems; others must be downloaded and installed. For more
information on using these tools, please see the comprehensive
discussion of network configuration and troubleshooting in
[Hunt 1998].
ping
The ping
utility, available as a preinstalled utility on all UNIX and
Windows machines, is the single most useful network utility.
It sends a series of ICMP "ping" messages to the remote IP
address of your choice, and reports the number of responses
the remote machine returns.
ping can be
used to test if a remote machine is up and reachable across
the network. It can also be used to test network conditions by
looking at the length of time between the outgoing ping and
the incoming response, and the number of pings that have no
response (due to either loss of the outgoing message or the
incoming response).
For example, this is how ping can be used to test connectivity
to the machine at IP address 216.32.74.55 (which happens to be
www.yahoo.com): % ping 216.32.74.55
PING 216.32.74.55: 56 data bytes
64 bytes from 216.32.74.55: icmp_seq=0 ttl=245 time=41.1 ms
64 bytes from 216.32.74.55: icmp_seq=1 ttl=245 time=16.4 ms
64 bytes from 216.32.74.55: icmp_seq=2 ttl=245 time=16.3 ms
^C
--- 216.32.74.55 ping statistics ---
4 packets transmitted, 3 packets received, 25% packet loss
round-trip min/avg/max = 16.3/24.6/41.1 ms
This session shows good connectivity. The
average response time is a snappy 24 ms, and no packets were
lost. You can also give ping a
DNS name, in which case it will attempt to resolve the name
before pinging the host.
One thing to watch for is that some firewall
systems are configured to block ping. In this case, the destination
machine may be unpingable, although you can reach it via
telnet or other means.
There are many variants of ping, each with a different
overlapping set of features.
nslookup
The nslookup
utility, available on most UNIX systems, can be used to test
and verify the DNS. It can be used interactively or as a
one-shot command-line tool. To use it from the command line,
call it with the DNS name of the host or domain you wish to
look up. It will perform the DNS search, and return IP
addresses and other DNS information corresponding to the name.
For example: % nslookup www.yahoo.com
Server: presto.lsjs.org
Address: 64.7.3.44
Non-authoritative answer:
Name: www.yahoo.akadns.net
Addresses: 204.71.200.67, 204.71.200.68, 204.71.202.160, 204.71.200.74, 204.71.200.75
Aliases: www.yahoo.com
This tells us that the host
www.yahoo.com has a canonical name of
www.yahoo.akadns.net, and has five IP addresses
assigned to it. This is typical of a heavily loaded Web
server, where multiple physical machines balance incoming
requests by servicing them in a round-robin fashion.
traceroute
While ping
tells you only whether a packet can get from A to B,
the traceroute program
displays the exact path a network packet takes to get there.
Call it with the IP address of the destination. Each line of
the response gives the address of a router along the way. For
example: % traceroute www.yahoo.com
traceroute to www.yahoo.akadns.net (216.32.74.52), 30 hops max, 40 byte packets
1 gw.lsjs.org (192.168.3.1) 2.52 ms 8.78 ms 4.85 ms
2 64.7.3.46 (64.7.3.46) 9.7 ms 9.656 ms 3.415 ms
3 mgp-gw.nyc.megapath.net (64.7.2.1) 19.118 ms 23.619 ms 16.601 ms
4 216.35.48.242 (216.35.48.242) 10.532 ms 10.515 ms 11.368 ms
5 dcr03-g2-0.jrcy01.exodus.net (216.32.222.121) 9.068 ms 9.369 ms 9.08 ms
6 bbr02-g4-0.jrcy01.exodus.net (209.67.45.126) 9.522 ms 11.091 ms 10.212 ms
7 bbr01-p5-0.stng01.exodus.net (209.185.9.98) 15.516 ms 15.118 ms 15.227 ms
8 dcr03-g9-0.stng01.exodus.net (216.33.96.145) 15.497 ms 15.448 ms 15.462 ms
9 csr22-ve242.stng01.exodus.net (216.33.98.19) 16.044 ms 15.724 ms 16.454 ms
10 216.35.210.126 (216.35.210.126) 15.954 ms 15.537 ms 15.644 ms
11 www3.dcx.yahoo.com (216.32.74.52) 15.644 ms 15.582 ms 15.577 ms
traceroute can
be invaluable for locating a network outage when a host can no
longer be pinged. The listing will stop without reaching the
desired destination, and the last item on the list indicates
the point beyond which the breakage is occurring.
As with ping,
some firewalls can interfere with traceroute. Traceroute is
preinstalled on most UNIX systems.
netstat
The netstat
utility, preinstalled on UNIX and Windows NT/2000
systems, prints a snapshot of all active network services and
connections. For example, running netstat on an active Web and FTP
server produces the following display (abbreviated for
space): % netstat -t
Active Internet connections (w/o servers)
Proto Recv-Q Send-Q Local Address Foreign Address State
tcp 0 0 brie.cshl.org:www writer.loci.wisc.e:1402 ESTABLISHED
tcp 0 0 brie.cshl.org:www 157-238-71-168.il.:1215 FIN_WAIT2
tcp 0 0 brie.cshl.org:www 157-238-71-168.il.:1214 FIN_WAIT2
tcp 0 0 brie.cshl.org:www 157-238-71-168.il.:1213 TIME_WAIT
tcp 0 0 brie.cshl.org:6010 brie.cshl.org:2225 ESTABLISHED
tcp 0 0 brie.cshl.org:2225 brie.cshl.org:6010 ESTABLISHED
tcp 0 2660 brie.cshl.org:ssh presto.lsjs.org:64080 ESTABLISHED
tcp 0 0 brie.cshl.org:www 206.169.243.7:1724 TIME_WAIT
tcp 0 20 brie.cshl.org:ftp usr25-wok.cableine:2173 ESTABLISHED
tcp 0 891 brie.cshl.org:www usr25-wok.cableine:2117 FIN_WAIT1
tcp 0 80 brie.cshl.org:ftp soa.sanger.ac.uk:49596 CLOSE
The -t
argument restricts the display to TCP connections. The
Recv-Q and Send-Q columns show the
number of bytes in the sockets' read and write buffers,
respectively. The Local
and Foreign Address
columns show the name and port numbers of the local and
remote peers, respectively, and the State column shows the
current state of the connection.
netstat can
also be used to show services that are waiting for incoming
connections, as well as UDP and UNIX-domain sockets. The netstat syntax on Windows systems is
slightly different. To get a list of TCP connections similar
to the one shown above, use the command netstat -p tcp.
tcpdump
The tcpdump
utility, available preinstalled on many versions of
UNIX, is a packet sniffer. It can be used to dump the contents
of every packet passing by your network card, including those
not directed to your machine. It features a powerful filter
language that can be used to detect and display just those
packets you are interested in, such as those using a
particular protocol or directed toward a specific port.
MacTCP Watcher
MacTCP Watcher
for the Macintosh combines the functionality of ping, dnslookup, and netstat into one user-friendly
application. It can be found by searching the large shareware
collection located at http://www.shareware.com/
scanner.exe
For Windows 98/NT/2000 developers, the small
scanner.exe utility, also
available from http://www.shareware.com/ , combines the
functionality of ping and dnslookup with the ability to scan a
remote host for open ports. It can be used to determine the
services a remote host provides.
net-toolbox.exe
This is a comprehensive set of Windows
network utilities that include ping, dnslookup, tcpdump, and netstat functionality. It can be
found by anonymous FTP to gatekeeper.dec.com in the directory
/pub/micro/pc/winsite/win95/netutil/.
|
Chapter 4. The TCP Protocol
In this chapter we look at TCP, a reliable,
connection-oriented byte-stream protocol. These features make
working with TCP sockets similar to working with familiar
filehandles and pipes. After opening a TCP socket, you can
send data through it using print() or
syswrite(), and read from it using <>,
read(), or sysread().
|
A TCP Echo Client
We'll start by developing a small TCP client
that is more sophisticated than the examples we looked at in
the previous chapter. By and large, clients are responsible
for actively initiating their connection to a remote service.
We have already seen the outlines of this process in Chapter
3. To review, a TCP client takes the following
steps:
-
Call socket() to create a socket
Using the socket() function, the client creates a
stream-type socket in the INET (Internet) domain
using the TCP protocol.
-
Call connect() to connect to the
peer Using connect(), the client constructs the
desired destination address and connects the socket to it.
-
Perform I/O on the socket The client
calls Perl's various input and output operations to
communicate over the socket.
-
Close the socket When the client is
done with I/O, it can close the socket with
close().
Our example application is a simple client
for the TCP "echo" service. This service, run by default on
many UNIX hosts, is simple. It waits for an incoming
connection, accepts it, and then echoes every byte that it
receives, rather like an annoying child. This continues until
the client closes the connection.
If you want to try the example script and
have no echo server of your own handy, there is an echo server
running on wuarchive.wustl.edu,
a large public FTP site.
Figure
4.1 shows tcp_echo_cli1.pl.
We'll step through the code first, and then explain what we
did and why we did it.
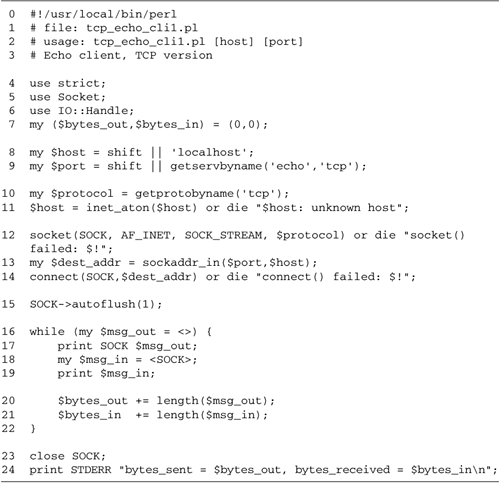
Lines 16: Load modules We turn on
strict syntax checking, and load the Socket and IO::Handle
modules. We use Socket for its socket-related constants, and
IO::Handle for its autoflush() method.
Line 7: Declare globals We create
two global variables for keeping track of the number of
bytes we send and receive.
Lines 89: Process command-line
arguments We read the destination host and port number
from the command line. If the host isn't provided, we
default to "localhost". If the port number isn't provided,
we use getservbyname() to look up the port number
for the echo service.
Lines 1011: Look up protocol and create
packed IP address We use getprotobyname() to
find the TCP protocol number for use with socket().
We then use inet_aton() to turn the hostname into a
packed IP address for use with sockaddr_in().
Line 12: Create the socket We call
socket() to create a socket filehandle named
SOCK in the same way that we did in Figure
3.4 (in Chapter
3). We pass arguments specifying the AF_INET
Internet address family, a stream-based socket type of
SOCK_STREAM, and the TCP protocol number looked up
earlier.
Lines 1314: Create destination address
and connect socket to it We use sockaddr_in()
to create a packed address containing the destination's IP
address and port number. This address is now used as the
destination for a connect() call. If successful,
connect() returns true. Otherwise, we die with an
error message.
Line 15: Turn on autoflush mode for the
socket We want data written to the socket to be flushed
immediately, rather than hang around in a local buffer. We
call the socket's autoflush() method to turn on
autoflush mode. This method is available courtesy of
IO::Handle.
Lines 1622: Enter main loop We now
enter a small loop. Each time through the loop we read a
line of text from standard input, and print it verbatim to
SOCK, sending it to the remote host. We then use
the <> operator to read a line of response
from the server, and print it to standard output.
Each time through the loop we tally the
number of bytes sent and received. This continues until we
reach EOF on standard input.
Lines 2324: Close the socket and print
statistics After the loop is done, we close the socket
and print to standard error our summary statistics on the
number of bytes sent and received.
A session with tcp_echo_cli1.pl looks like this: % tcp_echo_cli1.pl www.modperl.com
How now brown cow?
How now brown cow?
There's an echo in here.
There's an echo in here.
Yo-de-lay-ee-oo!
Yo-de-lay-ee-oo!
^D
bytes_sent = 61, bytes_received = 61
The ^D on the second-to-last line of the
transcript shows where I got tired of this game and pressed
the end-of-input key. (On Windows systems, this would be
^Z.)
|
|
$boolean =
socket (SOCKET,$domain,$type,$protocol)
Given a filehandle name, a domain, a
type, and a protocol, socket() creates a new
socket and associates it with the named filehandle. On
success, the function returns a true value. On error,
socket() returns undef and leaves the
error message in $!.
The domain, type, and protocol are all
small integers. Appropriate values for the first two are
constants defined in the Socket module, but the protocol
value must be determined at run time by calling
getprotobyname(). For creating TCP sockets, the
idiom is typically
socket(SOCK,AF_INET,SOCK_STREAM,
scalar getprotobyname("tcp"))
Here we force getprotobyname()
into a scalar context in order to return a single
function result containing the protocol number.
$boolean =
connect (SOCK,$dest_addr)
The connect() function
attempts to connect a connection-oriented socket to the
indicated destination address. The socket must already
have been created with socket(), and the packed
destination address created by sockaddr_in() or
equivalent. The system will automatically choose an
ephemeral port to use for the socket's local
address.
On success, connect() returns
a true value. Otherwise, connect() returns
false and $! is set to the system error code
explaining the problem. It is illegal for a
connection-oriented socket to call connect()
more than once; if another call is attempted, it results
in an EISCONN ("Transport endpoint is already
connected") error.
$boolean =
close (SOCK)
The close() call works with
sockets just like it does with ordinary filehandles. The
socket is closed for business. Once closed, the socket
can no longer be read from or written to. On success,
close() returns a true value. Otherwise, it
returns undef and leaves an error message in
$!.
The effect of close() on the
other end of the connection is similar to the effect of
closing a pipe. After the socket is closed, any further
reads on the socket at the other end return an end of
file (EOF). Any further writes result in a PIPE
exception.
$boolean =
shutdown (SOCK, $how)
shutdown() is a more precise
version of close() that allows you to control
which part of the bidirectional connection to shut down.
The first argument is a connected socket. The second
argument, $how, is a small integer that
indicates which direction to shut down. As summarized in
Table
4.1, a $how of 0 closes the socket for
further reads, a value of 1 closes the socket for
writes, and a value of 2 closes the socket for both
reading and writing (like close()). A nonzero
return value indicates that the shutdown was
successful.
Table 4.1. Shutdown()
Values
| 0 |
Closes socket for
reading |
| 1 |
Closes socket for
writing |
| 2 |
Closes socket
completely |
In addition to its ability to half-close a
socket, shutdown() has one other advantage over
close(). If the process has called fork() at
any point, there may be copies of the socket filehandle in the
original process's children. A conventional close()
on any of the copies does not actually close the socket until
all other copies are closed as well (filehandles have the same
behavior). In consequence, the client at the other end of the
connection won't receive an EOF until both the parent and its
child process(es) have closed their copies. In contrast,
shutdown() closes all copies of the socket, sending
the EOF immediately. We'll take advantage of this feature
several times in the course of this book.
|
A TCP Echo Server
Now we'll look at a simple TCP server. In
contrast to a TCP client, a server does not usually call
connect(). Instead, a TCP server follows the
following outline:
-
Create the
socket. This is the same as the corresponding step in
a client.
-
Bind the socket to
a local address. A client program can let the
operating system choose an IP address and port number to use
when it calls connect(), but a server must have a
well-known address so that clients can rendezvous with it.
For this reason it must explicitly associate the socket with
a local IP address and port number, a process known as
binding. The function that does this is called
bind().
-
Mark the socket as
listening. The server calls the listen()
function to warn the operating system that the socket will
be used to accept incoming connections. This function also
specifies the number of incoming connections that can be
queued up while waiting for the server to accept them.
A socket that is marked in this way as
ready to accept incoming connections is called a listening
socket.
-
Accept incoming
connections. The server now calls the
accept() function, usually in a loop. Each time
accept() is called, it waits for an incoming
connection, and then returns a new connected socket attached
to the peer (Figure
4.2). The listening socket is unaffected by this
operation.
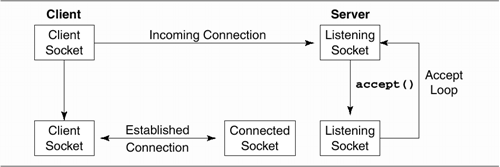
-
Perform I/O on the
connected socket. The server uses the connected
socket to talk to the peer. When the server is done, it
closes the connected socket.
-
Accept more
connections. Using the listening socket, the server
can accept() as many connections as it likes. When
it is done, it will close() the listening socket
and exit.
Our example server is named tcp_echo_serv.pl. This server is a
slightly warped version of the standard echo server. It echoes
everything sent to it, but rather than send it back verbatim,
it reverses each line right to left (but preserves the newline
at the end). So if one sends it "Hello world!," the line
echoed back will be "!dlrow olleH." (There's no reason to do
this except that it adds some spice to an otherwise boring
example.)
This server can be used by the client of Figure
4.1, or with the standard Telnet program. Figure
4.3 lists the server code.

Lines 19: Load modules, initialize
constants and variables We start out as in the client by
bringing in the Socket and IO::Handle modules. We also
define a private echo port of 2007 that won't conflict with
any existing echo server. We set up the $port and
$protocol variables as before (lines 89) and
initialize the counters.
Lines 1013: Install INT interrupt
handler There has to be a way to interrupt the server,
so we install a signal handler for the INT
(interrupt) signal, which is sent from the terminal when the
user presses ^C. This handler simply prints out the
accumulated byte counters' statistics and exits.
Line 14: Create the socket Using
arguments identical to those used by the TCP client in Figure
4.1, we call socket() to create a stream TCP
socket.
Line 15: Set the socket's
SO_REUSEADDR option The next step is to set the
socket's SO_REUSEADDR option to true by calling
setsockopt(). This option is commonly used to allow
us to kill and restart the server immediately. Otherwise,
there are conditions under which the system will not allow
us to rebind the local address until old connections have
timed out.
Lines 1617: Bind the socket to a local
address We now call bind() to assign a local
address to a socket. We create a local address using
sockaddr_in(), passing it our private echo port for
the port, and INADDR_ANY as the IP address.
INADDR_ANY acts as a wildcard. It allows the
operating system to accept connections on any of the host's
IP addresses (including the loopback address and any network
interface card addresses it might have).
Line 18: Call listen() to make
socket ready to accept incoming connections We call
listen() to alert the operating system that the
socket will be used for incoming connections.
The listen() function takes two
arguments. The first is the socket, and the second is an
integer indicating the number of incoming connections that
can be queued to wait for processing. It's common for
multiple clients to try to connect at roughly the same time;
this argument determines how large the backlog of pending
connections can get. In this case, we use a constant defined
in the Socket module, SOMAXCONN, to take the
maximum number of queued connections that the system
allows.
Lines 1934: Enter main loop The
bulk of the code is the server's main loop, in which it
waits for, and services, incoming connections.
Line 21: accept() an incoming
connection Each time through the loop we call
accept(), using the name of the listening socket as
the second argument, and a name for the new socket
(SESSION) as the first. (Yes, the order of
arguments is a little odd.) If the call to accept()
is successful, it returns the packed address of the remote
socket as its function result, and returzns the connected
socket in SESSION.
Lines 2223: Unpack client's address
We call sockaddr_in() in a list context to
unpack the client address returned by accept() into
its port and IP address components, and print the address to
standard error. In a real application, we might write this
information to a time-stamped log file.
Lines 2433: Handle the connection
This section handles communications with the client
using the connected socket. We first put the
SESSION socket into autoflush mode to prevent
buffering problems. We now read one line at a time from the
socket using the <> operator, reverse the
text of the line, and send it back to the client using
print(>).
This continues until
<SESSION> returns undef, which
indicates that the peer has closed its end of the
connection. We close the SESSION socket, print a
status message, and go back to accept() to wait for
the next incoming connection.
Line 35: Clean up After the main
loop is done we close the listening socket. This part of the
code is never reached because the server is designed to be
terminated by the interrupt key.
When we run the example server from the
command line, it prints out the "waiting for incoming
connections" message and then pauses until it receives an
incoming connection. In the session shown here, there are two
connections, one from a local client at the 127.0.0.1 loopback
address, and the other from a client at address 192.168.3.2.
After interrupting the server, we see the statistics printed
out by the INT handler. % tcp_echo_serv1.p1
waiting for incoming connections on port 2007...
Connection from [127.0.0.1,2865]
Connection from [127.0.0.1,2865] finished
Connection from [192.168.3.2,2901]
Connection from [192.168.3.2,2901] finished
bytes_sent = 26, bytes_received = 26
The INT handler in this server
violates the recommendation from Chapter
2 that signal handlers not do any I/O. In addition, by
calling exit() from within the handler, it risks
raising a fatal exception on Windows machines as they shut
down. We will see a more graceful way of shutting down a
server in Chapter
10.
Socket Functions Related to
Incoming Connections
Three new functions are related to the need
of servers to handle incoming connections.
|
$boolean =
bind (SOCK,$my_addr)
Bind a local address to a socket,
returning a true value if successful, false otherwise.
The socket must already have been created with
socket(), and the packed address created by
sockaddr_in() or equivalent. The port part of
the address can be any unused port on the system. The IP
address part may be the address of one of the host's
network interfaces, the loopback address, or the
wildcard INADDR_ANY.
On UNIX systems, it requires superuser
(root) privileges to bind to the reserved ports below
1024. Such an attempt will return undef and set
$! to an error of EACCES ("Permission
denied").
The bind() function is usually
called in servers in order to associate a newly created
socket with a well-known port; however, a client can
call it as well if it wishes to specify its local port
and/or network interface.
$boolean =
listen (SOCK,$max_queue)
The listen() function tells
the operating system that a socket will be used to
accept incoming connections. The call's two arguments
are a socket filehandle, which must already have been
created with socket(), and an integer value
indicating the number of incoming connections that can
be queued.
The maximum size of the queue is
system-specific. If you specify a higher value than the
system allows, listen() silently truncates it
to its maximum value. The Socket module exports the
constant SOMAXCONN to determine this maximum
value.
If successful, listen()
returns a true value and marks SOCK as
listening. Otherwise it returns undef and sets
$! to the appropriate error.
$remote_addr
= accept (CONNECTED_SOCKET,LISTEN_SOCKET)
Once a socket has been marked
listening, call accept() to accept incoming
connections. The accept() function takes two
arguments, CONNECTED_SOCKET, the name of a
filehandle to receive the newly connected socket, and
LISTEN_SOCKET, the name of the listening
socket. If successful, the packed address of the remote
host will be returned as the function result, and
CONNECTED_SOCKET will be associated with the
incoming connection.
Following accept(), you will
use CONNECTED_SOCKET to communicate with the
peer. You do not need to create
CONNECTED_SOCKET beforehand. In case you're
confused by this, think of accept() as a
special form of open() in which
LISTEN_SOCKET replaces the file name.
If no incoming connection is waiting to
be accepted, accept() will block until there is
one. If multiple clients connect faster than your script
calls accept(), they will be queued to the
limit specified in the listen() call.
The accept() function returns
undef if any of a number of error conditions
occur, and sets $! to an appropriate error
message.
$my_addr =
getsockname (SOCK)
$remote_addr
= getpeername (SOCK)
Should you wish to recover the local or
remote address associated with a socket, you can do so
with getsockname() or
getpeername().
The getsockname() function
returns the packed binary address of the socket at the
local side, or undef if the socket is unbound.
The getpeername() function behaves in the same
way, but returns the address of the socket at the remote
side, or undef if the socket is
unconnected.
In either case, the returned address
must be unpacked with sockaddr_in(), as
illustrated in this short example: if ($remote_addr = getpeername(SOCK)) {
my ($port,$ip) = sockaddr_in($remote_addr);
my $host = gethostbyaddr($ip,AF_INET);
print "Socket is connected to $host at port $port\n";
}
|
Limitations of tcp_echo_serv1.pl
Although tcp_echo_serv1.pl works as written,
it has a number of drawbacks that are addressed in later
chapters. The drawbacks include the following:
-
No support for
multiple incoming connections. This is the biggest
problem. The server can accept only one incoming connection
at a time. During the period that it is busy servicing an
existing connection, other requests will be queued up until
the current connection terminates and the main loop again
calls accept(). If the number of queued clients
exceeds the value specified by listen(), new
incoming connections will be rejected.
To avoid this problem, the server would
have to perform some concurrent processing with threads or
processes, or cleverly multiplex its input/output
operations. These techniques are discussed in Part III of
this book.
-
Server remains in
foreground. After it is launched, the server remains
in the foreground, where any signal from the keyboard (such
as a ^C) can interrupt its operations. Long-running servers
will want to dissociate themselves from the keyboard and put
themselves in the background. Techniques for doing this are
described in Chapter
10, Forking Servers and the inetd Daemon.
-
Server logging is
primitive. The server logs status information to the
standard error output stream. However, a robust server will
run as a background process and shouldn't have any standard
error to write to. The server should append log entries to a
file or use the operating system's own logging facilities.
Logging techniques are described in Chapter
16, Bulletproofing Servers.
Adjusting Socket Options
Sockets have options that control various
aspects of their operation. Among the things you can adjust
are the sizes of the buffers used to send and receive data,
the values of send and receive timeouts, and whether the
socket can be used to receive broadcast transmissions.
The default options are fine for most
purposes; however, occasionally you may want to adjust some
options to optimize your application, or to enable optional
features of the TCP/IP protocol. The most commonly used option
is SO_REUSEADDR, which is frequently activated in
server applications.
Socket options can be examined or changed
with the Perl built-in functions getsockopt() and
setsockopt().
|
$value =
getsockopt (SOCK,$level,$option_name);
$boolean =
setsockopt
(SOCK,$level,$option_name,$option_value);
The getsockopt() and
setsockopt() functions allow you to examine and
change a socket's options. The first argument is the
filehandle for a previously created socket. The second
argument, $level, indicates the level of the
networking stack you wish to operate on. You will
usually use the constant SO_SOCKET, indicating
that you are operating on the socket itself. However, a
getsockopt() and setsockopt() are
occasionally used to adjust options in the TCP or UDP
protocols, in which case you use the protocol number
returned by getprotobyname().
The third argument,
$option_name, is an integer value selected from
a large list of possible constants. The last argument,
$option_value, is the value to set the option
to, or it returns undef if inapplicable. On
success, getsockopt() returns the value of the
requested option, or undef if the call failed.
On success, setsockopt() returns a true value
if the option was successfully set; otherwise, it
returns undef. |
The value of an option is often a Boolean
flag indicating whether the option should be turned on and
off. In this case, no special code is needed to set or examine
the value. For example, here is how to set the value of
SO_BROADCAST to true (broadcasting is discussed in Chapter
20): setsockopt(SOCK,SO_SOCKET,SO_BROADCAST,1);
And here is how to retrieve the current value
of the flag: my $reuse = getsockopt(SOCK,SO_SOCKET,SO_BROADCAST);
However, a few options act on integers or
more esoteric data types, such as C timeval
structures. In this case, you must pack the values into binary
form before passing them to setsockopt() and unpack
them after calling getsockopt(). To illustrate, here
is the way to recover the maximum size of the buffer that a
socket uses to store outgoing data. The SO_SNDBUF
option acts on a packed integer (the "I" format): $send_buffer_size = unpack("I",getsockopt($sock,SOL_SOCKET,SO_SNDBUF));
Common Socket Options
Table
4.2 lists the common socket options used in network
programming. These constants are imported by default when you
load the Socket module.
SO_REUSEADDR
allows a TCP socket to rebind to a local address that is in
use. It takes a Boolean argument indicating whether to
activate address reuse. See the section The SO_REUSEADDR
Socket Option later in this chapter.
SO_KEEPALIVE, when set to a true
value, tells a connected socket to send messages to the peer
intermittently. If the remote host fails to respond to a
message, your process will receive a PIPE signal the
next time it tries to write to the socket. The interval of the
keepalive messages cannot be changed in a portable way and
varies from OS to OS (it is 45 seconds on my Linux
system).
SO_LINGER
controls what happens when you try to close a TCP socket that
still has unsent queued data. Normally, close()
returns immediately, and the operating system continues to try
to send the unsent data in the background. If you prefer, you
can make the close() call block until all the data
has been sent by setting SO_LINGER, allowing you to
inspect the return value returned by close() for
successful completion.
Unlike other socket options,
SO_LINGER operates on a packed data type known as the
linger structure. The linger
structure consists of two integers: a flag indicating whether
SO_LINGER should be active, and a timeout value
indicating the maximum number of seconds that close()
should linger before returning. The linger structure should be
packed and unpacked using the II format: $linger = pack("II",$flag,$timeout);
For example, to make a socket linger for up
to 120 seconds you would call: setsockopt(SOCK,SOL_SOCKET, SO_LINGER,pack("II",1,120))
or die "Can't set SO_LINGER: $!";
SO_BROADCAST
is valid for UDP sockets only. If set to a true value, it
allows send() to be used to send packets to the
broadcast address for delivery to all hosts on the local
subnet. We discuss broadcasting in Chapter
20.
The SO_OOBINLINE flag controls how
out-of-band information is handled. This feature allows the
peer to be alerted of the presence of high-priority data. We
describe how this works in Chapter
17.
SO-SNDLOWAT
and SO_RCVLOWAT set the
low-water marks for the output and input buffers,
respectively. The significance of these options is discussed
in Chapter
13, Nonblocking I/O. These options are integers, and must
be packed and unpacked using the I pack format.
SO_TYPE is a
read-only option. It returns the type of the socket, such as
SOCK_STREAM. You will need to unpack this value with
the I format before using it. The IO::Socket
sockopt() method discussed in Chapter
5 does the conversion automatically.
Table 4.2. Common Socket
Options
| SO_REUSEADDR
|
Enable reuse of the
local address. |
| SO_KEEPALIVE
|
Enable the
transmission of periodic "keepalive" messages. |
| SO_LINGER |
Linger on close if
data present. |
| SO_BROADCAST
|
Allow socket to send
messages to the broadcast address. |
| SO_OOBINLINE
|
| Keep out-of-band data
inline. |
| SO_SNDLOWAT
|
Get or set the size of
the output buffer "low water mark." |
| SO_RECVLOWAT
|
Get or set the size of
the input buffer "low water mark." |
| SO_TYPE |
Get the socket type
(read only). |
| SO_ERROR |
Get and clear the last
error on the socket (read
only). |
Last, the read-only SO_ERROR option
returns the error code, if any, for the last operation on the
socket. It is used for certain asynchronous operations, such
as nonblocking connects (Chapter
13). The error is cleared after it is read. As before,
users of getsockopt() need to unpack the value with
the I format before using it, but this is taken care
of automatically by IO::Socket.
The SO_REUSEADDR Socket Option
Many developers will want to activate the
SO_REUSEADDR flag in server applications. This flags
allows a server to rebind to an address that is already in
use, allowing the server to restart immediately after it has
crashed or been killed. Without this option, the
bind() call will fail until all old connections have
timed out, a process that may take several minutes.
The idiom is to insert the following line of
code after the call to socket() and before the call
to bind(): setsockopt(SOCK,SOL_SOCKET,SO_REUSEADDR,1) o r die "setsockopt: $!";
The downside of setting SO_REUSEADDR
is that it allows you to launch your server twice. Both
processes will be able to bind to the same address without
triggering an error, and they will then compete for incoming
connections, leading to confusing results. Servers that we
develop later (e.g., Chapters
10, 14,
and 16)
avoid this possibility by creating a file when the program
starts up and deleting it on exit. The server refuses to
launch if it sees that this file already exists.
The operating system does not allow a socket
address bound by one user's process to be bound by another
user's process, regardless of the setting of
SO_REUSEADDR.
The fcntl() and
ioctl() Functions
In addition to socket options, a number of
attributes are adjusted using the fcntl() and
ioctl() functions. We discuss fcntl() in Chapter
13, where we use it to turn on nonblocking I/O, and again
in Chapter
17, where we use fcntl() to set the owner of a
socket so that we receive a URG signal when the
socket receives TCP urgent data.
The ioctl() function appears in Chapter
17 as well, where we use it to implement the
sockatmark() function for handling urgent data, and
again in Chapter
21, where we create a variety of functions for examining
and modifying the IP addresses assigned to network
interfaces.
|
|
$bytes = send
(SOCK,$data,$flags[,$destination])
The send() function uses the
socket indicated by the first argument to deliver the
data indicated by $data, to the destination
address indicated by $destination. If the data
was successfully queued for transmission,
send() returns the number of bytes sent;
otherwise, it returns undef. The third
argument, $flags, is the bitwise OR of zero or
more of the two options listed in Table
4.3.
We discuss the MSG_OOB flag in
detail in Chapter
17. MSG_DONTROUTE is used in routing and
diagnostic programs and is not discussed in this book.
In general, you should pass 0 as the value of
$flags in order to accept the default
behavior.
If the socket is a connected TCP
socket, then $destination should not be
specified and send() is roughly equivalent to
syswrite(). With UDP sockets, the destination
can be changed with every call to send().
$address =
recv (SOCK,$buffer,$length,$flags)
The recv() function accepts up
to $length bytes from the indicated socket and
places them into the scalar variable $buffer.
The variable is grown or shrunk to the length actually
read. The $flags argument has the same
significance as the corresponding argument in
$send and should usually be set to 0.
If successful, recv() returns
the packed socket address of the message sender. In case
of error, the function returns undef and sets
$! appropriately.
When called on a connected TCP socket,
recv() acts much like sysread(),
except that it returns the address of the peer. The real
usefulness of recv() is for receiving datagrams
for UDP transmissions.
$boolean =
socketpair
(SOCK_A,SOCK_B,$domain,$type,$protocol)
The socketpair() function
creates two unnamed sockets connected end to end.
$domain, $type, and $protocol
have the same significance as in the socket()
function. If successful, socketpair() returns
true and opens sockets on SOCK_A and
SOCK_B.
Table 4.3. send()
Flags
| MSG_OOB |
Transmit a byte of
urgent data on a TCP socket. |
| MSG_DONTROUTE
|
Bypass routing
tables. |
The socketpair() function is similar
to the pipe() function that we saw in Chapter
2, except that the connection is bidirectional. Typically
a script creates a pair of sockets and then fork(),
with the parent closing one socket and the child closing the
other. The two sockets can then be used for bidirectional
communication between parent and child.
While in principle socketpair() can
used for the INET protocol, in practice most systems only
support socketpair() for creating UNIX-domain
sockets. Here is the idiom: socketpair(SOCK1,SOCK2,AF_UNIX,SOCK_STREAM,PF_UNSPEC) or die $!;
We show examples of using UNIX-domain sockets
in Chapter
22.
End-of-Line Constants Exported by
the Socket Module
In addition to the constants used for
constructing sockets and establishing outgoing connections,
the Socket module optionally exports constants and variables
that are useful for dealing with text-oriented network
servers.
As we saw in Chapter
2, operating systems have different ideas of what
constitutes the end of line in a text file, with various OSs
using carriage return (CR), linefeed (LF), or carriage
return/linefeed (CRLF). Adding to the confusion is the fact
that Perl's "\r" and "\n" string escapes
translate into different ASCII characters depending on the
local OS's idea of the newline.
Although this is not a hard and fast rule,
most text-oriented network services terminate their lines with
the CRLF sequence, octal " \015\012 ". When
performing line-oriented reads from such servers, you should
set the input record separator, global $/, to "
\015\012 " (not to " \r\n ", because this is
nonportable). To make this simpler, the Socket module
optionally exports several constants defining the common line
endings (see Table
4. 4). In addition, to make it easier to interpolate these
sequences into strings, Socket exports the variables
$CRLF, $CR, and $LF.
Table 4.4. Constants Exported by
Socket Module
| CRLF |
A constant that
contains the CRLF sequence |
| CR |
A constant that
contains the CR character |
| LF |
A constant that
contains the LF
character |
These symbols are not exported by default,
but must be brought in with use either individually
or by importing the ":crlf" tag. In the latter case,
you probably also want to import the ":DEFAULT" tag
in order to get the default socket-related constants as
well: use Socket qw(:DEFAULT :crlf);
|
Exceptional Conditions during TCP
Communications
The TCP protocol is tremendously robust in
the face of poor network conditions. It can survive slow
connections, flaky routers, intermittent network outages, and
a variety of misconfigurations, and still manage to deliver a
consistent, error-free data stream.
TCP can't overcome all problems. This section
briefly discusses the common exceptions, as well as some
common programming errors.
Exceptions during connect()
Various errors are common during calls to
connect().
-
The remote host is
up, but no server is listening when the client tries to
connect. A client tries to connect to a remote host,
but no server is listening to the indicated port. The
connect() function aborts with a "Connection
refused" (ECONNREFUSED) error.
-
The remote host is
down when the client tries to connect. A client tries
to connect to a remote host, but the host is not running (it
is crashed or unreachable). In this case, connect()
blocks until it times out with a "Connection timed out"
(ETIMEDOUT) error. TCP is forgiving of slow network
connections, so the timeout might not occur for many
minutes.
-
The network is
misconfigured. A client tries to connect to a remote
host, but the operating system can't figure out how to route
the message to the desired destination, because of a local
misconfiguration or the failure of a router somewhere along
the way. In this case, connect() fails with a
"Network is unreachable" (ENETUNREACH) error.
-
There is a
programmer error. Various errors are due to common
programming mistakes. For example, an attempt to call
connect() with a filehandle rather than a socket
results in a "Socket operation on non-socket"
(ENOTSOCK) error. An attempt to call
connect() on a socket that is already connected
results in "Transport endpoint is already connected"
(EISCONN) error.
The ENOTSOCK error can also be
returned by other socket calls, including bind(),
listen(), accept(), and the
sockopt() calls.
Exceptions during Read and Write
Operations
Once a connection is established, errors are
still possible. You are almost sure to encounter the following
errors during your work with networked programs.
-
The server program
crashes while you are connected to it. If the server
program crashes during a
communications session, the operating system will close the
socket. From your perspective, the situation is identical to
the remote program closing its end of the socket
deliberately.
On reads, this results in an EOF the next
time read() or sysread() is called. On
writes, this results in a PIPE exception, exactly as in the
pipe examples in Chapter
2. If you intercept and handle PIPE,
print() or syswrite() returns false and
$! is set to "Broken pipe" (EPIPE).
Otherwise, your program is terminated by the PIPE
signal.
-
The server host
crashes while a connection is established. On the
other hand, if the host
crashes while a TCP connection is active, the operating
system has no chance to terminate the connection gracefully.
At your end, the operating system has no way to distinguish
between a dead host and one that is simply experiencing a
very long network outage. Your host will continue to
retransmit IP packets in hopes that the remote host will
reappear. From your perspective, the current read or write
call will block indefinitely.
At some later time, when the remote host
comes back on line, it will receive one of the local host's
retransmitted packets. Not knowing what to do with it, the
host will transmit a low-level reset message, telling the
local host that the connection has been rejected. At this
point, the connection is broken, and your program receives
either an EOF or a pipe error, depending on the
operation.
One way to avoid blocking indefinitely is
to set the SO_KEEPALIVE option on the socket. In
this case, the connection times out after some period of
unresponsiveness, and the socket is closed. The keepalive
timeout is relatively long (minutes in some cases) and
cannot be changed.
-
The network goes
down while a connection is established. If a router or network segment goes down while a
connection is established, making the remote host
unreachable, the current I/O operation blocks until
connectivity is restored. In this case, however, when the
network is restored the connection usually continues as if
nothing happened, and the I/O operation completes
successfully.
There are several exceptions to this,
however. If, instead of simply going down, one of the routers
along the way starts issuing error messages, such as "host
unreachable," then the connection is terminated and the effect
is similar to scenario (1). Another common situation is that
the remote server has its own timeout system. In this case, it
times out and closes the connection as soon as network
connectivity is restored.
|
Chapter 5. The IO::Socket API
The last chapter walked through Perl's
built-in interface to Berkeley sockets, which closely mirrors
the underlying C-library calls. Some of the built-in
functions, however, are awkward because of the need to convert
addresses and other data structures into the binary forms
needed by the C library.
The advent of the object-oriented extensions
to Perl5 made it possible to create a more intuitive interface
based on the IO::Handle module. IO::Socket and related modules
simplify code and make it easier to read by eliminating the
noisy C-language-related calls and allowing you to focus on
the core of the application.
This chapter introduces the IO::Socket API,
and then walks through some basic TCP applications.
|
Using IO::Socket
Before we discuss IO::Socket in detail, let's
get a feel for it by reimplementing some of the examples from
Chapters
3 and 4.
A Daytime Client
The first example is a rewritten version of
the daytime service client developed in Chapter
3 (Figure
3.7). As you recall, this client establishes an outgoing
connection to a daytime server, reads a line, and exits.
This is a good opportunity to fix a minor bug
in the original examples (left there in the interests of not
unnecessarily complicating the code). Like many Internet
servers, the daytime service terminates its lines with CRLF
rather than a single LF as Perl does. Before reading from
daytime, we set the end-of-line character to CRLF. Otherwise,
the line we read will contain an extraneous CR at the end.
Figure
5.1 lists the code.
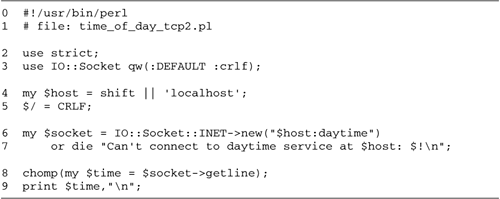
Lines 14: Initialize module We load
IO::Socket and import the ":crlf" constants as well
as the default constants. These constants are conveniently
reexported from Socket. We recover the name of the remote
host from the command line.
Line 5: Set the end-of-line
separator To read lines from the daytime server, we set
the $/ end-of-line global to CRLF. Note
that this global option affects all filehandles, not just
the socket.
Lines 67: Create socket We create a
new IO::Socket object by calling IO::Socket::INET's new
method, specifying the destination address in the form $host:service. We will see other
ways to specify the destination address later.
Lines 89: Read the time of day and
print it We read a single line from the server by
calling getline(), and remove the CRLF from the end
with chomp(). We print this line to
STDOUT.
When we run this program, we get the expected
result: % time_of_day_tcp.pl wuarchive.wustl.edu
Tue Aug 15 07:39:49 2000
TCP Echo Client
Now we'll look at an object-oriented version
of the echo service client from Chapter
4. Figure
5.2 lists the code.
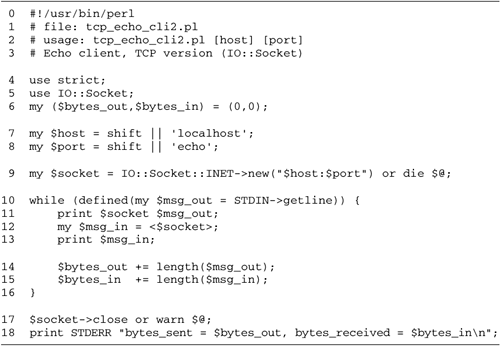
Lines 18: Initialize script We load
IO::Socket, initialize constants and globals, and process
the command-line arguments.
Line 9: Create socket We call the
IO::Socket::INET->new() method using the $host:$port argument. If
new() is successful, it returns a socket object
connected to the remote host.
Lines 1016: Enter main loop We now
enter the main loop. Each time through the loop we call
getline() on the STDIN filehandle to
retrieve a line of input from the user. We send this line of
text to the remote host using print() on the
socket, and read the server's response using the
<> operator. We print the response to
standard output, and update the statistics.
Lines 1718: Clean up The main loop
will end when STDIN is closed by the user. We close
the socket and print the accumulated statistics to
STDERR.
Did you notice that line 10 uses the
object-oriented getline() method with STDIN?
This is a consequence of bringing in IO::Socket, which
internally loads IO::Handle. As discussed in Chapter
2, a side effect of IO::Handle is to add I/O object
methods to all filehandles used by your program, including the
standard ones.
Unlike with the daytime client, we don't need
to worry about what kind of line ends the echo service uses,
because it echoes back to us exactly what we send it.
Note also that we did not need to set
autoflush mode on the IO::Socket object, as we did in examples
in Chapter
4. Since IO::Socket version 1.18, autoflush is turned on
by default in all sockets created by the module. This is the
version that comes with Perl 5.00503 and higher.
|
IO::Socket Methods
We'll now look at IO::Socket in greater
depth.
The IO::Handle Class Hierarchy
Figure
5.3 diagrams the IO::Handle class hierarchy. The patriarch
of the family tree, IO::Handle, provides object-oriented
syntax for all of Perl's various input/output methods. Its
immediate descendent, IO::Socket, defines additional methods
that are suitable for Berkeley sockets. IO::Socket has two
descendents. IO::Socket::INET defines behaviors that are
specific for Internet domain sockets; IO::Socket::UNIX defines
appropriate behaviors for AF_UNIX (a.k.a., AF_LOCAL)
sockets.

One never creates an IO::Socket object
directly, but creates either an IO::Socket::INET or an
IO::Socket::UNIX object. We use the IO::Socket::INET subclass
both in this chapter and in much of the rest of this book.
Future versions of the I/O library may support other
addressing domains.
Other important descendents of IO::Handle
include IO::File, which we discussed in Chapter
2, and IO::Pipe, which provides an object-oriented
interface to Perl's pipe() call. From
IO::Socket::INET descends Net::Cmd, which is the parent of a
whole family of third-party modules that provide interfaces to
specific command-oriented network services, including FTP and
Post Office Protocol. We discuss these modules beginning in Chapter
6.
Although not directly descended from
IO::Handle, other modules in the IO::* namespace include
IO::Dir for object-oriented methods for reading and
manipulating directories, IO::Select for testing sets of
filehandles for their readiness to perform I/O, and
IO::Seekable for performing random access on a disk file. We
introduce IO::Select in Chapter
12, where we use it to implement network servers using I/O
multiplexing.
Creating IO::Socket::INET
Objects
As with other members of the IO::Handle
family, you create new IO::Socket::INET objects by invoking
its new() method, as in: $sock = IO::Socket::INET->new('wuarchive.wustl.edu:daytime');
This object is then used for all I/O related
to the socket. Because IO::Socket::INET descends from
IO::Handle, its objects inherit all the methods for reading,
writing, and managing error conditions introduced in Chapter
2. To these inherited methods, IO::Socket::INET adds
socket-oriented methods such as accept(),
connect(), bind(), and
sockopt().
As with IO::File, once you have created an
IO::Socket option you have the option of either using the
object with a method call, as in: $sock->print('Here comes the data.');
or using the object as a regular
filehandle: print $sock 'Ready or not, here it comes.';
Which syntax you use is largely a matter of
preference. For performance reasons discussed at the end of
this chapter, I prefer the function-oriented style whenever
there is no substantive difference between the two.
The IO::Socket::INET->new()
constructor is extremely powerful, and is in fact the most
compelling reason for using the object-oriented socket
interface.
|
$socket =
IO::Socket::INET->new (@args);
The new() class method
attempts to create an IO::Socket::INET object. It
returns the new object, or if an error was encountered,
undef. In the latter case, $! contains
the system error, and $@ contains a more
verbose description of the error generated by the module
itself. |
IO::Socket::INET->new() accepts
two styles of argument. In the simple "shortcut" style,
new() accepts a single argument consisting of the
name of the host to connect to, a colon, and the port number
or service name. IO::Socket::INET creates a TCP socket, looks
up the host and service name, constructs the correct
sockaddr_in structure, and automatically attempts to
connect() to the remote host. The shortcut style is
very flexible. Any of these arguments is valid: wuarchive.wustl.edu:echo
wuarchive.wustl.edu:7
128.252.120.8:echo
128.252.120.8:7
In addition to specifying the service by name
or port number, you can combine the two so that
IO::Socket::INET will attempt to look up the service name
first, and if that isn't successful, fall back to using the
hard-coded port number. The format is hostname:service(port). For instance,
to connect to the wuarchive
echo service, even on machines that for some reason don't have
the echo service listed in the network information database,
we can call: my $echo = IO::Socket::INET->new('wuarchive.wustl.edu:echo(7)')
or die "Can't connect: $!\n";
The new() method can also be used to
construct sockets suitable for incoming connections, UDP
communications, broadcasting, and so forth. For these more
general uses, new() accepts a named argument style
that looks like this: my $echo = IO::Socket::INET->new(PeerAddr => 'wuarchive.wustl.edu',
PeerPort => 'echo(7)',
Type => SOCK_STREAM,
Proto => 'tcp')
or die "Can't connect: $!\n";
Recall from Chapter
1 that the " => " symbol is accepted by Perl
as a synonym for ",". The newlines between the argument pairs
are for readability only. In shorter examples, we put all the
name/argument pairs on a single line.
The list of arguments that you can pass to
IO::Socket::INET is extensive. They are summarized in Table
5.1
Table 5.1. Arguments to
IO::Socket::INET->new()
| PeerAddr |
Remote host address |
<hostname or
address>[:<port>] |
| PeerHost |
Synonym for
PeerAddr |
|
| PeerPort |
Remote port or
service |
<service name or
number> |
| LocalAddr |
Local host bind
address |
<hostname or
address>[:port] |
| LocalHost |
Synonym for
LocalAddr |
|
| LocalPort |
Local host bind
port |
<service name or
port number> |
| Proto |
Protocol name (or
number) |
<protocol name or
number> |
| Type |
Socket type |
SOCK_STREAM |
SOCK_DGRAM | ... |
| Listen |
Queue size for
listen |
<integer> |
| Reuse |
Set
SO_REUSEADDR before binding |
<boolean> |
| Timeout |
Timeout value |
<integer> |
| MultiHomed
|
Try all adresses on
multihomed hosts |
<boolean> |
The PeerAddr
and PeerHost arguments are
synonyms which are used to specify a host to connect to. When
IO::Socket::INET is passed either of these arguments, it will
attempt to connect() to the indicated host. These
arguments accept a hostname, an IP address, or a combined
hostname and port number in the format that we discussed
earlier for the simple form of new(). If the port
number is not embedded in the argument, it must be provided by
PeerPort.
PeerPort
indicates the port to connect to, and is used when the port
number is not embedded in the hostname. The argument can be a
numeric port number, a symbolic service name, or the combined
form, such as "ftp(22)."
The LocalAddr, LocalHost, and LocalPort arguments are used by
programs that are acting as servers and wish to accept
incoming connections. LocalAddr and LocalHost are synonymous, and
specify the IP address of a local network interface. LocalPort specifies a local port
number. If IO::Socket::INET sees any of these arguments, it
constructs a local address and attempts to bind() to
it.
The network interface can be specified as an
IP address in dotted-quad form, as a DNS hostname, or as a
packed IP address. The port number can be given as a port
number, as a service name, or using the "service(port)"
combination. Itis also possible to combine the local IP
address with the port number, as in "127.0.0.1:http(80)." In
this case, IO::Socket::INET will take the port number from
LocalAddr, ignoring the LocalPort argument.
If you specify LocalPort but not LocalAddr, then IO::Socket::INET
binds to the INADDR_ANY wildcard, allowing the socket
to accept connections from any of the host's network
interfaces. This is usually the behavior that you want.
Stream-oriented programs that wish to accept
incoming connections should also specify the Listen and possibly Reuse arguments. Listen gives the size of the listen
queue. If the argument is present, IO::Socket will call
listen() after creating the new socket, using the
argument as its queue length. This argument is mandatory if
you wish to call accept() later.
Reuse, if a
true value, tells IO::Socket::INET to set the
SO_REUSEADDR option on the new socket. This is useful
for connection-oriented servers that need to be restarted from
time to time. Without this option, the server has to wait a
few minutes between exiting and restarting in order to avoid
"address in use" errors during the call to
bind().
Proto and
Type specify the protocol and
socket type. The protocol may be symbolic (e.g., "tcp") or
numeric, using the value returned by getprotoby
name(). Type must be one
of the SOCK_* constants, such as
SOCK_STREAM. If one or more of these options is not
provided, IO::Socket::INET guesses at the correct values from
context. For example, if Type
is absent, IO::Socket:: INET infers the correct type from the
protocol. If Proto is absent
but a service name was given for the port, then
IO::Socket::INET attempts to infer the correct protocol to use
from the service name. As a last resort, IO::Socket::INET
defaults to "tcp."
Timeout sets
a timeout value, in seconds, for use with certain operations.
Currently, timeouts are used for the internal call to
connect() and in the accept() method. This
can be handy to prevent a client program from hanging
indefinitely if the remote host is unreachable.
The MultiHomed option is useful in the
uncommon case of a TCP client that wants to connect to a host
with multiple IP addresses and doesn't know which IP address
to use. If this argument is set to a true value, the
new(), method uses gethostbyname() to look
up all the IP addresses for the hostname specified by
PeerAddr. It then attempts a connection to each of the host's
IP addresses in turn until one succeeds.
To summarize, TCP clients that wish to make
outgoing connections should call new() with a Proto argument of tcp, and either a
PeerAddr with an appended
port number, or a PeerAddr/PeerPort pair. For
example: my $sock = IO::Socket::INET->new(Proto => 'tcp',
PeerAddr => 'www.yahoo.com',
PeerPort => 'http(80)');
TCP servers that wish to accept incoming
connections should call new(), with a Proto of " tcp ", a LocalPort argument indicating the
port they wish to bind with, and a Listen argument indicating the
desired listen queue length: my $listen = IO::Socket::INET->new(Proto => 'tcp',
LocalPort => 2007,
Listen => 128);
As we will discuss in Chapter
19, UDP applications need provide only a Proto argument of " udp "
or a Type argument of
SOCK_DGRAM. The idiom is the same for both clients
and servers: my $udp = IO::Socket::INET->new(Proto => 'udp');
IO::Socket Object Methods
Once a socket is created, you can use it as
the target for all the standard I/O functions, including
print(), read(), <>,
sysread(), and so forth. The object-oriented method
calls discussed in Chapter
2 in the context of IO::File are also available. In
addition, IO::Socket::INET adds the following socket-specific
methods to its objects:
|
$connected_socket =
$listen_socket->accept()
($connected_socket,$remote_addr) =
$listen_socket->accept()
The accept() method performs
the same task as the like-named call in the
function-oriented API. Valid only when called on a
listening socket object, accept() retrieves the
next incoming connection from the queue, and returns a
connected session socket that can be used to communicate
with the remote host. The new socket inherits all the
attributes of its parent, except that it is
connected.
When called in a scalar context,
accept() returns the connected socket. When
called in an array context, accept() returns a
two-element list, the first of which is the connected
socket, and the second of which is the packed address of
the remote host. You can also recover this address at a
later time by calling the connected socket's
peername() method.
$return_val =
$sock->connect ($dest_addr)
$return_val =
$sock->bind ($my_addr)
$return_val =
$sock->listen ($max_queue)
These three TCP-related methods are
rarely used because they are usually called
automatically by new(). However, if you wish to
invoke them manually, you can do so by creating a new
TCP socket without providing either a PeerAddr or a Listen argument: $sock = IO::Socket::INET->new(Proto=>'tcp');
$dest_addr = sockaddr_in(...) # etc.
$sock->connect($dest_addr);
$return_val =
$sock->connect ($port, $host)
$return_val =
$sock->bind ($port, $host)
For your convenience,
connect() and bind() both have
alternative two-argument forms that take unpacked port
and host addresses rather than a packed address. The
host address can be given in dotted-IP form or as a
symbolic hostname.
$return_val =
$socket->shutdown($how)
As in the function-oriented call,
shutdown() is a more forceful way of closing a
socket. It will close the socket even if there are open
copies in forked children. $how controls which
half of the bidirectional socket will be closed, using
the codes shown in Table
3.1.
$my_addr =
$sock->sockname()
$her_addr =
$sock->peername()
The sockname() and
peername() methods are simple wrappers around
their function-oriented equivalents. As with the
built-in functions, they return packed socket addresses
that must be unpacked using sockaddr_in().
$result =
$sock->sockport()
$result =
$sock->peerport()
$result =
$sock->sockaddr()
result =
$sock->peeraddr()
These four methods are convenience
functions that unpack the values returned by
sockname() and peername().
sockport() and peerport() return the
port numbers of the local and remote endpoints of the
socket, respectively. sockaddr(), and
peeraddr() return the IP address of the local
and remote endpoints of the socket as binary structures suitable for
passing to gethostbyaddr(). To convert
theresult into dotted-quad form, you still need to
invoke inet_ntoa().
$my_name =
$sock->sockhost()
$her_name =
$sock->peerhost()
These methods go one step further, and
return the local and remote IP addresses in full
dotted-quad form ("aa.bb.cc.dd"). If you wish to recover
the DNS name of the peer, falling back to the
dotted-quad form in case of a DNS failure, here is the
idiom: $peer = gethostbyaddr($sock->peeraddr,AF_INET) ||
$sock->peerhost;
$result =
$sock->connected()
The connected() method returns
true if the socket is connected to a remote host, false
otherwise. It works by calling peername().
$protocol =
$sock->protocol()
$type =
$sock->socktype()
$domain =
$sock->sockdomain()
These three methods return basic
information about the socket, including its numeric
protocol, its type, and its domain. These methods can be
used only to get the attributes of a socket object. They
can't be used to change the nature of an already-created
object.
$value =
$sock->sockopt($option [,$value])
The sockopt() method can be
used to get and/or set a socket option. It is a front
end for both getsockopt() and
setsockopt(). Called with a single numeric
argument, sockopt() retrieves the current value
of the option. Called with an option and a new value,
sockopt() sets the option to the indicated
value, and returns a result code indicating success or
failure. There is no need to specify an option level, as
you do with getsockopt(), because the
SOL_SOCKET argument is assumed.
Unlike the built-in
getsockopt(), the object method automatically
converts the packed argument returned by the underlying
system call into an integer, so you do not need to
unpack the option values returned by sockopt().
As we discussed earlier, the most frequent exception to
this is the SO_LINGER option, which operates on
an 8-byte linger structure as its argument.
$val =
timeout([$timeout])
timeout() gets or sets the
timeout value that IO::Socket uses for its
connect(), and accept() methods.
Called with a numeric argument, it sets the timeout
value and returns the new setting. Otherwise, it returns
the current setting. The timeout value is not currently used for calls
that send or receive data. The eval{} trick,
described in Chapter
2, can be used to achieve that result.
$bytes =
$sock->send ($data [, $flags ,$destination])
$address =
$sock-> recv ($buffer,$length [,$flags])
These are front ends for the
send() and recv() functions, and are
discussed in more detail when we discuss UDP
communications in Chapter
19. |
An interesting side effect of the timeout
implementation is that setting theIO::Socket::INET timeout
makes the connect() and accept() calls
interruptable by signals. This allows a signal handler to
gracefully interrupt a program that is hung waiting on a
connect() or accept(). We will see an
example of this in the next section.
|
More Practical Examples
We'll now look at additional examples that
illustrate important aspects of the IO::Socket API. The first
is a rewritten and improved version of the reverse echo server
from Chapter
4. The second is a simple Web client.
Reverse Echo Server Revisited
We'll now rewrite the reverse echo server in
Figure
4.2. In addition to being more elegant than the earlier
version (and easier to follow, in my opinion), this version
makes several improvements on the original. It replaces the
dangerous signal handler with a handler that simply sets a
flag and returns. This avoids problems stemming from making
I/O calls within the handler and problems with exit()
on Windows platforms. The second improvement is that the
server resolves the names of incoming connections, printing
the remote hostname and port number to standard error.
Finally, we will observe the Internet convention that servers
use CRLF sequences for line endings. This means that we will
set $/ to CRLF and append CRLF to
the end of all our writes. Figure
5.4 lists the code for the improved server.
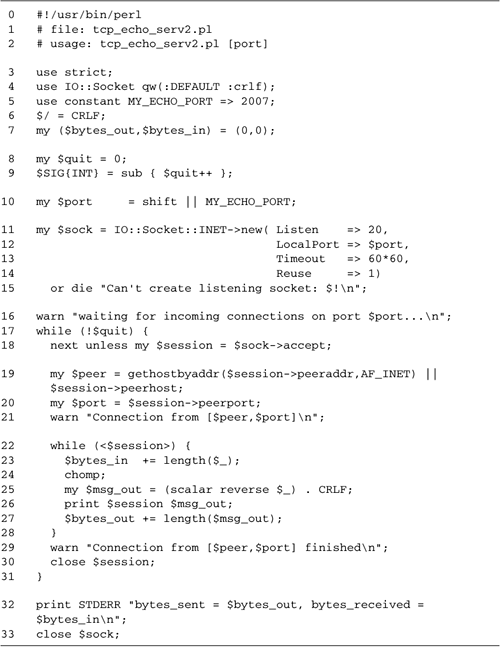
Lines 17: Initialize script We turn
on strict syntax checking and load the IO::Socket module. We
import the default constants and the newline-related
constants by importing the tags :DEFAULT and
:crlf.
We define our local port as a constant, and
initialize the byte counters for tracking statistics. We
also set the global $/ variable to CRLF in
accordance with the network convention.
Lines 89: Install INT signal
handler We install a signal handler for the INT
signal, so that the server will shut down gracefully when
the user presses the interrupt key. The improved handler
simply sets the flag named $quit to true.
Lines 1015: Create the socket
object We recover the port number from the command line
or, if no port number is provided, we default to the
hard-coded constant. We now call
IO::Socket::INET->new() with arguments that
cause it to create a listening socket bound to the specified
local port. Other arguments set the SO_REUSEADDR
option to true, and specify a 1-hour timeout (60*60 seconds)
for the accept() operation.
The Timeout parameter makes each call
to the accept() method return undef if an
incoming connection has not been received within the
specified time. However, our motivation for activating this
feature is not for its own sake, but for the fact that it
changes the behavior of the method so that it is not
automatically restarted after being interrupted by a signal.
This allows us to interrupt the server with the ^C key
without bothering to wrap accept() in an
eval{} block (see Chapter
2, Timing Out Slow System Calls).
Lines 1631: Enter main loop After
printing a status message, we enter a loop that continues
until the INT interrupt handler has set
$quit to true. Each time through the loop, we call
the socket's accept() method. If the
accept() method completes without being interrupted
by a signal or timing out on its own, it returns a new
connected socket object, which we store in a variable named
$session. Otherwise, accept() returns
undef, in which case we go back to the beginning of
the loop. This gives us a chance to test whether the
interrupt handler has set $quit to true.
Lines 1921: Get remote host's name and
port We call the connected socket's peeraddr()
method to get the packed IP address at the other end of the
connection, and attempt to translate it into a hostname
using gethostbyaddr(). If this fails, it returns
undef, and we call the peerhost() method
to give us the remote host's address in dotted-quad form.
We get the remote host's port number using
peerport(), and print the address and port number
to standard error.
Lines 2230: Handle the connection
We read lines from the connected socket, reverse them, and
print them back out to the socket, keeping track of the
number of bytes sent and received while we do so. The only
change from the earlier example is that we now terminate
each line with CRLF.
When the remote host is done, we get an EOF
when we try to read from the connected socket. We print out
a warning, close the connected socket, and go back to the
top of the loop to accept() again.
When we run the script, it acts like the
earlier version did, but the status messages give hostnames
rather than dotted-IP addresses. % tcp_echo_serv2.pl
waiting for incoming connections on port 2007...
Connection from [localhost,2895]
Connection from [localhost,2895] finished
Connection from [formaggio.cshl.org,12833]
Connection from [formaggio.cshl.org,12833] finished
^C
bytes_sent = 50, bytes_received = 50
A Web Client
In this section, we develop a tiny Web client
named web_fetch.pl. It reads a
Universal Resource Locator (URL) from the command line, parses
it, makes the request, and prints the Web server's response to
standard output. Because it returns the raw response from the
Web server without processing it, it is very useful for
debugging misbehaving CGI (Common Gateway Interface) scripts
and other types of Web-server dynamic content.
The Hypertext Transfer Protocol (HTTP) is the
main protocol for Web servers. Part of the power and appeal of
the protocol is its simplicity. A client wishing to fetch a
document makes a TCP connection to the desired Web server,
sends a brief request, and then receives the response from the
server. After the document is delivered, the Web server breaks
the connection. The hardest part is parsing the URL. HTTP URLs
have the following general format:
http://hostname:port/path/to/document#fragment
All HTTP URLs begin with the prefix http://. This is followed by a
hostname such as www.yahoo.com,
a colon, and the port number that the Web server is listening
on. The colon and port may be omitted, in which case the
standard server port 80 is assumed. The hostname and port are
followed by the path to the desired document using UNIX-like
file path conventions. The path may be followed by a "#" sign
and a fragment name, which indicate a subsection in the
document that the Web browser should scroll to.
Our client will parse the components of this
URL into the hostname:port combination and the path. We ignore
the fragment name. We then connect to the designated server
using a TCP socket and send an HTTP request of this form: GET /path/to/document HTTP/1.0 CRLF CRLF
The request consists of the request method
"GET" followed by a single space and the designated path,
copied verbatim from the URL. This is followed by another
space, the protocol version number HTTP/1.0, and two CRLF
pairs. After the request is sent, we wait for a response from
the server. A typical response looks like this: HTTP/1.1 200 OK
Date: Wed, 01 Mar 2000 17:00:41 GMT
Server: Apache/1.3.6 (UNIX)
Last-Modified: Mon, 31 Jan 2000 04:28:15 GMT
Connection: close
Content-Type: text/html
<!DOCTYPE HTML PUBLIC "-//IETF//DTD HTML//EN">
<html> <head> <title> Presto Home Page </title> </head>
<body>
<h1>Welcome to Presto</h1>
...
The response is divided into two parts: a
header containing information about the returned document, and
the requested document itself. The two parts are separated by
a blank line formed by two CRLF pairs.
We will delve into the structure of HTTP
responses in more detail in Chapter
9, where we discuss the LWP library, and Chapter
13, where we develop a more sophisticated Web client
capable of retrieving multiple documents simultaneously. The
only issue to worry about here is that, whereas the header is
guaranteed by the HTTP protocol to be nice human-readable
lines of text, each terminated by a CRLF pair, the document
itself can have any format. In particular, we must be prepared
to receive binary data, such as the contents of a GIF or MP3
file.
Figure
5.5 shows the web_fetch.pl
script in its entirety.
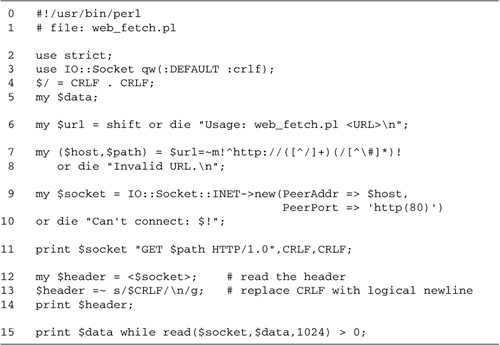
Lines 15: Initialize module We turn
on strict syntax checking and load the IO::Socket module,
importing the default and newline-related constants. As in
previous examples, we are dealing with CRLF-delimited data.
However, in this case, we set $/ to be a pair of CRLF sequences. Later, when
we call the <> operator, it will read the
entire header down through the CRLF pair that terminates it.
Lines 68: Parse URL We read the
requested URL from the command line and parse it using a
pattern match. The match returns the hostname, possibly
followed by a colon and port number, and the path up
through, but not including, the fragment.
Lines 910: Open socket We open a
socket connected to the remote Web server. If the URL
contained the port number, it is included in the hostname
passed to PeerAddr, and the
PeerPort argument is
ignored. Otherwise, PeerPort specifies that we should
connect to the standard "http" service, port 80.
Line 11: Send the request We send an
HTTP request to the server using the format described
earlier.
Lines 1214: Read and print the
header Our first read is line-oriented. We read from the
socket using the <> operator. Because
$/ is set to a pair of CRLF sequences, this read
grabs the entire header up through the blank line. We now
print the header, but since we don't particularly want
extraneous CRs to mess up the output, we first replace all
occurrence of $CRLF with a logical newline ("\n",
which will evaluate to whatever is the appropriate newline
character for the current platform.
Line 15: Read and print the document
Our subsequent reads are byte-oriented. We call
read() in a tight loop, reading up to 1024 bytes
with each operation, and immediately printing them out with
print(). We exit when read() hits the EOF
and returns 0.
Here is an example of what web_fetch.pl looks like when it is
asked to fetch the home page for www.cshl.org: % web_fetch.pl http://www.cshl.org/
HTTP/1.1 200 OK
Server: Netscape-Enterprise/3.5.1C
Date: Wed, 16 Aug 2000 00:46:12 GMT
Content-type: text/html
Last-modified: Fri, 05 May 2000 13:19:29 GMT
Content-length: 5962
Accept-ranges: bytes
Connection: close
<HTML>
<HEAD>
<TITLE>Cold Spring Harbor Laboratory</TITLE>
<META NAME="GENERATOR" CONTENT="Adobe PageMill 2.0 Mac"> <META
Name="keywords" Content="DNA, genes, genetics, genome, genome
sequencing, molecular biology, biological science, cell biology,
James D. Watson, Jim Watson, plant genetics, plant biology,
bioinformatics, neuroscience, neurobiology, cancer, drosophila,
Arabidopsis, double-helix, oncogenesis, Cold Spring Harbor
Laboratory, CSHL">
...
Although it seems like an accomplishment to
fetch a Web page in a mere 15 lines of code, client scripts
that use the LWP module can do the same thingand morewith
just a single line. We discuss how to use LWP to access the
Web in Chapter
9.
Performance and Style
Although the IO::Socket API simplifies
programming, and is generally a big win in terms of
development effort and code maintenance, it has some drawbacks
over the built-in function-oriented interface.
If memory usage is an issue, you should be
aware that IO::Socket adds to the Perl process's memory
"footprint" by a significant amount: approximately 800 K on my
Linux/Intel-based system, and more than double that on a
Solaris system.
The object-oriented API also slows program
loading slightly. On my laptop, programs that use IO::Socket
take about half a second longer to load than those that use
the function-oriented Socket interface. Fortunately, the
execution speed of programs using IO::Socket are not
significantly different from the speeds of classical
interface. Network programs are generally limited by the speed
of the network rather than the speed of processing.
Nevertheless, for the many IO::Socket methods
that are thin wrappers around the corresponding system calls
and do not add significant functionality, I prefer to use the
IO::Socket as plain filehandles rather than use the
object-oriented syntax. For example, rather than writing: $socket->syswrite("A man, a plan, a canal, panama!");
I will write: syswrite ($socket,"A man, a plan, a canal, panama!");
This has exactly the same effect as the
method call, but avoids its overhead.
For methods that do improve on the function
call, don't hesitate to use them. For example, the
accept() method is an improvement over the built-in
function because it returns a connected IO::Socket object
rather than a plain filehandle. The method also has a syntax
that is more Perl-like than the built-in.
|
Concurrent Clients
This chapter concludes by introducing a topic
that is one of the central issues of Part III, the problem of
concurrency.
A Gab Client, First Try
To motivate this discussion, let's write a
simple client that can be used for interactive conversations
with line-oriented servers. This program will connect to a
designated host and port, and simply act as a direct conduit
between the remote machine and the user. Everything the user
types is transmitted across the wire to the remote host, and
everything we receive from the remote host is echoed to
standard output.
We can use this client to talk to the echo
servers from this chapter and the last, or to talk with other
line-oriented servers on the Internet. Common examples include
FTP, SMTP, and POP3 servers.
We'll call this client gab1.pl, because it is the first in a
series of such clients. A simplebut incorrectimplementation
of the gab client looks like Figure
5.6.
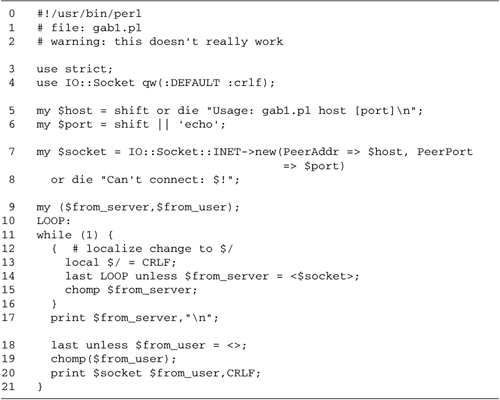
Lines 16: Initialize module We load
IO::Socket as before and recover the desired remote hostname
and port number from the command-line arguments.
Lines 78: Create socket We create
the socket using IO::Socket::INET->new() or, if
unsuccessful, die with an error message.
Lines 921: Enter main loop We enter
a loop. Each time through the loop we read one line from the
socket and print it to standard output. Then we read a line
of input from the user and print it to the socket.
Because the remote server uses CRLF pairs
to end its lines, but the user types conventional newlines,
we need to keep setting and resetting $/. The
easiest way to do this is to place the code that reads a
line from the socket in a little block, and to localize
(with local) the $/ variable, so that its
current value is saved on entry into the block, and restored
on exit. Within the block, we set $/ to
CRLF.
If we get an EOF from either the user or
the server, we leave the loop by calling last.
At first, this straightforward script seems
to work. For example, this transcript illustrates a session
with an FTP server. The first thing we see on connecting with
the server is its welcome banner (message code 220). We type
in the FTP USER command, giving the name "anonymous," and get
an acknowledgment. We then provide a password with PASS, and
get another acknowledgment. Everything seems to be going
smoothly. % gab1.pl phage.cshl.org ftp
220 phage.cshl.org FTP server ready.
USER anonymous
331 Guest login ok, send your complete e-mail address as password.
PASS jdoe@nowhere.com
230 Guest login ok, access restrictions apply.
Unfortunately, things don't last that way for
long. The next thing we try is the HELP command, which is
supposed to print a multiline summary of FTP commands. This
doesn't go well. We get the first line of the expected output,
and then the script stops, waiting for us to type the next
command. We type another HELP, and get the second line of the
output from the first HELP
command. We type QUIT, and get the third line of the HELP
command. HELP
214-The following commands are recognized (* =>'s unimplemented).
HELP
USER PORT STOR MSAM* RNTO NLST MKD CDUP
QUIT
PASS PASV APPE MRSQ* ABOR SITE XMKD XCUP
QUIT
ACCT* TYPE MLFL* MRCP* DELE SYST RMD STOU
QUIT
...
Clearly the script has gotten out of synch.
As it is written, it can deal with only the situation in which
a single line of input from the user results in a single line
of output from the server. Having no way of dealing with
multiline output, it can't catch up with the response to the
HELP command.
What if we changed the line that reads from
the server to something like this? while ($from_server = <$socket>) {
chomp $from_server;
print $from_server,"\n";
}
Unfortunately, this just makes matters worse.
Now the script hangs after it reads the first line from the
server. The FTP server is waiting for us to send it a command,
but the script is waiting for another line from the server and
hasn't even yet asked us for input, a situation known as deadlock.
In fact, none of the straightforward
rearrangements of the read and print orders fix this problem.
We either get out of synch or get hopelessly deadlocked.
A Gab Client, Second Try
What we need to do is decouple the process
reading from the remote host from the process of reading from
the socket. In fact, we need to isolate the tasks in two
concurrent but independent processes that won't keep blocking
each other the way the naive implementation of the gab client
did.
On UNIX and Windows systems, the easiest way
to accomplish this task is using the fork() command
to create two copies of the script. The parent process will be
responsible for copying data from standard input to the remote
host, while the child will be responsible for the flow of data
in the other direction. Unfortunately, Macintosh users do not
have access to this call. A good but somewhat more complex
solution that avoids the call to fork() is discussed
in Chapter
12, Multiplexed Operations.
As it turns out, the simple part of the
script is connecting to the server, forking a child, and
having each process copy data across the network. The hard
part is to synchronize the two processes so that they both
quit gracefully when the session is done. Otherwise, there is
a chance that one process may continue to run after the other
has exited.
There are two scenarios for terminating the
connection. In the first scenario, the remote server initiates
the process by closing its end of the socket. In this case,
the child process receives an EOF when it next tries to read
from the server and calls exit(). It somehow has to
signal to the parent that it is done. In the second scenario,
the user closes standard input. The parent process detects EOF
when it reads from STDIN and has to inform the child
that the session is done.
On UNIX systems, there is a built-in way for
children to signal parents that they have exited. The
CHLD signal is sent automatically to a parent
whenever one of its subprocesses has died (or have either
stopped or resumed; we discuss this in more detail in Chapter
10). For the parent process to detect that the remote
server has closed the connection it merely has to install a
CHLD handler that calls exit(). When the
child process detects that the server has closed the
connection, the child will exit, generating a CHLD signal. The
parent's signal handler is invoked, and the process now exits
too.
The second scenario, in which the user closes
STDIN, is a bit more complicated. One easy way is for
the parent just to kill() its child after standard
input has closed. There is, however, a problem with this. Just
because the user has closed standard input doesn't mean that
the server has finished sending output back to us. If we kill
the child before it has received and processed all the pending
information from the server, we may lose some information.
The cleaner way to do this is shown in Figure
5.7. When the parent process gets an EOF from standard
input, it closes its end of the socket, thereby sending the
server an end-of-file condition. The server detects the EOF,
and closes its end of the
connection, thereby propagating the EOF back to the child
process. The child process exits, generating a CHLD signal.
The parent intercepts this signal, and exits itself.

The beauty of this is that the child doesn't
see the EOF until after it has finished processing any queued
server data. This guarantees that no data is lost. In
addition, the scheme works equally well when the termination
of the connection is initiated by the server. The risk of this
scheme is that the server may not cooperate and close its end
of the connection when it receives an EOF. However, most
servers are well behaved in this respect. If you encounter one
that isn't, you can always kill both the parent and the child
by pressing the interrupt key.
There is one subtle aspect to this scheme.
The parent process can't simply close() its copy of
the socket in order to send an EOF to the remote host. There
is a second copy of the socket in the child process, and the
operating system won't actually close a filehandle until its
last copy is closed. The solution is for the parent to call
shutdown(1) on the socket, forcefully closing it for
writing. This sends EOF to the server without interfering with
the socket's ability to continue to read data coming in the
other direction. This strategy is implemented in Figure
5.8, in a script named gab2.pl.
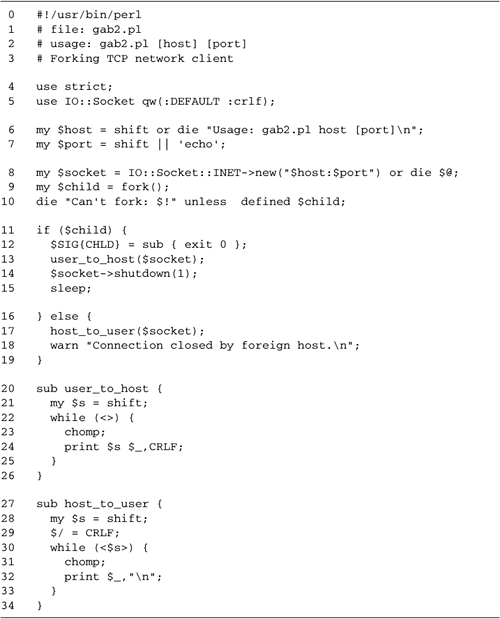
Lines 17: Initialize module We turn
on strict syntax checking, load IO::Socket, and fetch the
host and port from the command line.
Line 8: Create the socket We create
the connected socket in exactly the same way as before.
Lines 910: Call fork We call
fork(), storing the result in the variable
$child. Recall that if successful, fork()
duplicates the current process. In the parent process,
fork() returns the PID of the child; in the child
process, fork() returns numeric 0.
In case of error, fork() returns
undef. We check for this and exit with an error
message.
Lines 1115: Parent process copies from
standard input to socket The rest of the script is
divided into halves. One half is the parent process, and is
responsible for reading lines from standard input and
writing to the server; the other half is the child, which is
responsible for reading lines from the server and writing
them to standard output.
In the parent process, $child is
nonzero. For the reasons described earlier, we set up a
signal handler for the CHLD signal. This handler
simply calls exit(). We then call the
user_to_host() subroutine, which copies user data
from standard input to the socket.
When standard input is closed,
user_to_host() returns. We call the socket's
shutdown() method, closing it for writing. Now we
go to sleep indefinitely, awaiting the expected
CHLD signal that will terminate the process.
Lines 1619: Child process copies from
socket to standard output In the child process, we call
host_to_user() to copy data from the socket to
standard output. This subroutine will return when the remote
host closes the socket. We don't do anything special after
that except to warn that the remote host has closed the
connection. We allow the script to exit normally and let the
operating system generate the CHLD message.
Lines 2026: The user_to_host()
subroutine This subroutine is responsible for copying lines
from standard input to the socket. Our loop reads a line
from standard input, removes the newline, and then prints to
the socket, appending a CRLF to the end. We return when
standard input is closed.
Lines 2734: The host_to_user()
subroutine This subroutine is almost the mirror image of the
previous one. The only difference is that we set the
$/ input record separator global to CRLF
before reading from the socket. Notice that there's no
reason to localize $/ in this case because changes
made in the child process won't affect the parent. When
we've read the last line from the socket, we return.
You may wonder why the parent goes to sleep
rather than simply exit after it has shutdown() its
copy of the socket. The answer is simply esthetic. As soon as
the parent exits, the user will see the command-line prompt
reappear. However, the child may still be actively reading
from the socket and writing to standard output. The child's
output will intermingle in an ugly way with whatever the user
is doing at the command line. By sleeping until the child
exits, the parent avoids this behavior.
You may also wonder about the call to
exit() in the CHLD signal handler. While
this is a problematic construction on Windows platforms
because it causes crashes, the sad fact is that the Windows
port of Perl does not generate or receive CHLD
signals when a child process dies, so this issue is moot. To
terminate gab2.pl on Windows
platforms, press the interrupt key.
When we try to connect to an FTP server using
the revised script, the results are much more satisfactory.
Multiline results now display properly, and there is no
problem of synchronization or deadlocking. % gab2.pl phage.cshl.org ftp
220 phage.cshl.org FTP server ready.
USER anonymous
331 Guest login ok, send your complete e-mail address as password.
PASS ok@better.now
230 Guest login ok, access restrictions apply.
HELP
214-The following commands are recognized (* =>'s unimplemented).
USER PORT STO RMSAM* RNTO NLST MKD CDUP
PASS PASV APP EMRSQ* ABOR SITE XMKD XCUP
ACCT* TYPE MLFL* MRCP* DELE SYST RMD STOU
SMNT* STRU MAIL* ALLO CWD STAT XRMD SIZE
REIN* MODE MSND* REST XCWD HELP PWD MDTM
QUIT RETR MSOM* RNFR LIST NOOP XPWD
214 Direct comments to ftp-bugs@phage.cshl.org
QUIT
221 Goodbye.
Connection closed by foreign host.
This client is suitable for talking to many
line-oriented servers, but there is one Internet service that
you cannot successfully access via this clientthe Telnet
remote login service itself. This is because Telnet servers
initially exchange some binary protocol information with the
client before starting the conversation. If you attempt to use
this client to connect to a Telnet port (port 23), you will
just see some funny characters and then a pause as the server
waits for the client to complete the protocol handshake. The
Net::Telnet module (Chapter
6) provides a way to talk to Telnet servers.
| |
|

 LINUX
LINUX 
 Books
Books
